
Update Overview
- Basic Operations
- Rendering & Lighting
- Drawings & Quotation
- Asset Management
- Customization
- Construction
- Aluminum Doors & Windows
Basic Operations
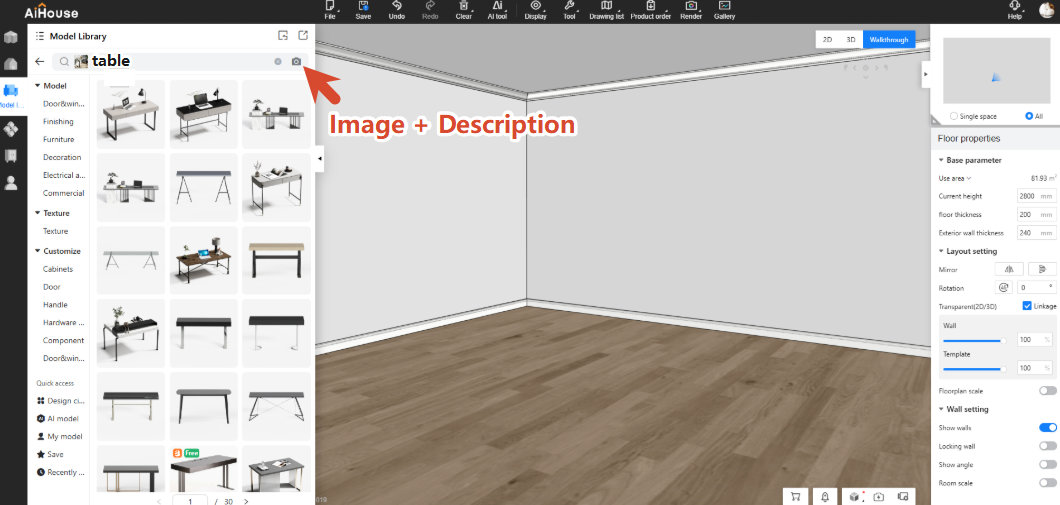
1. Product Search Now Supports Image + Text
Highlights:
- Adds the ability to “refine results with additional text”. Image search still runs on the image alone by default; “image + text” combined search is an optional supplement.
- Improves search hit accuracy and saves the time spent repeatedly uploading images on a trial-and-error basis.
How to Use:
- Open the image search entry, then drag in or upload an image to start a search
- After uploading, the system first returns image-only results without waiting for text input
- The results page shows the image thumbnail at the top, and the search box prompts “Add keywords for a more precise search”
- Add text (material/style/structure/usage, etc.) and click Search
- The system re-searches based on “current image + added text” and returns updated results
- You can edit the text and search again multiple times, or remove the image to exit image search
2. Material Editor Improvements
Highlights:
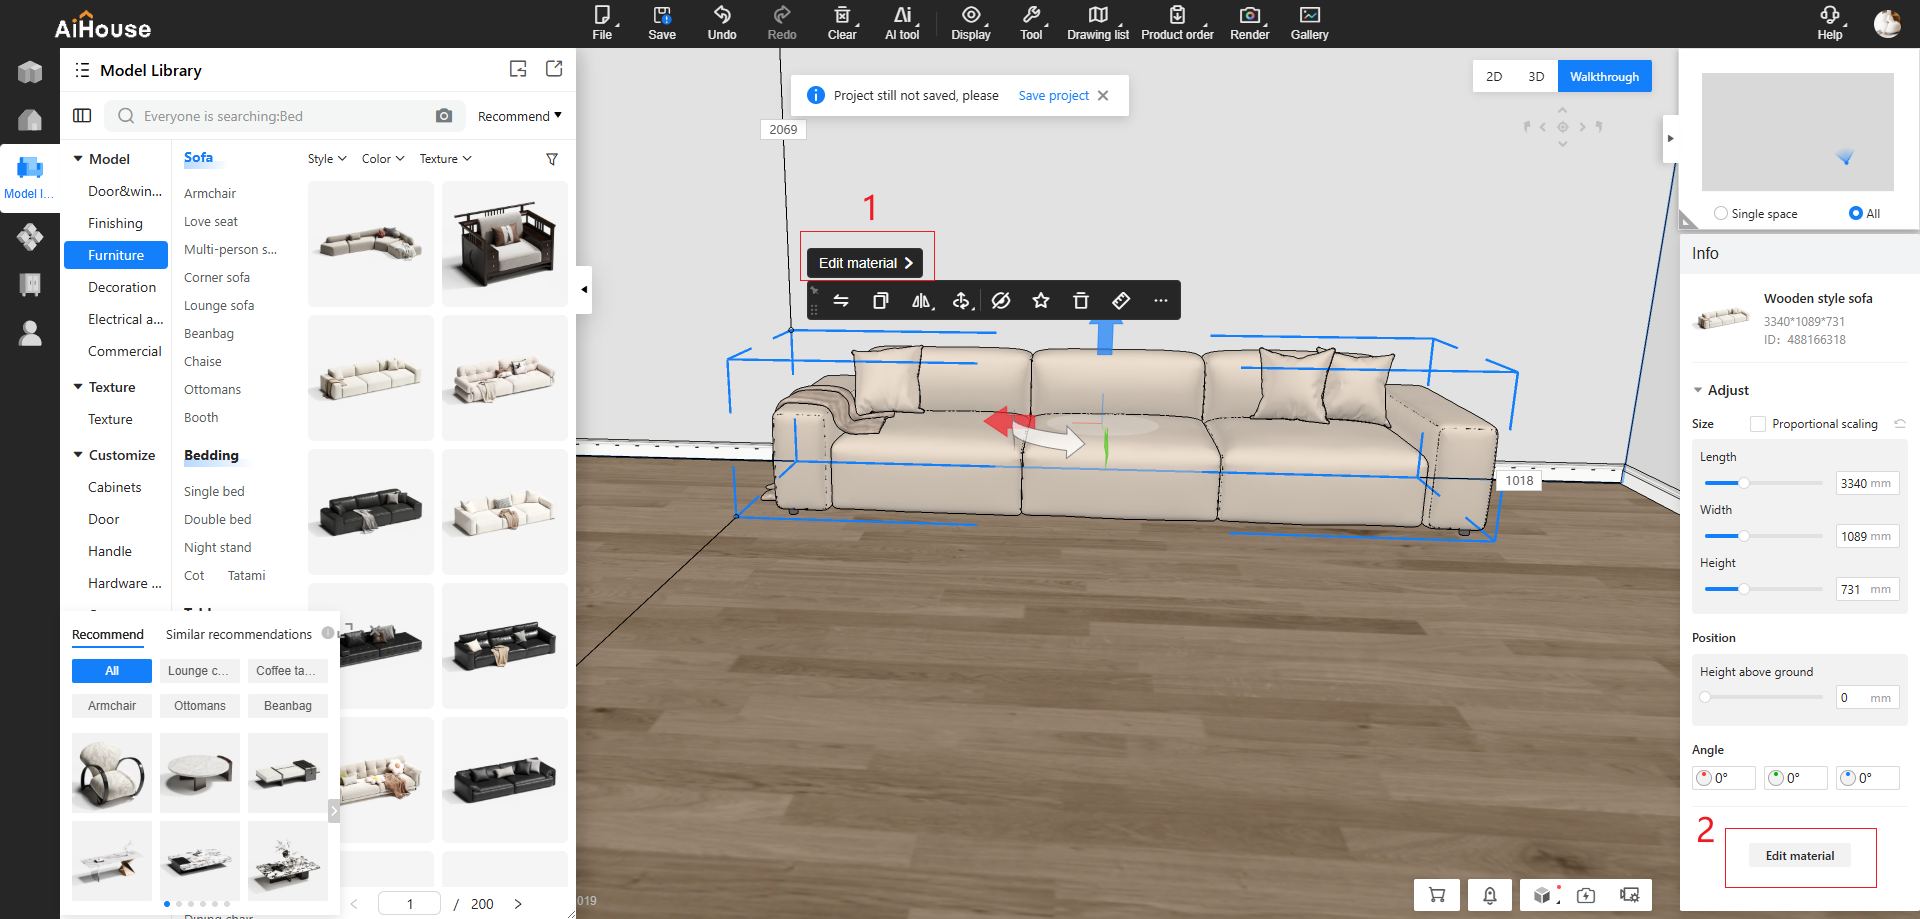
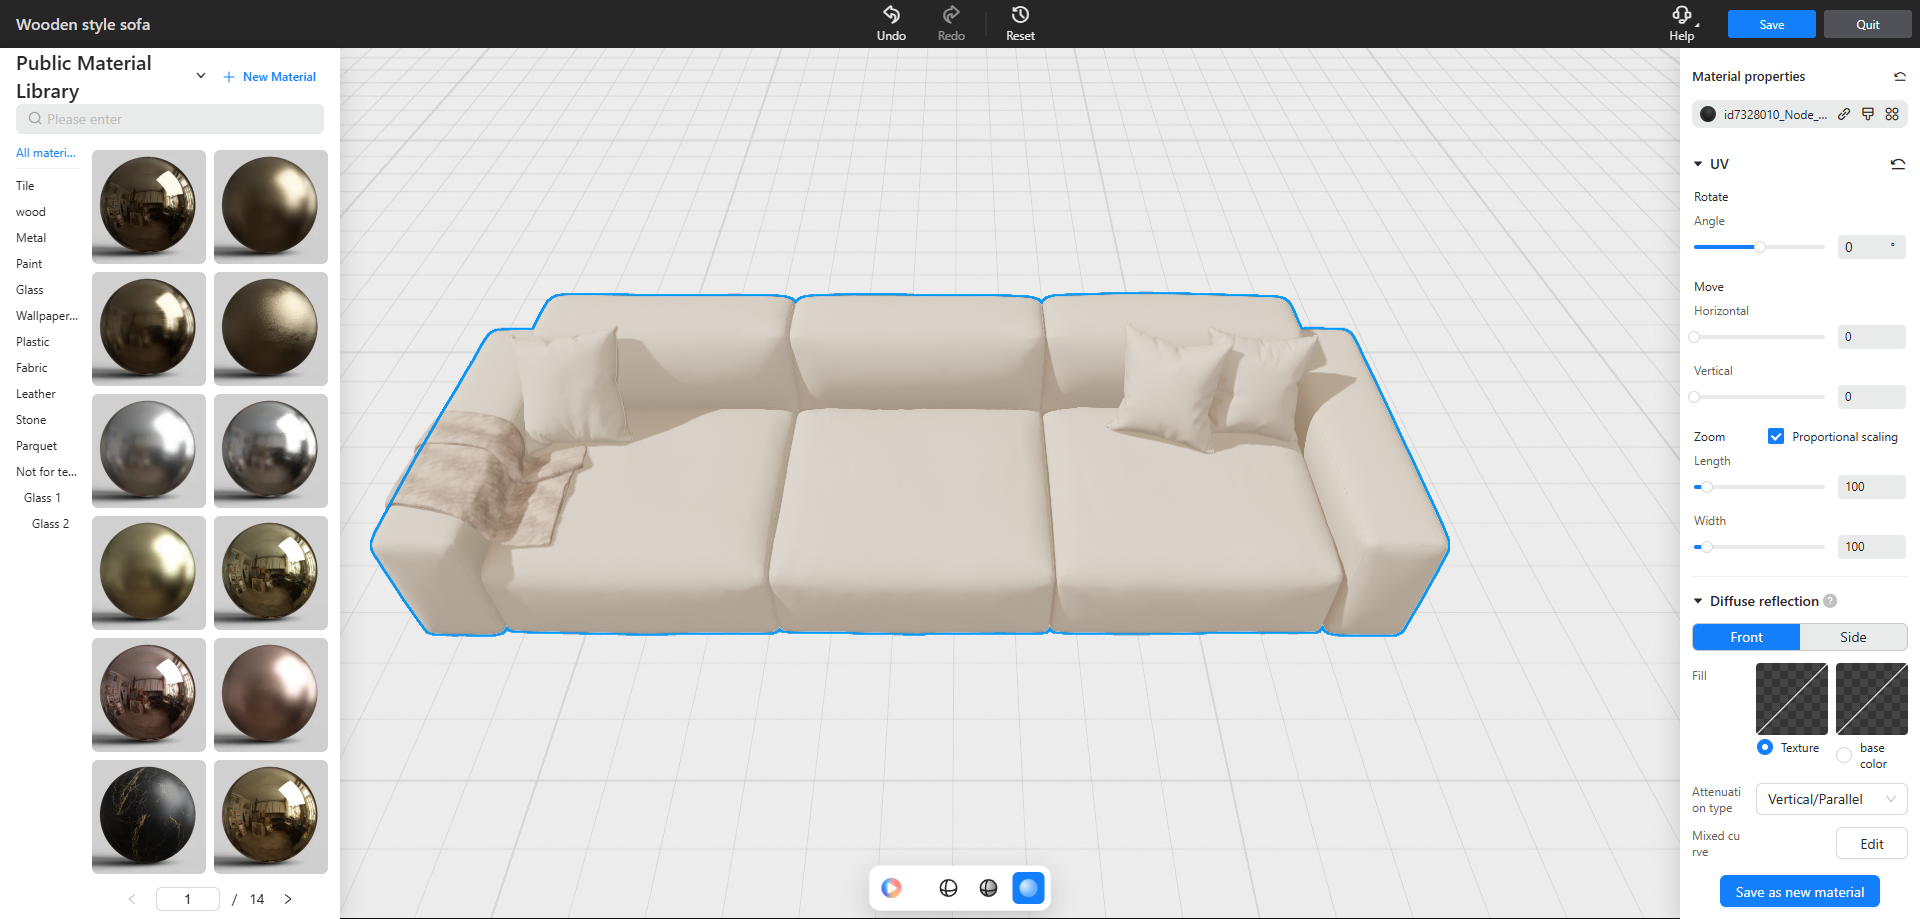
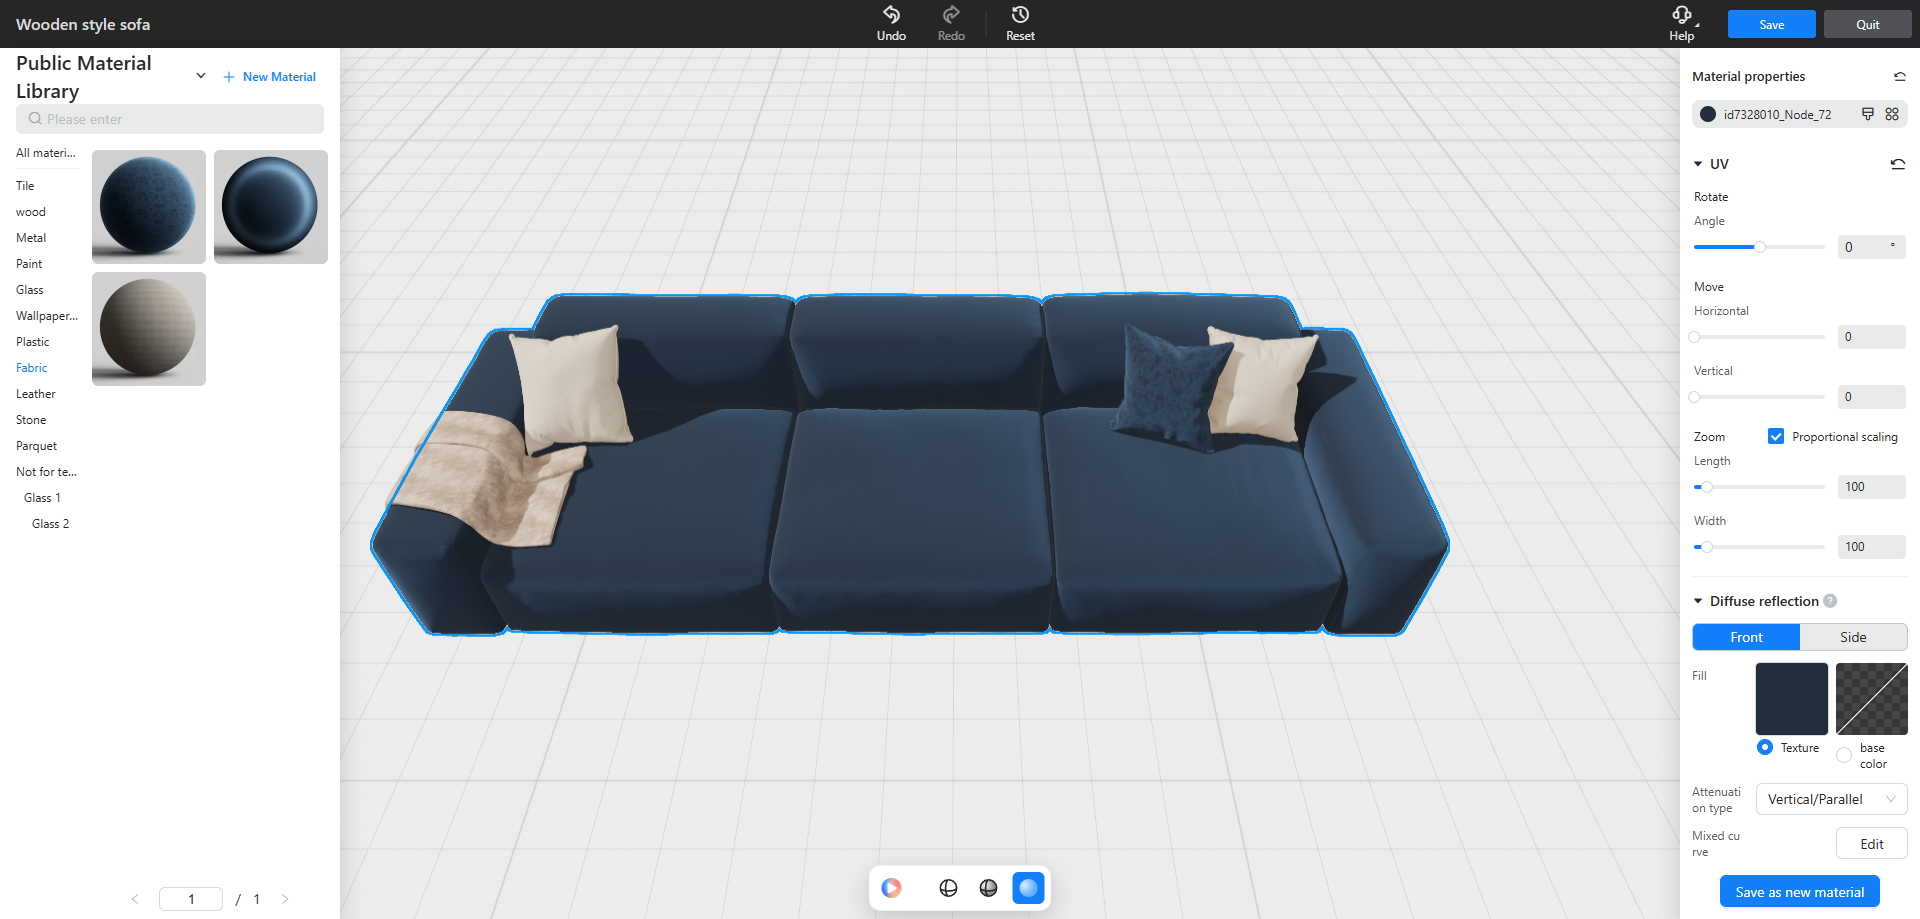
- Provides a visual material editor that lets you directly modify material parameters such as color, texture, reflection, and refraction.
- Parameter adjustments are rendered in real time, so the preview updates instantly - what you see is what you get.
Rendering & Lighting
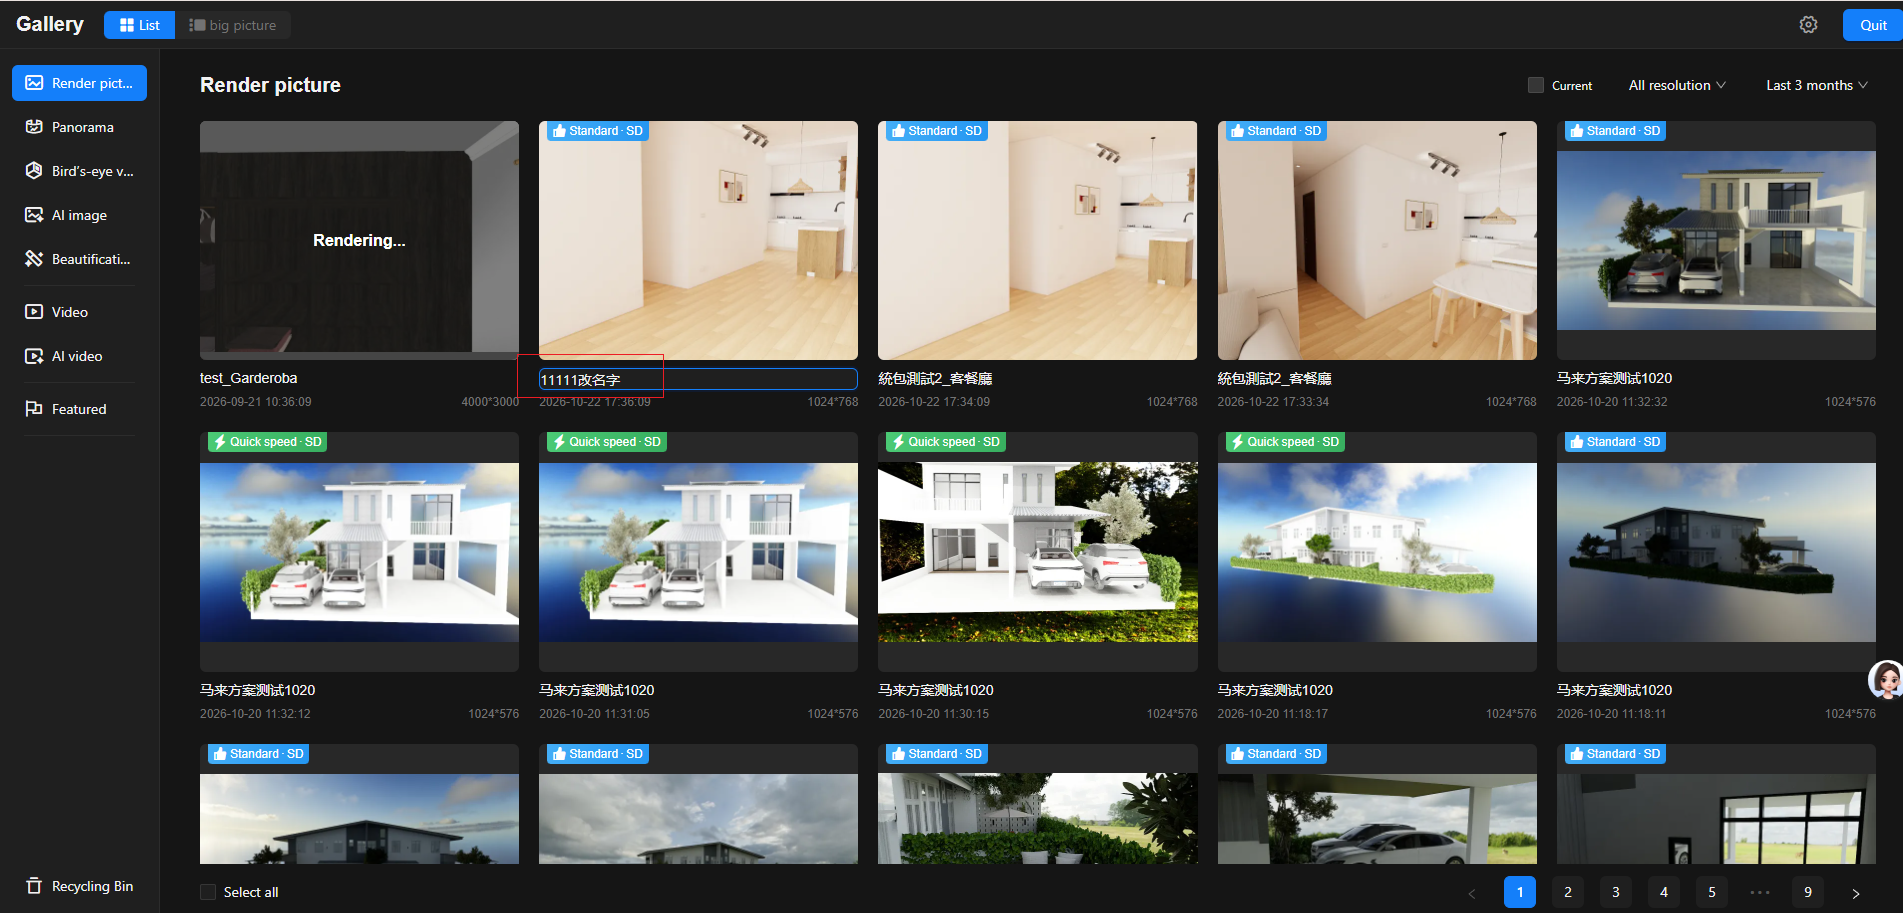
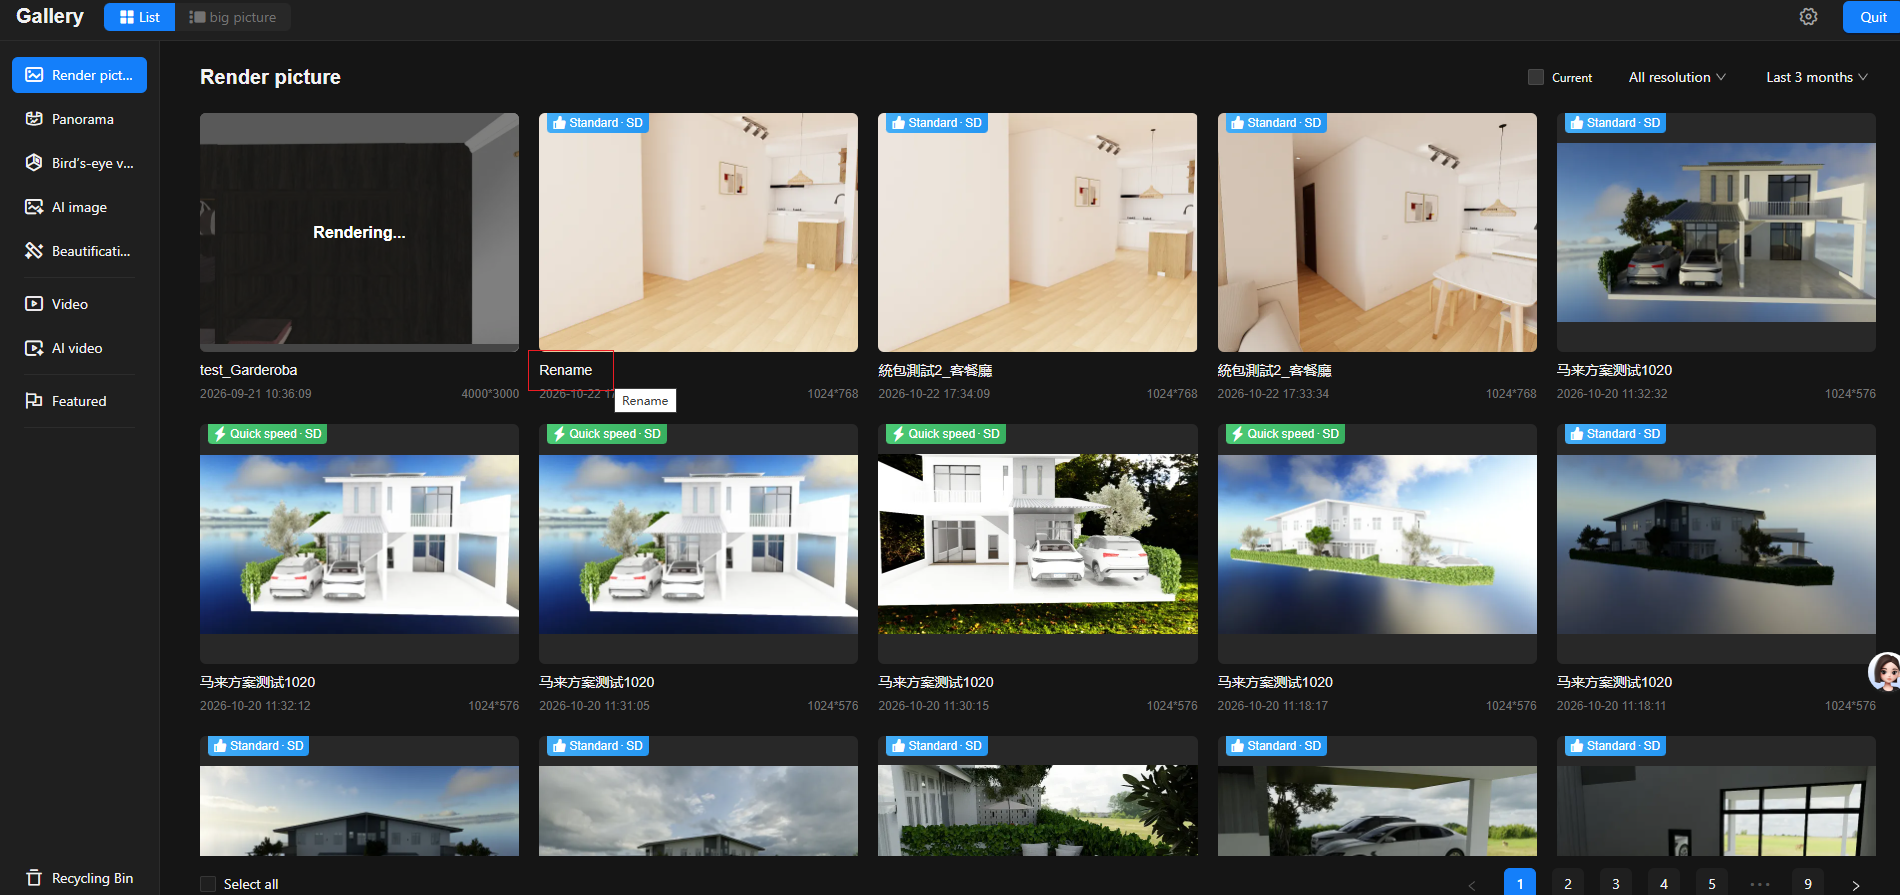
1. Rename Images in Album
Highlights:
- Rename images directly in Album - previously you had to download them before renaming.
- Supports custom names, making Album naming more convenient.
How to Use:
- Open Album and double-click a rendering name to enter a new name
Note: The rendering library in Workspace is renamed in sync.
2. Material Management Added to the Display/Hide Button on the Render Page
Highlights:
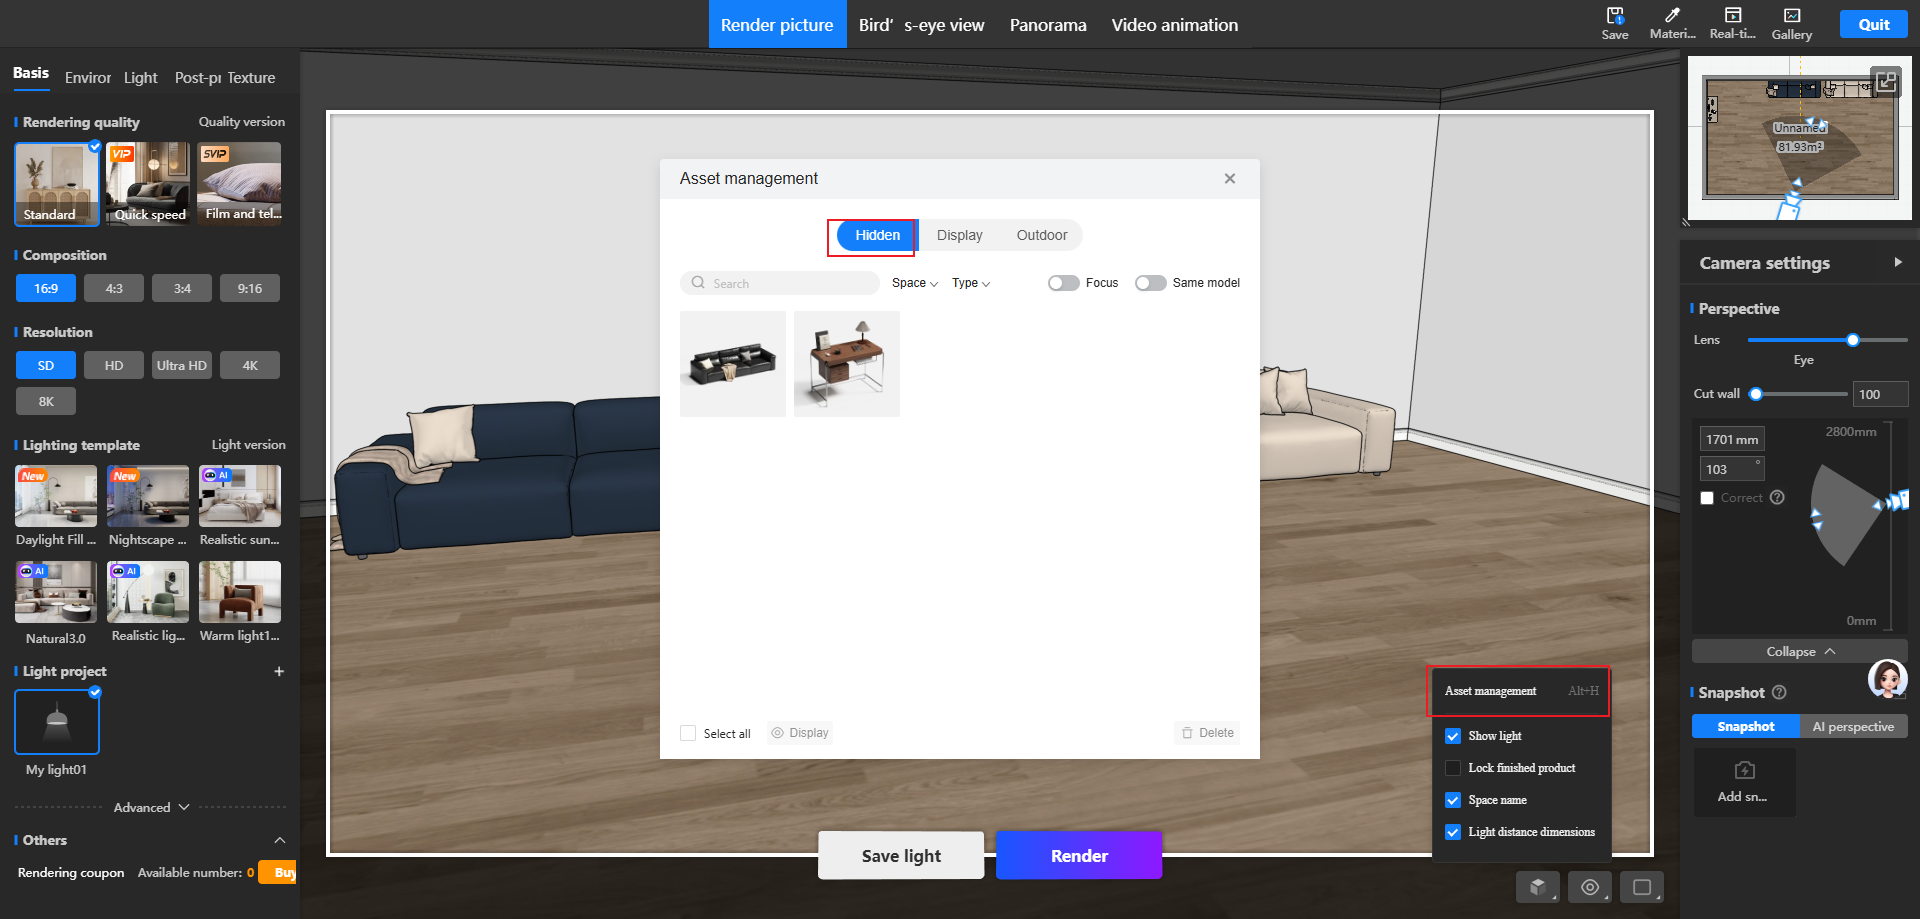
- Material Management is now available directly on the render page - previously you had to exit rendering and go back to Basic to show, hide, and manage models.
How to Use:
- Open the render page, click Material Management from the display/hide button in the bottom toolbar, or press Alt+H to open Material Management directly
3. Smart View Upgrade
Highlights:
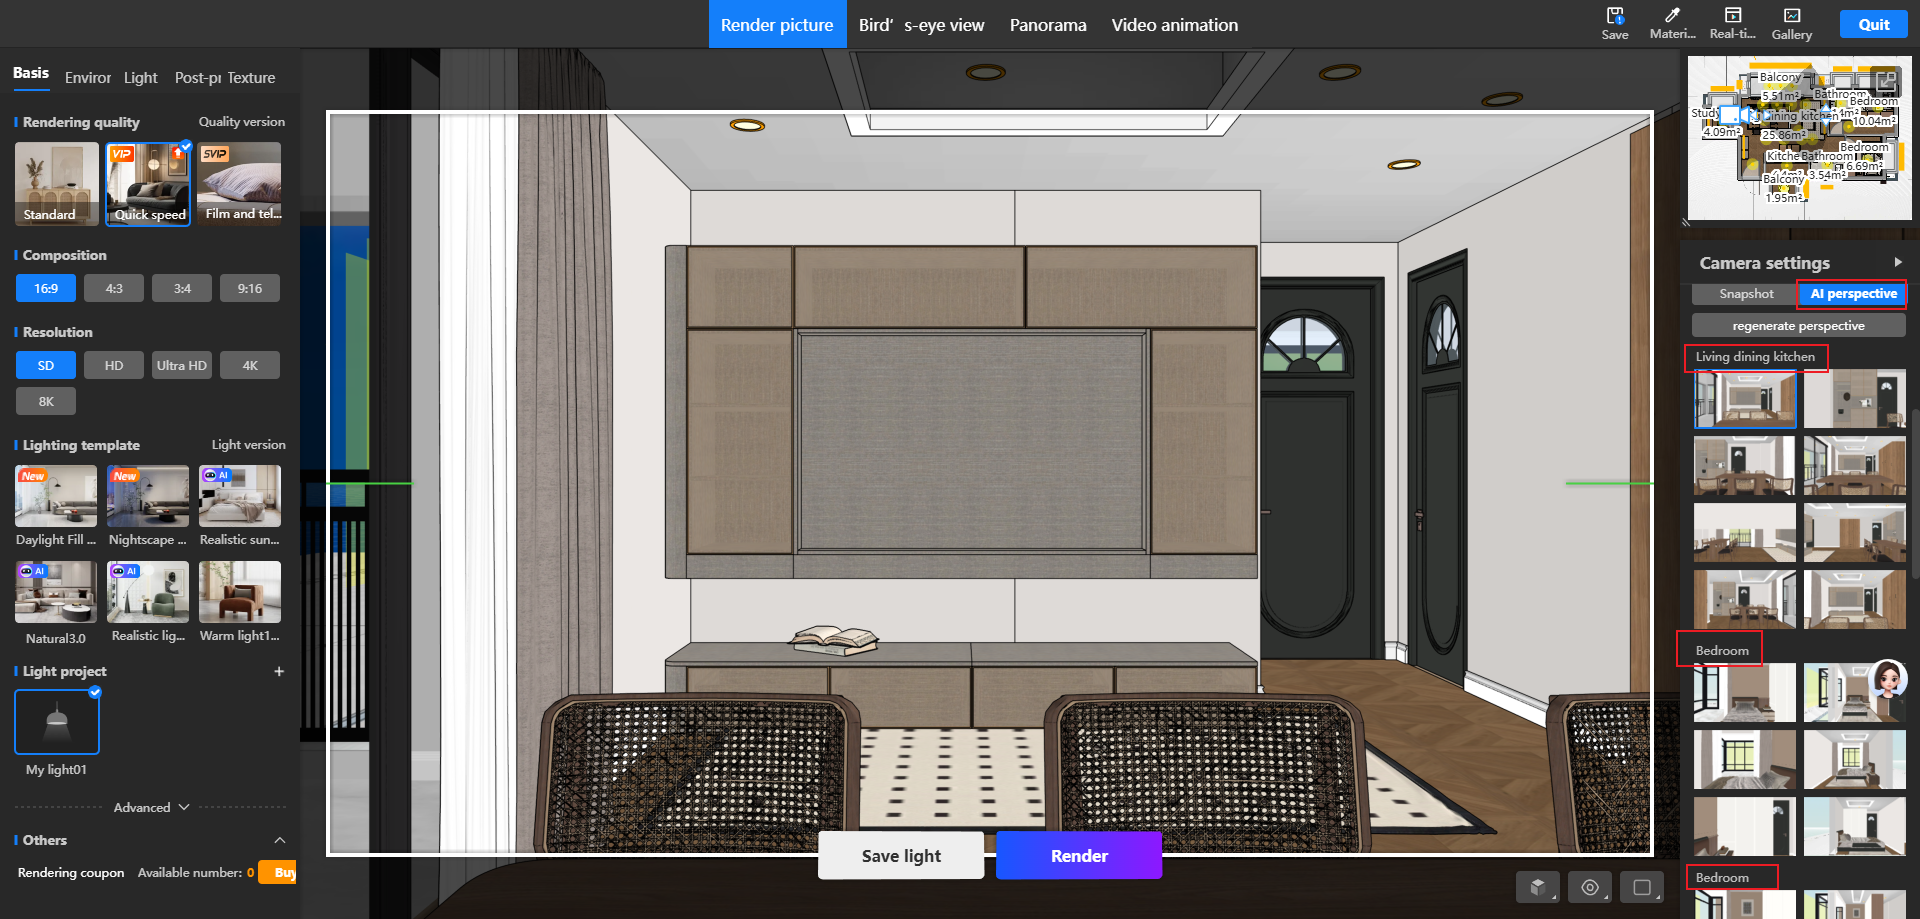
- Smart View computation is optimized to generate views in milliseconds with zero waiting.
- New views are grouped by space and sorted by common angles, making them faster to find and apply.
- More views with dynamic FOV adjustment, reducing manual adjustments.
How to Use:
- Enter the render page
- Click Smart View in Snapshot
- Click Generate Smart View
- Select a view and render
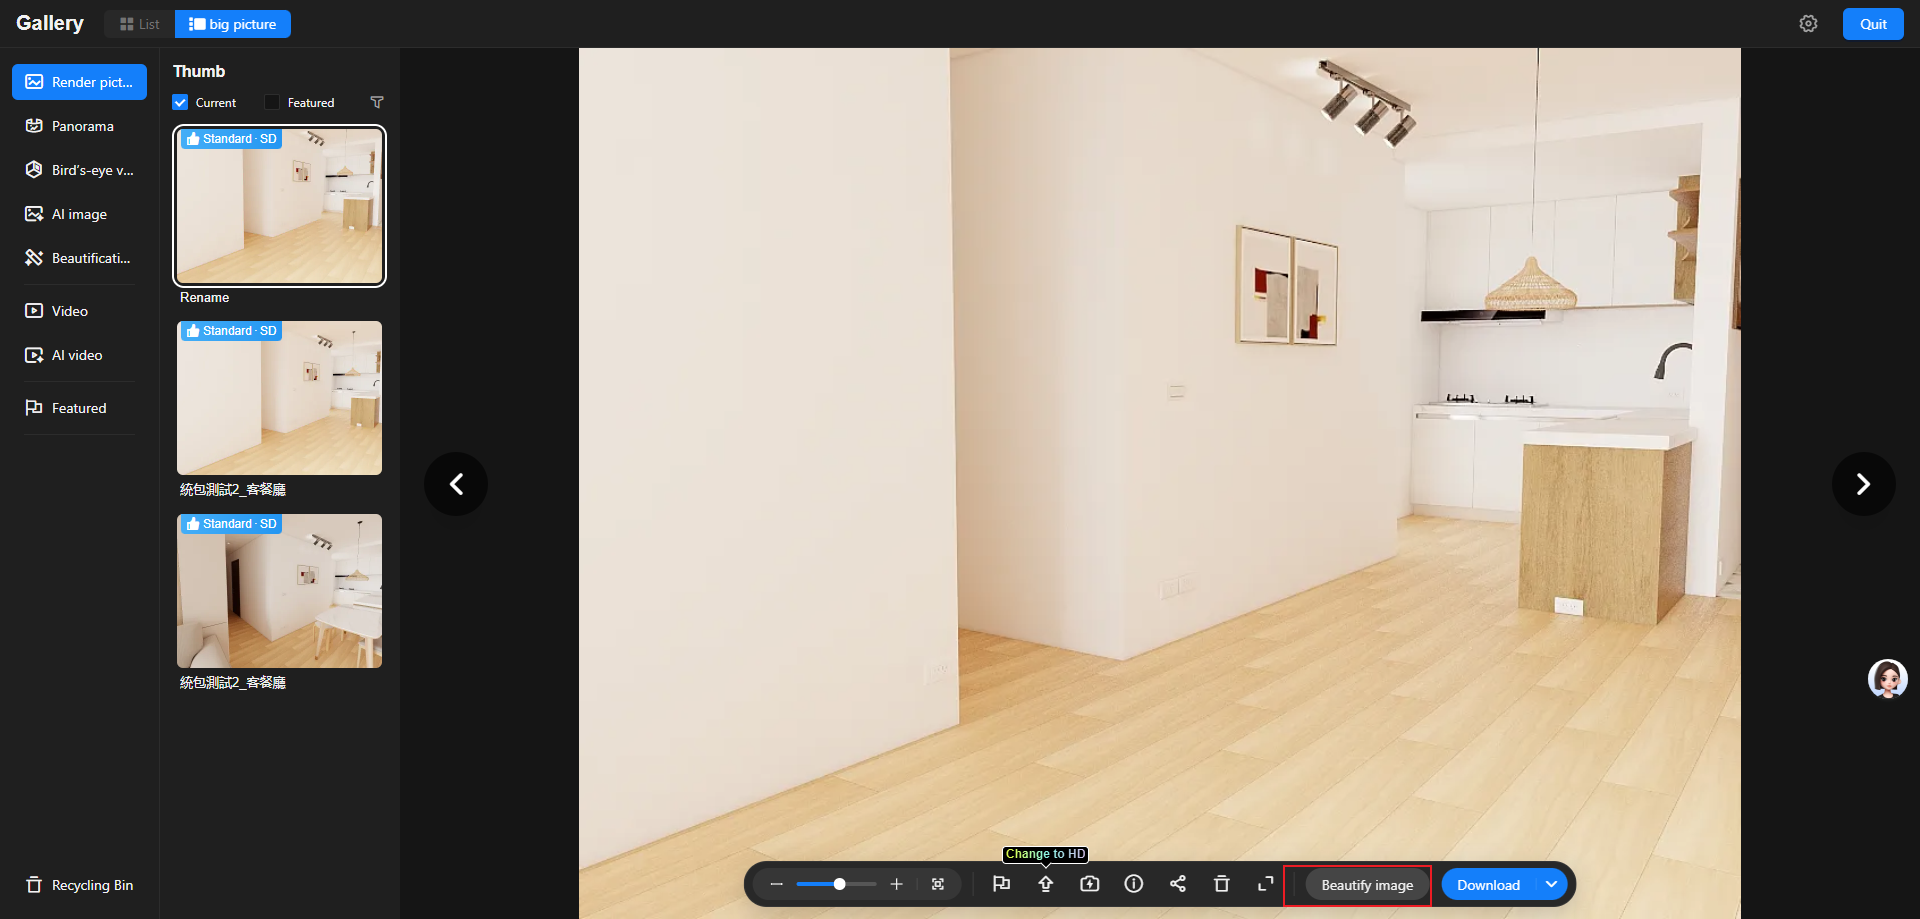
4. Quick Annotation of Renderings in Album
Highlights:
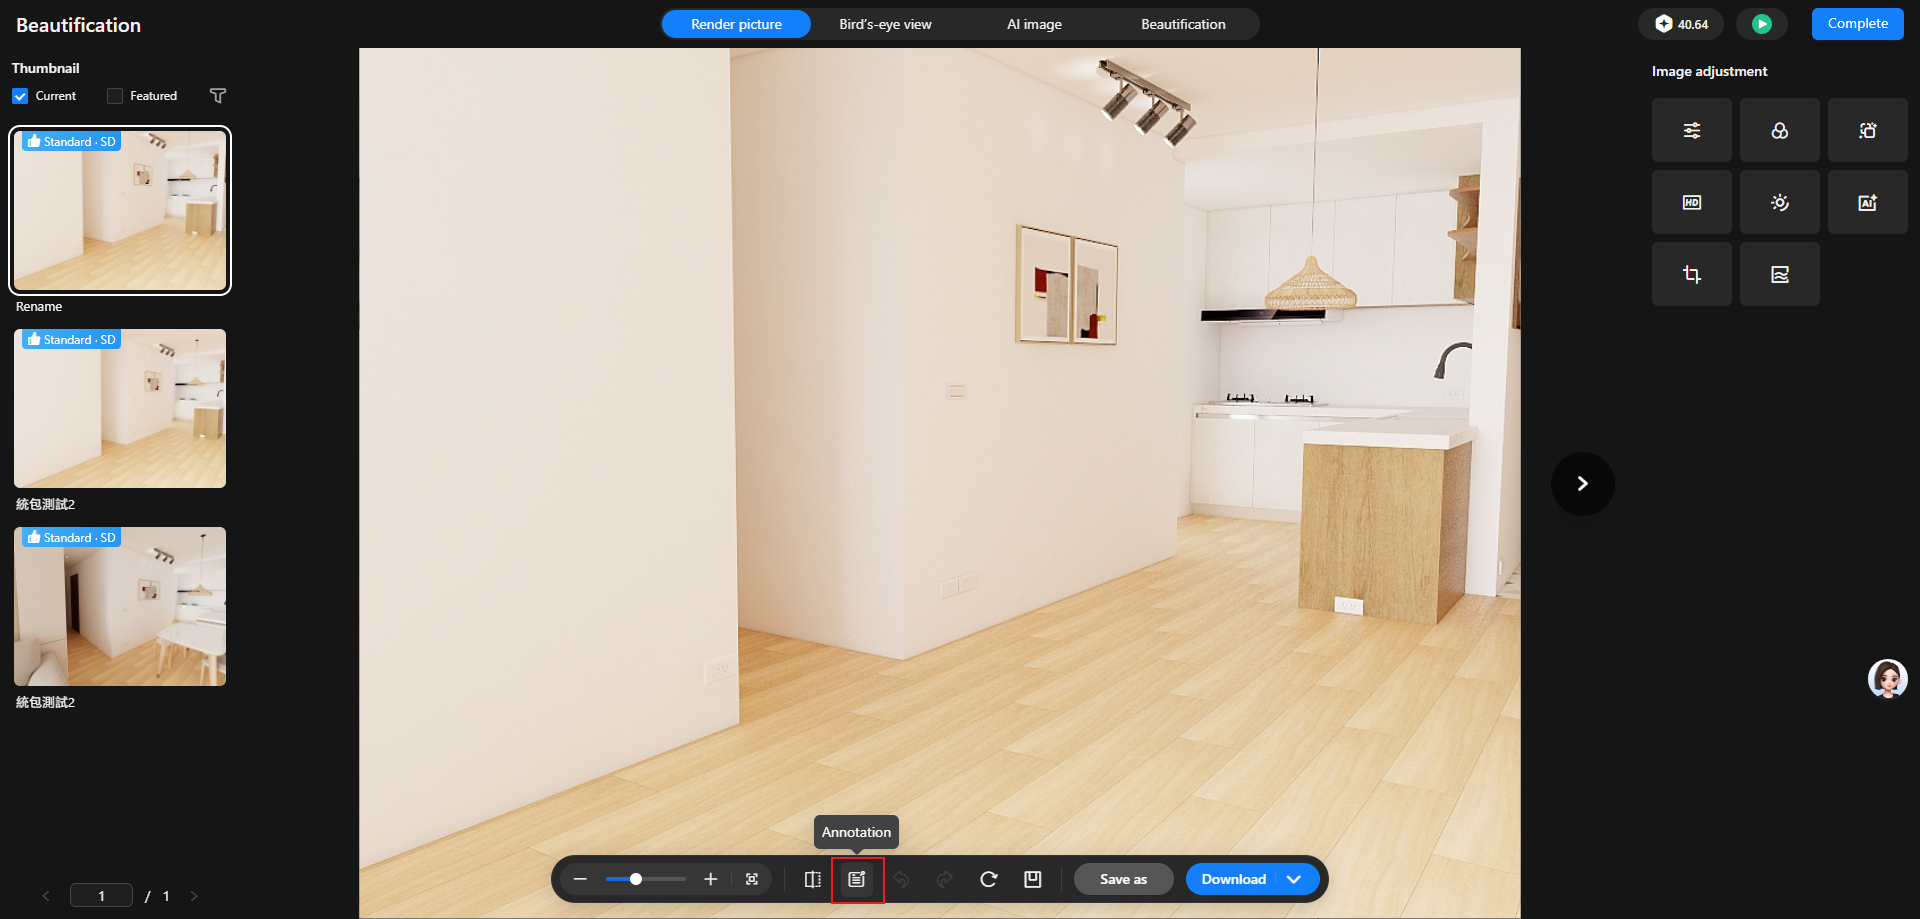
- Annotate renderings directly in Image Enhancement without downloading them first.
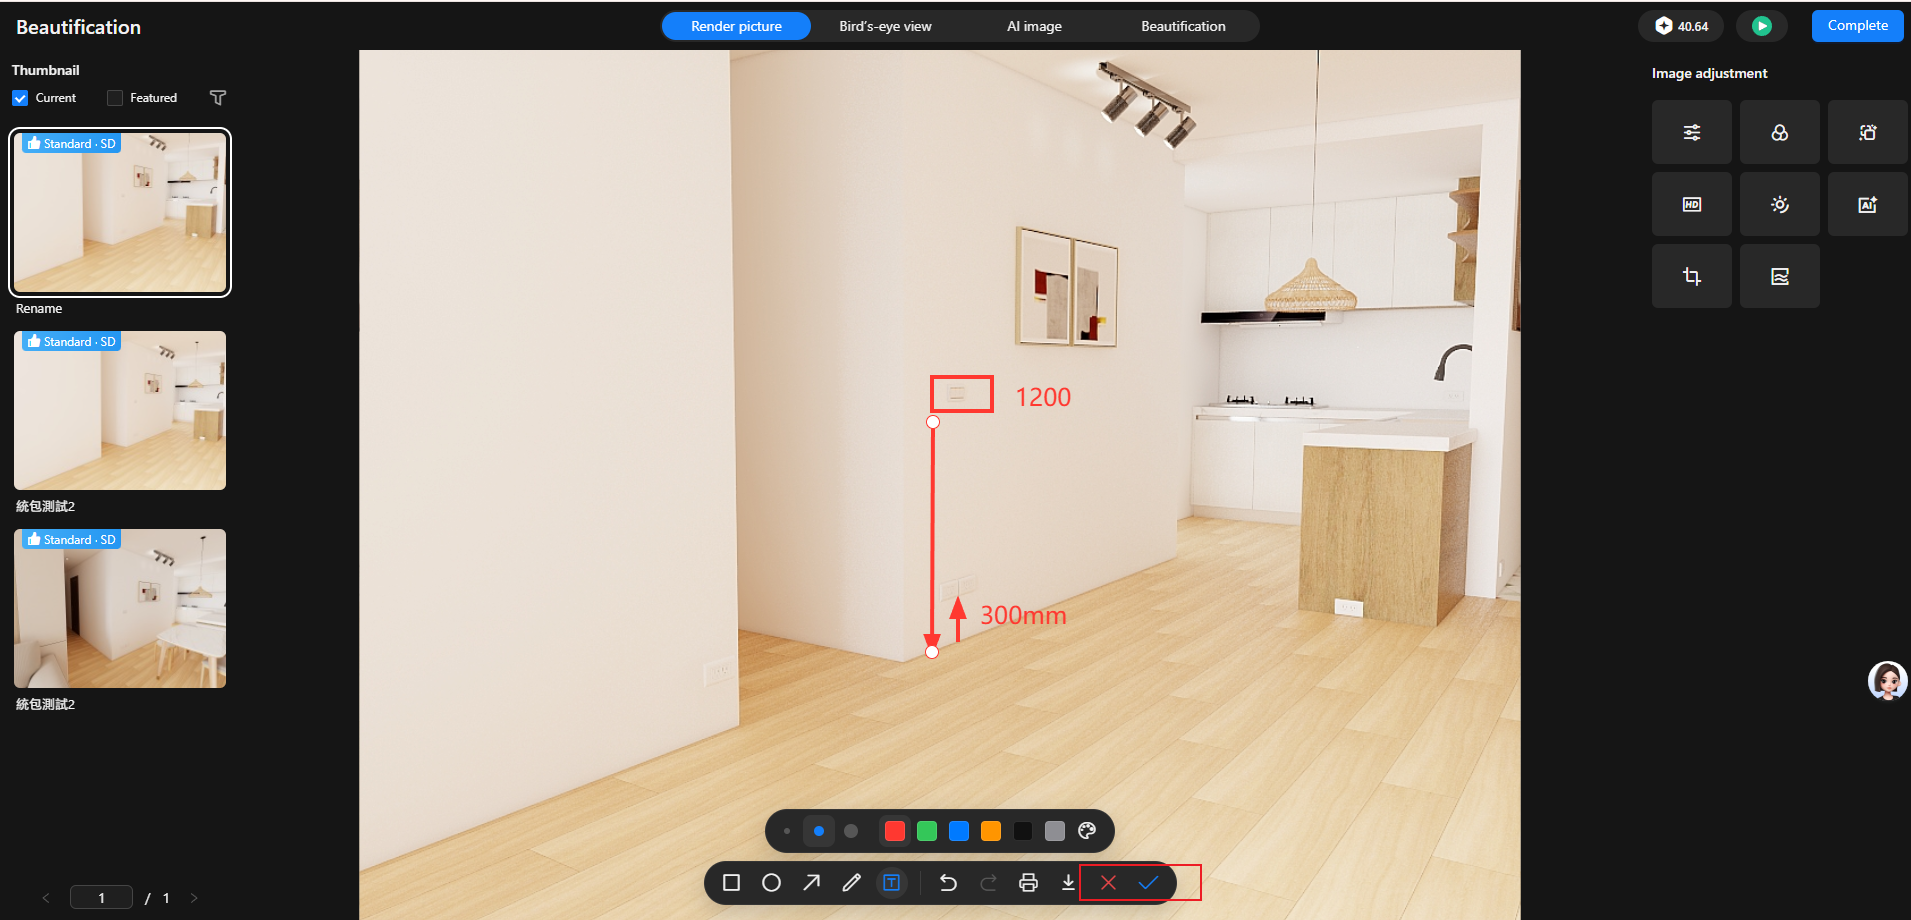
- Annotate details when confirming a design with the client, or print annotated renderings directly for installers on site.
How to Use:
- Open Image Enhancement in Album
- Click the Annotation button in the bottom toolbar of Image Enhancement
- Enter annotation mode and add text or markup
- After annotating, download, copy, or print the image, then exit
Note: Temporary annotation only. After annotating, you can download, copy, or print the image, but annotated images cannot be saved.
Drawings & Quotation
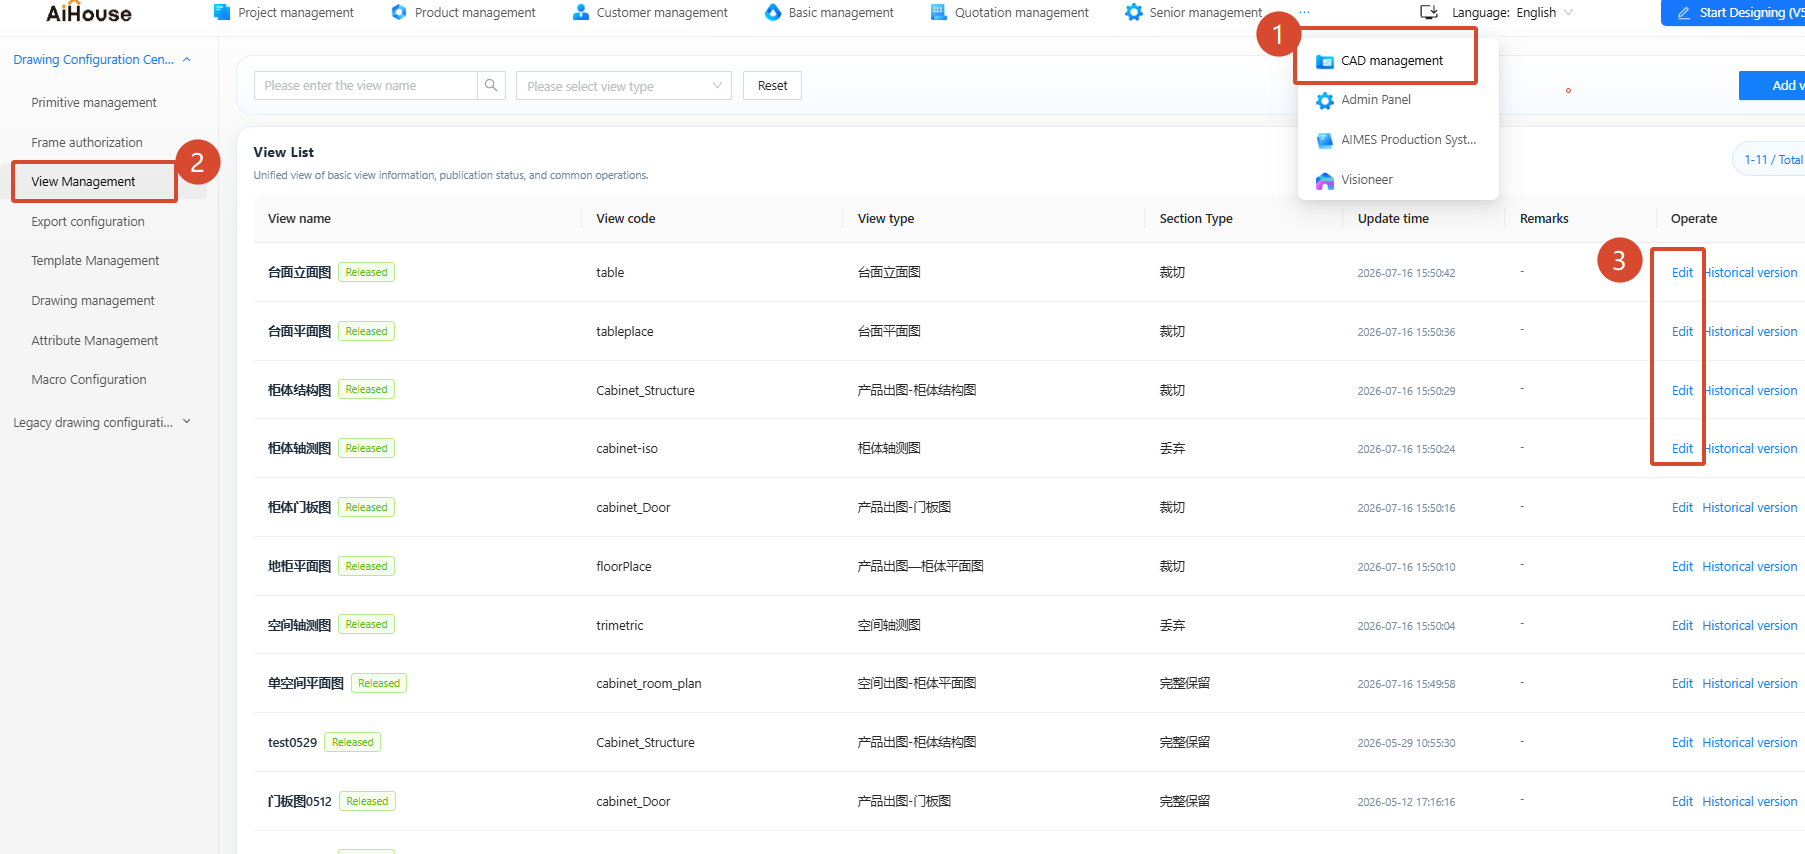
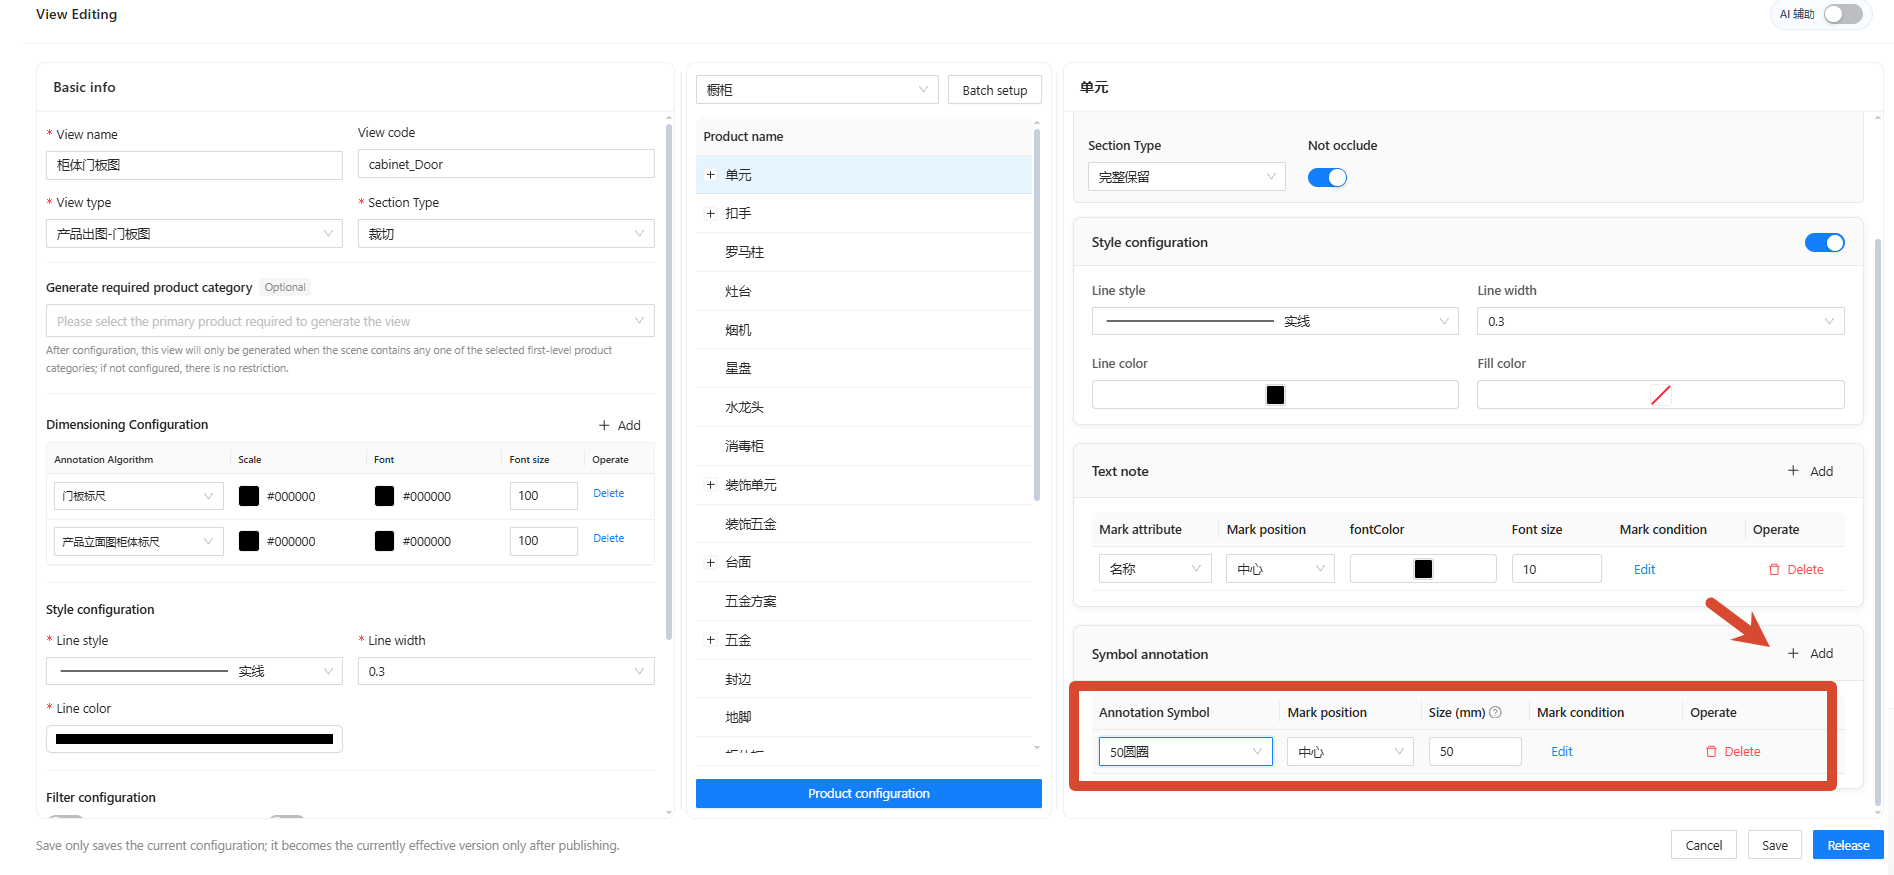
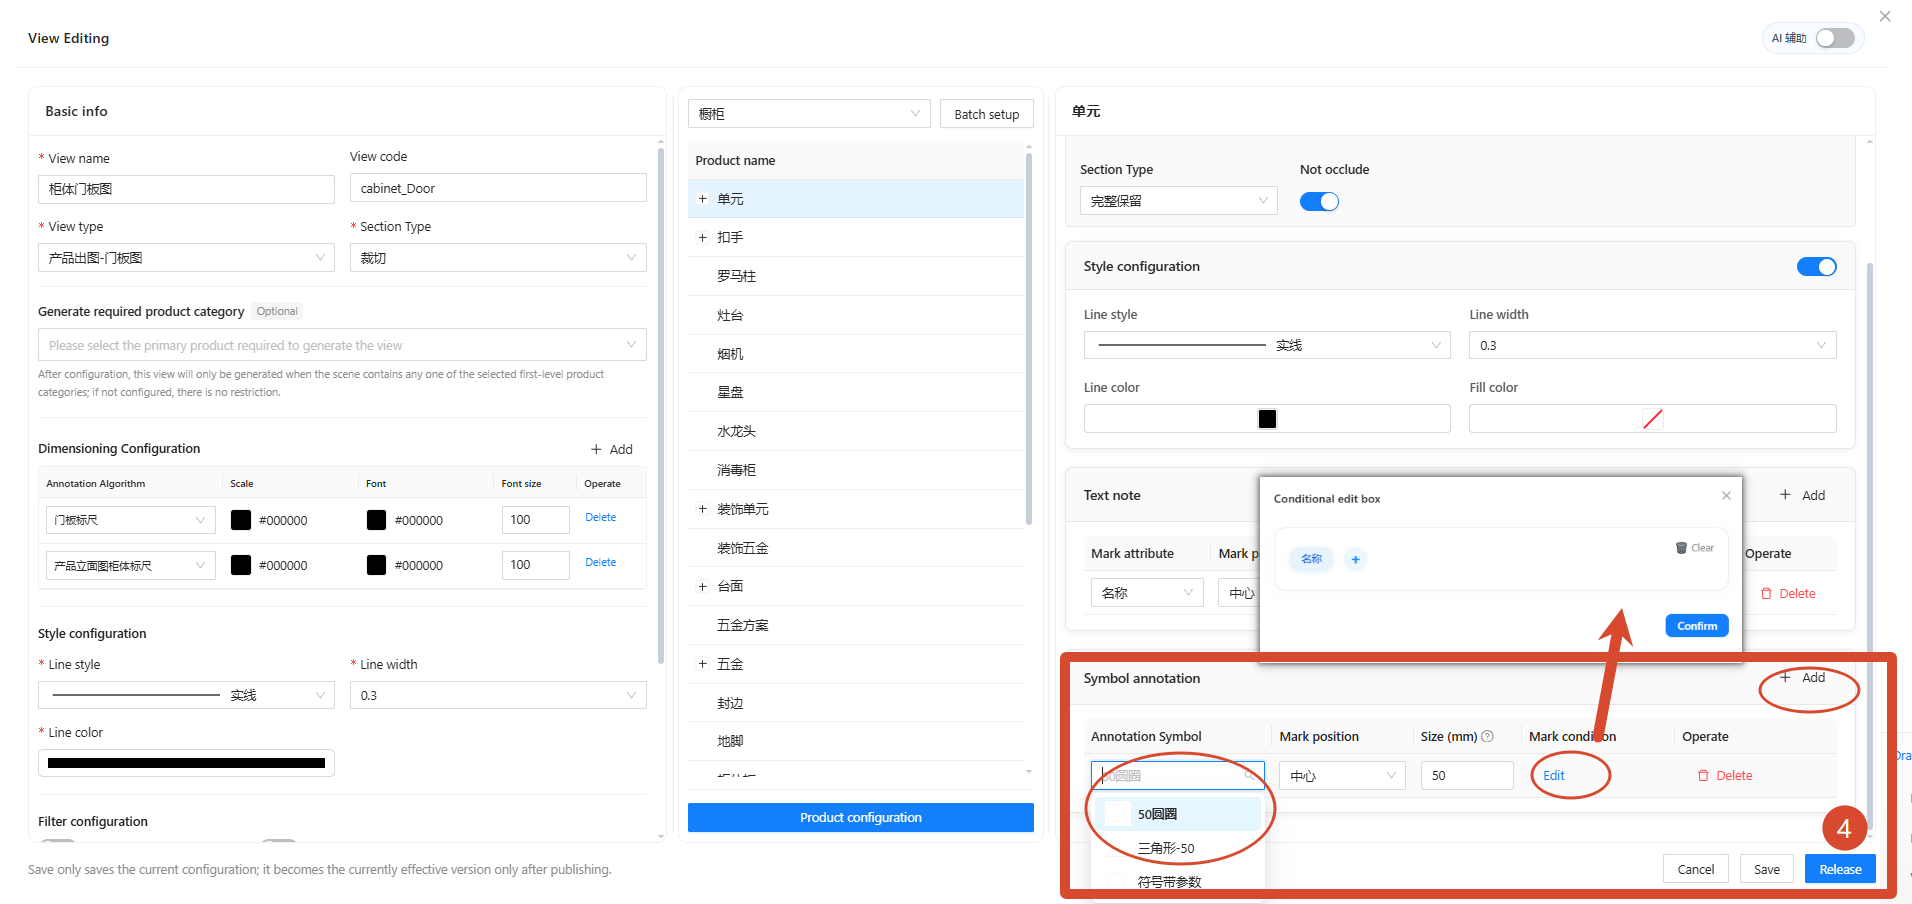
1. Symbol Annotation
*Only available for Enterprise accounts
Highlights:
- Add annotation symbols to any product and set the symbol position and size.
- Attributes in the symbol can be bound to product attributes for dynamic linkage.
- For special products and scenarios, upload custom CAD symbols for identification, with configurable position, attributes, annotation conditions, and symbol size.
- Reusable symbol configurations, automatic attribute sync, and adjustable size and style adapt to different drawing scales.
2. Catalog Statistics
*Only available for Enterprise accounts
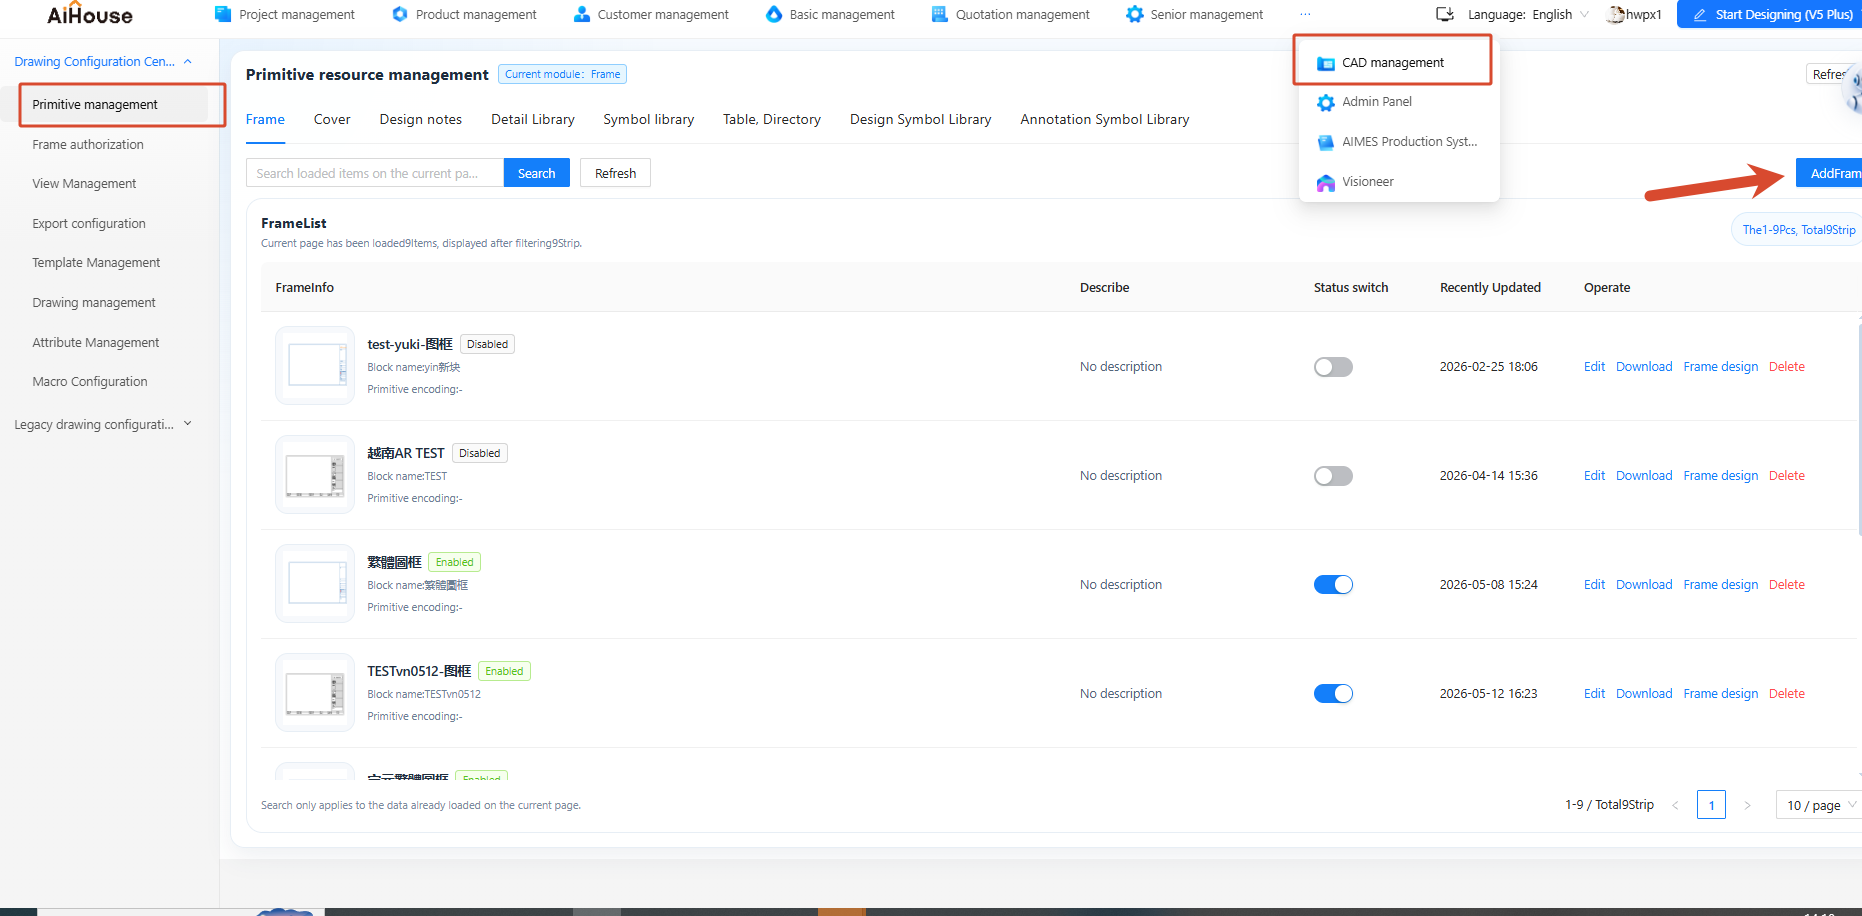
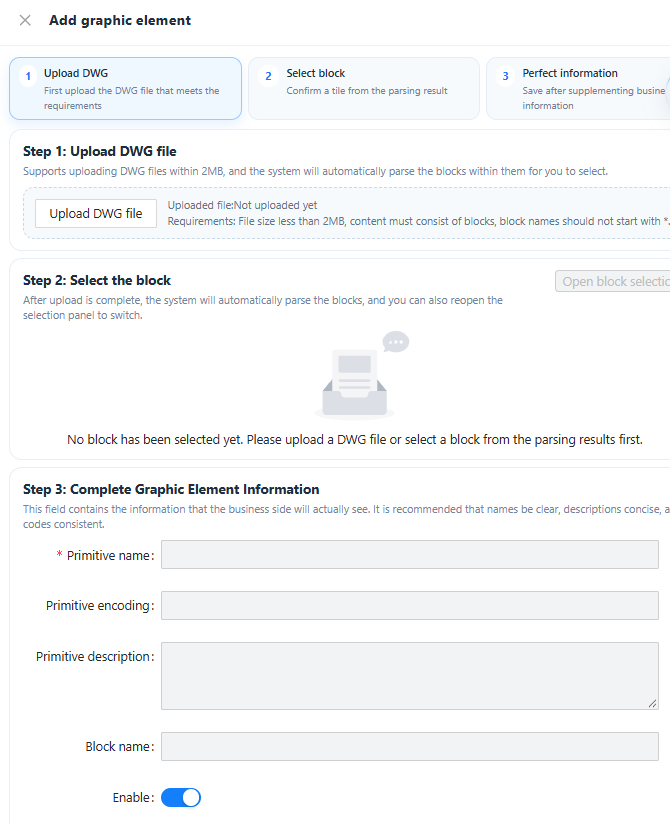
Highlights:
- Four standard business templates; complete statistics for cabinets, panels, hardware, and drawings in three configuration steps.
- Advanced customization lets you flexibly configure statistics fields, data combinations, calculation rules, and display styles to meet complex business needs.
Asset Management
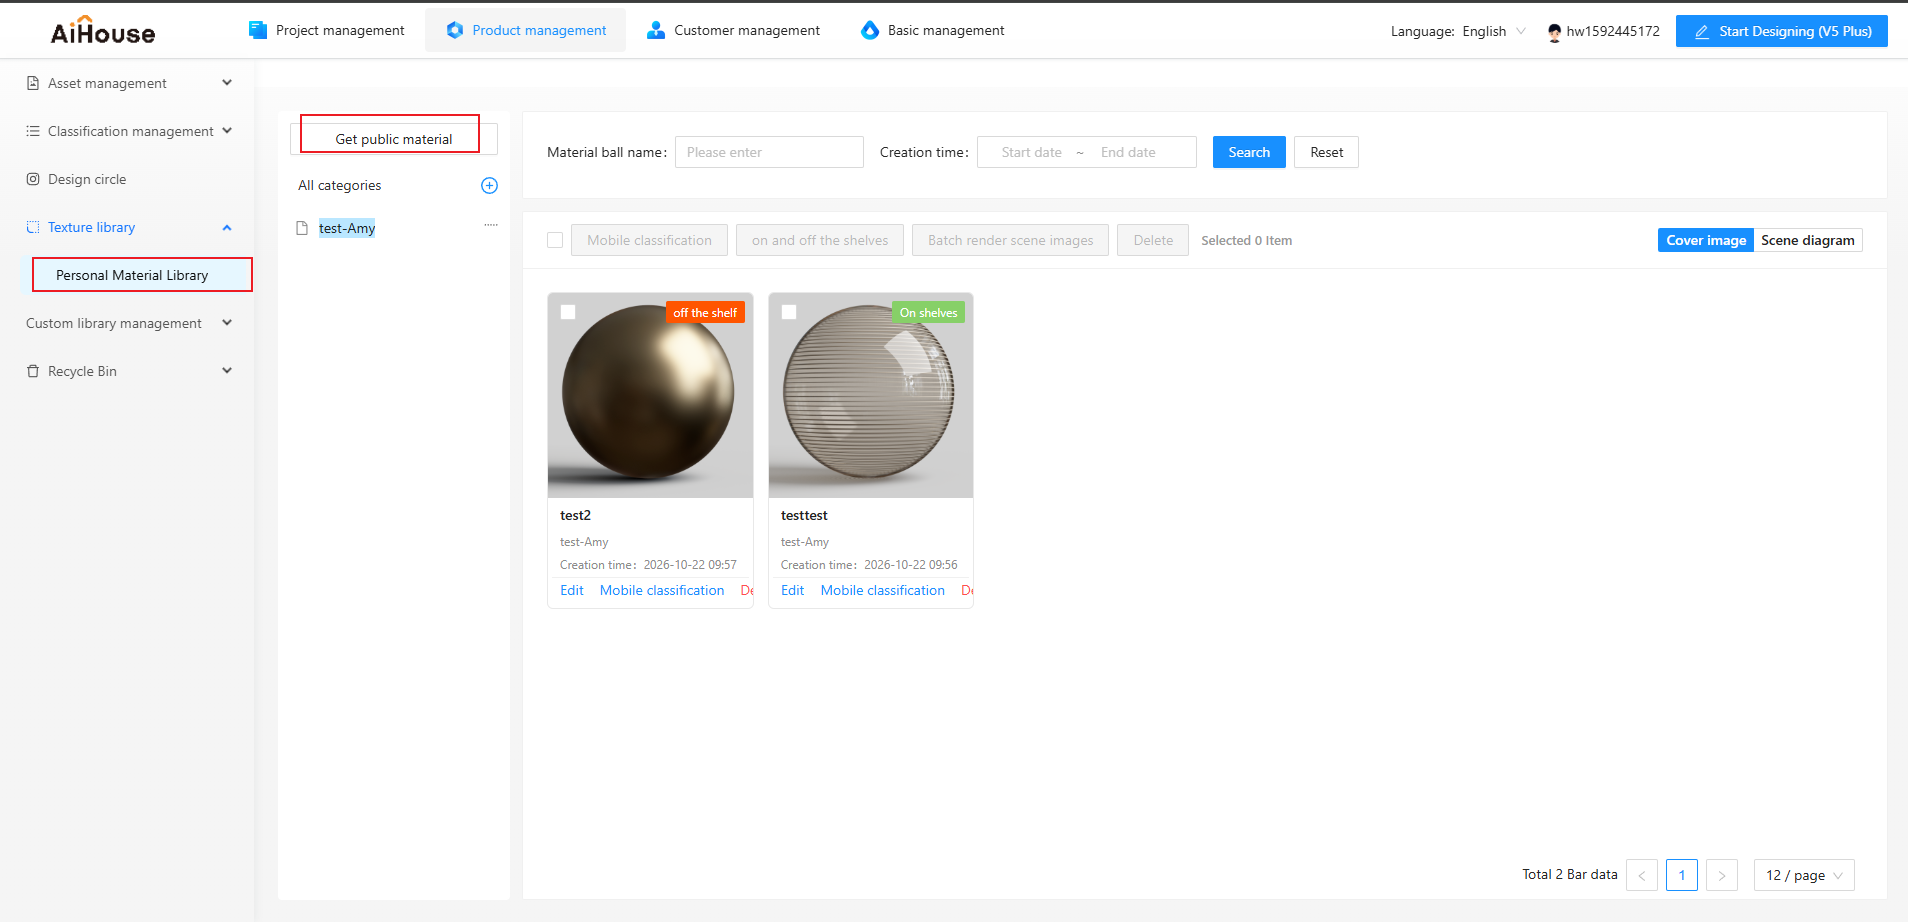
1. Personal Material Library Management
Highlights:
- Create custom categories in your personal material library and organize material spheres into them.
- Render material sphere scene images and generate material sphere previews with one click.
- Manage the visibility of personal material spheres to control what is shown or hidden.
Customization
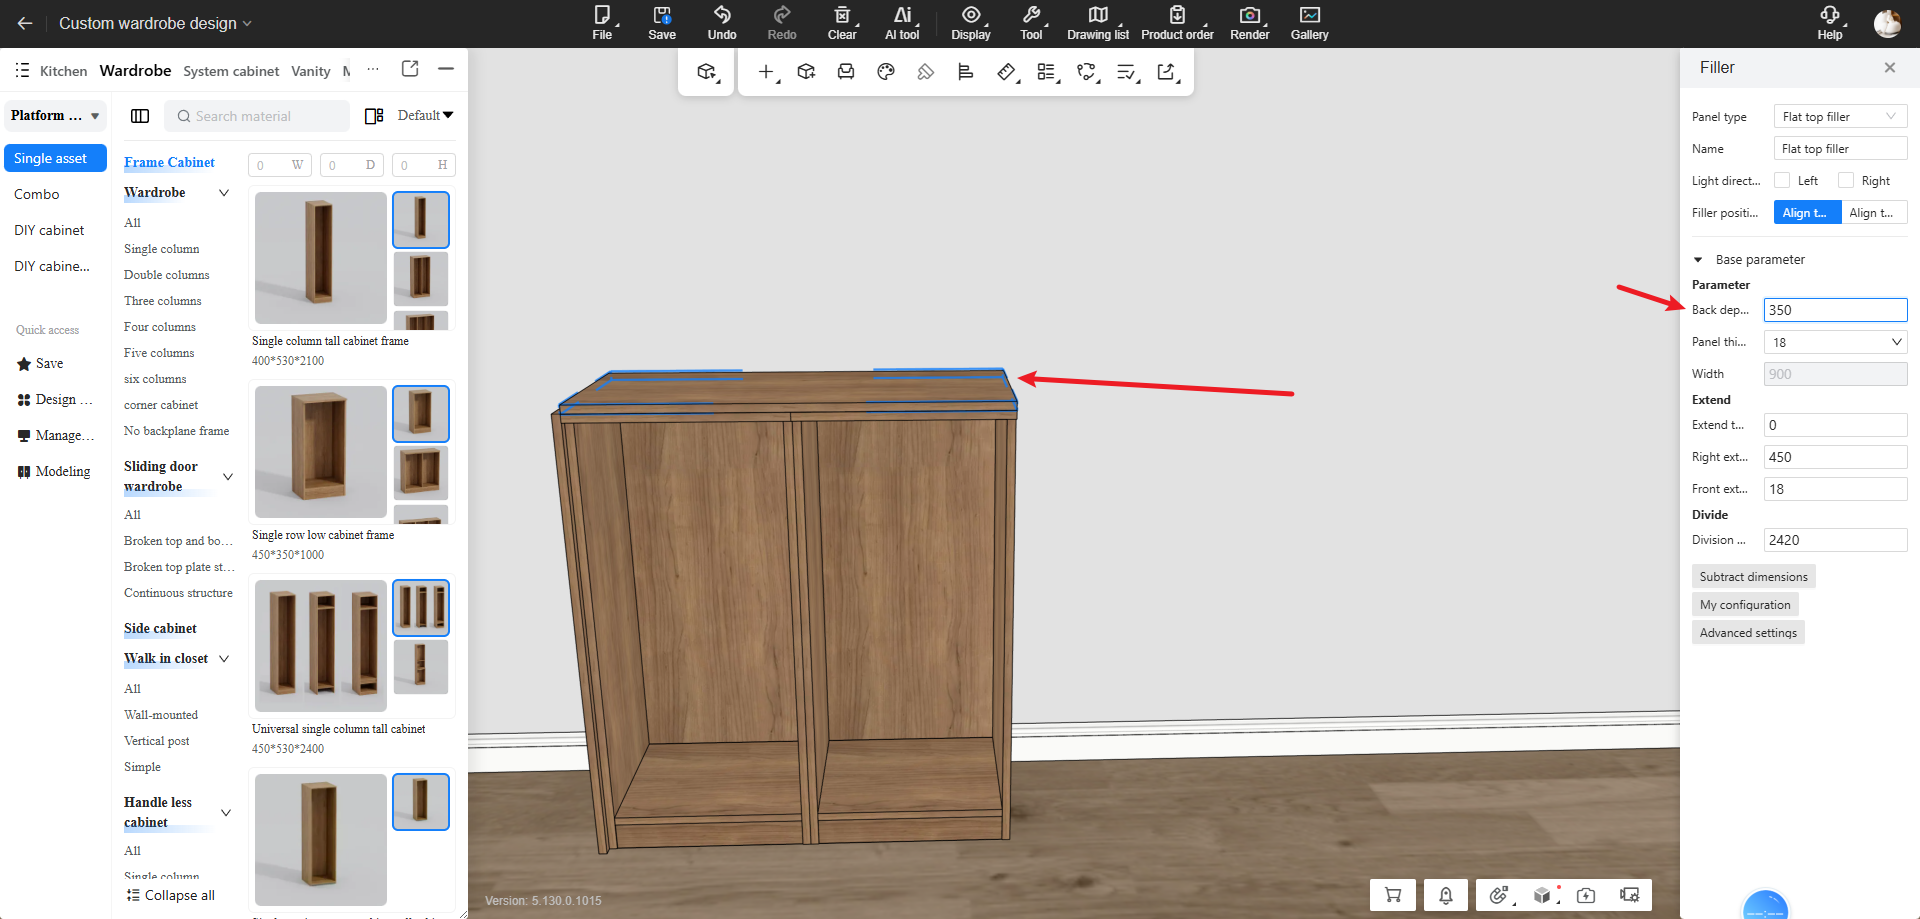
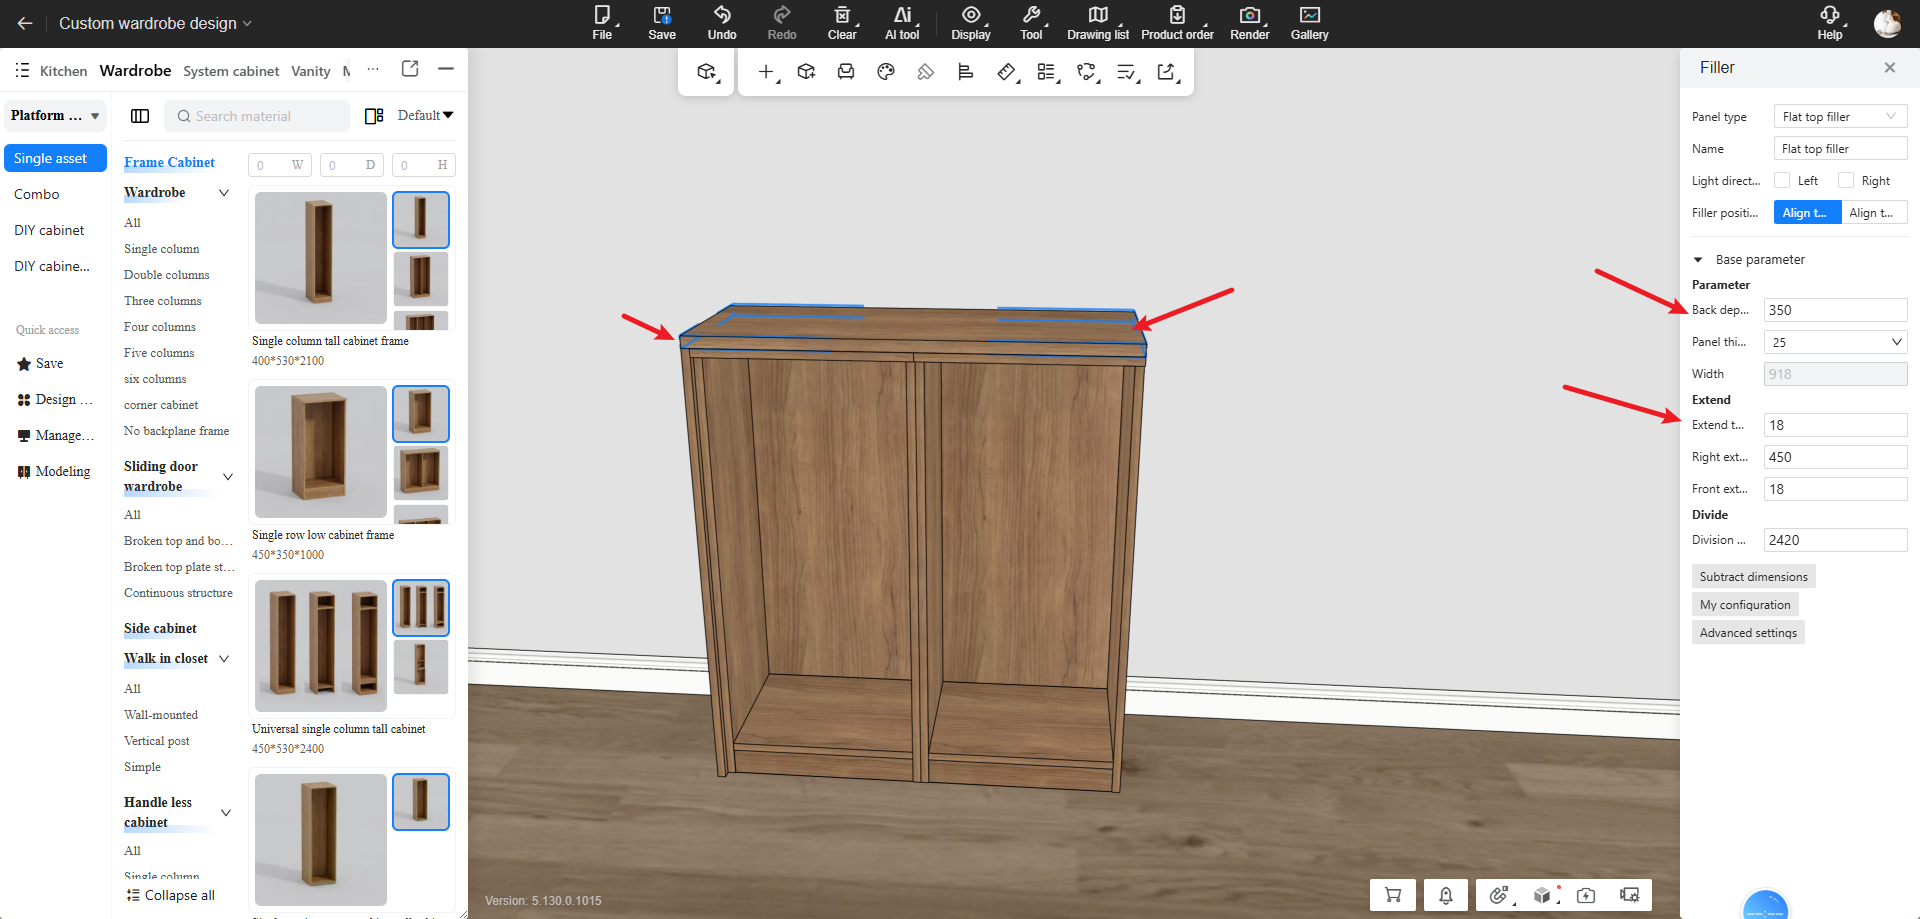
1. New Capping Panel Generation Processes
Highlights:
- New process configurations for visible panels and countertop panels in the backend, with maintainable parameters such as panel thickness.
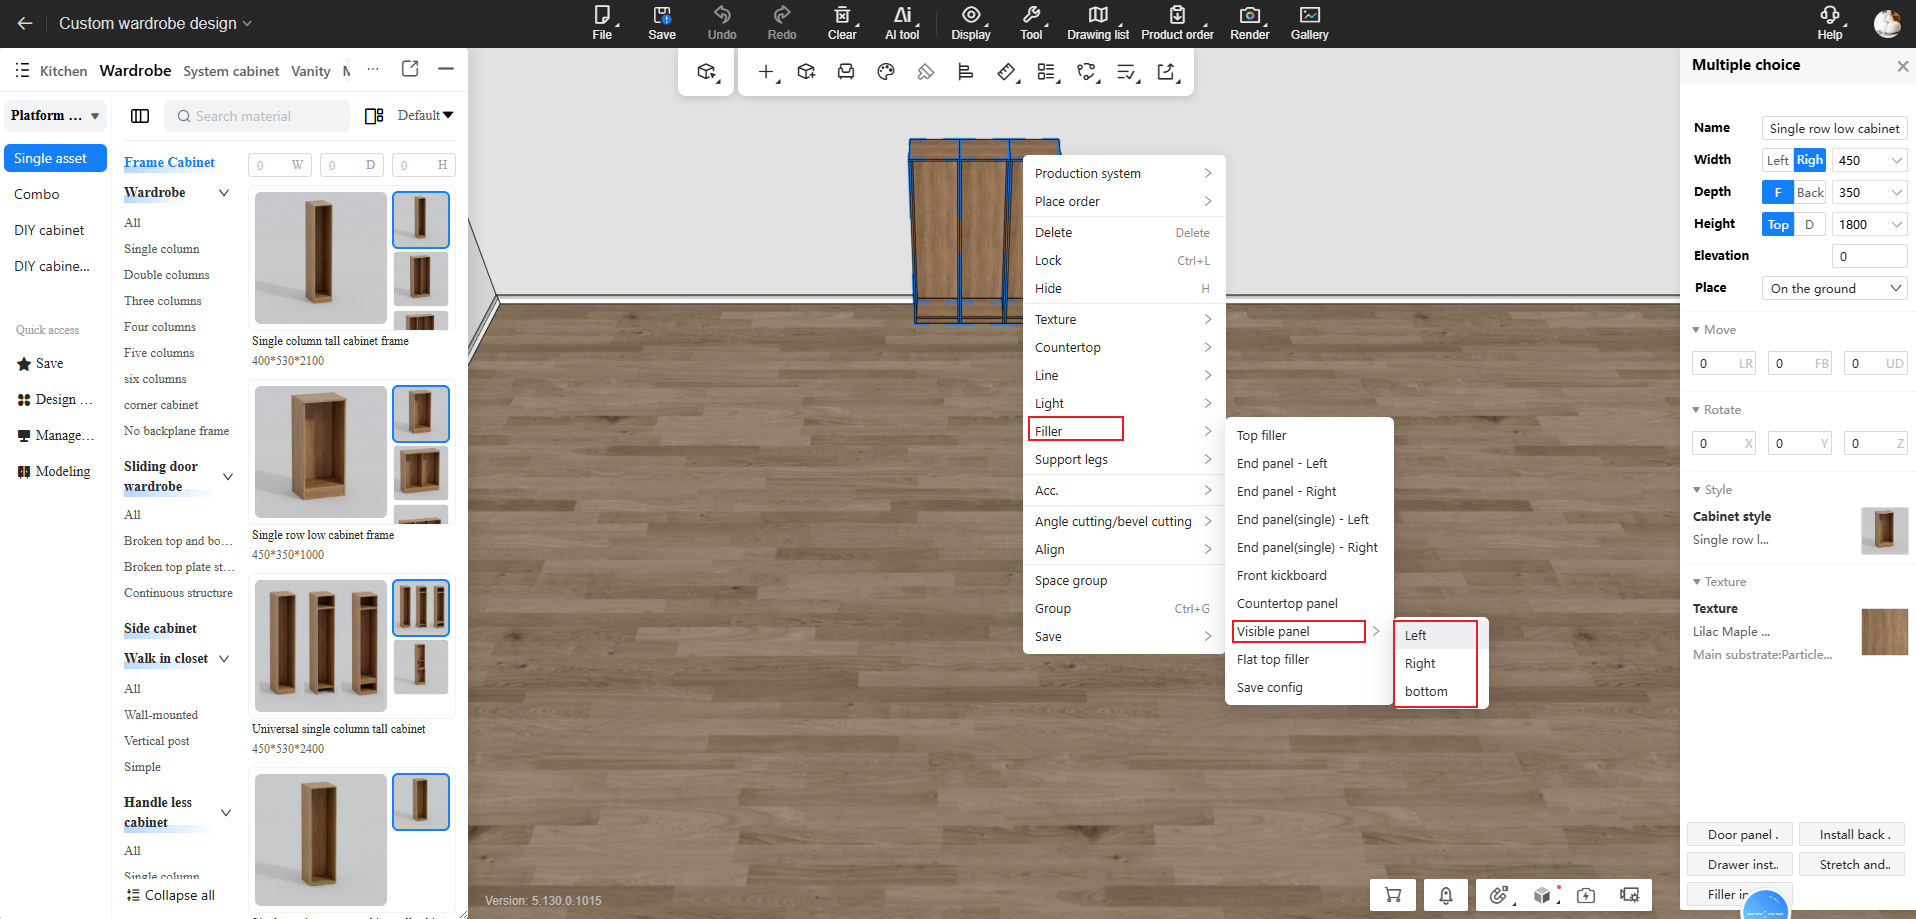
- Visible panels and countertop panels are added to the right-click menu on the design side, enabling quick generation per cabinet.
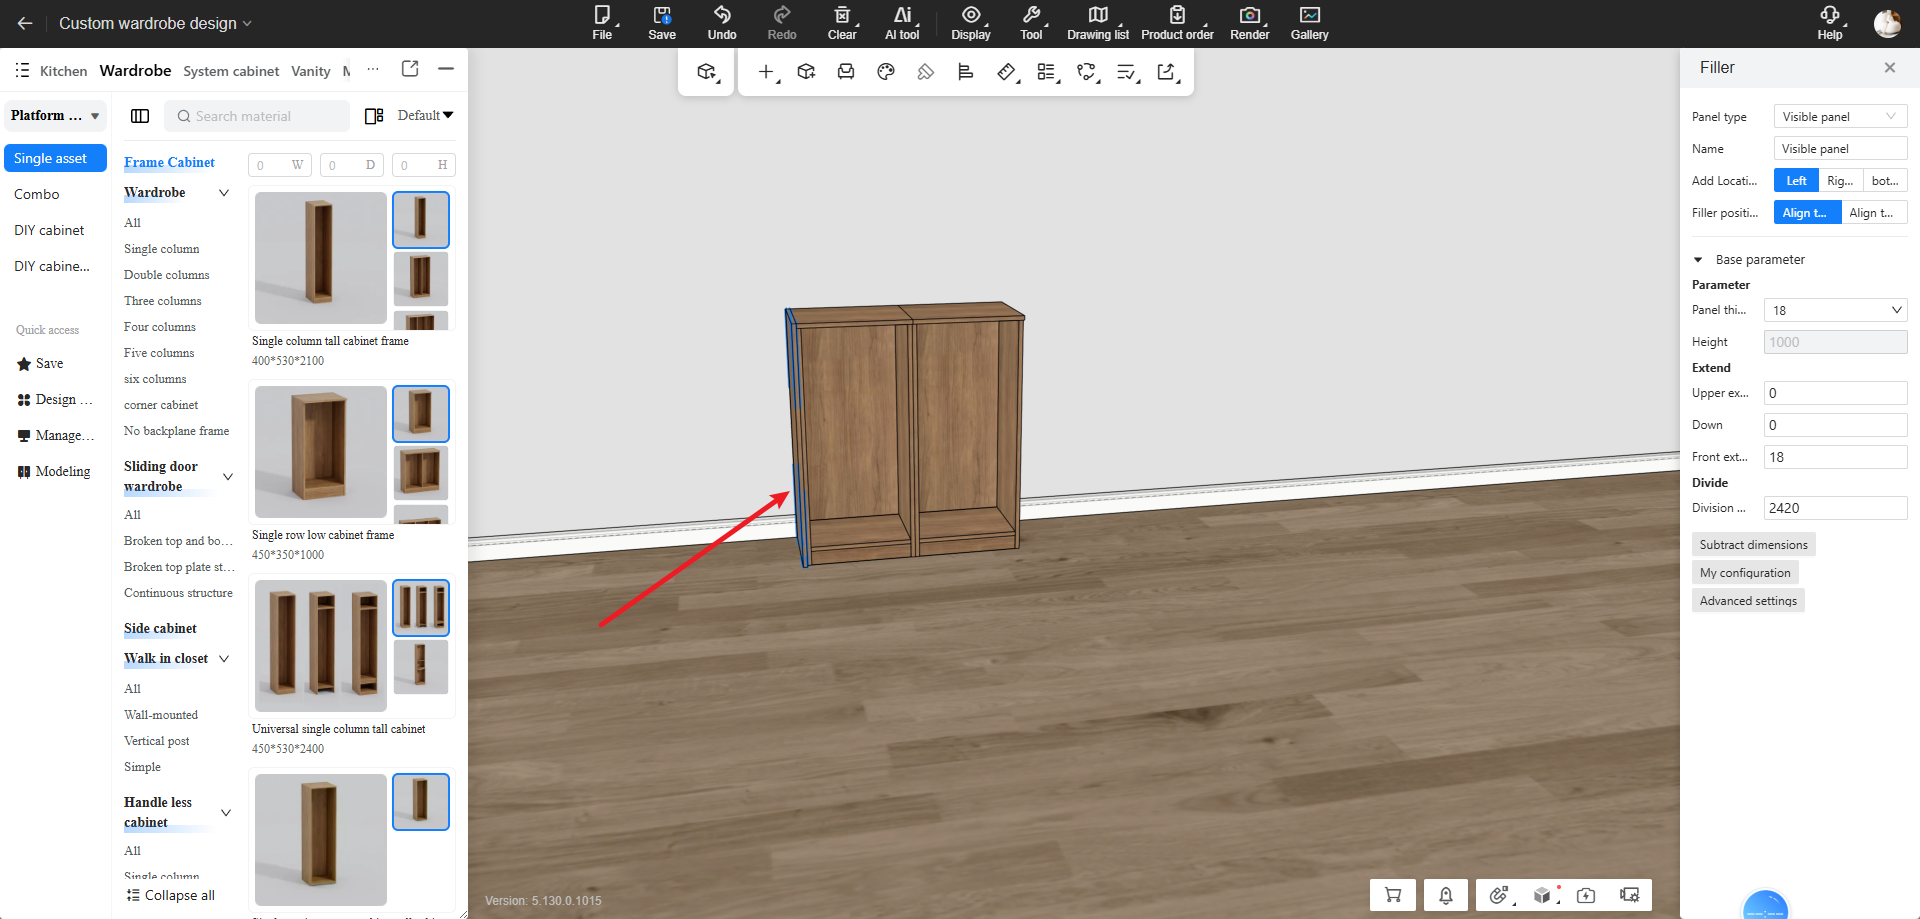
- L-shaped and T-shaped processes for top and side capping panels are more flexible, with adjustable visible direction, cover method, cover value, and front/back extension.
- Multi-select cabinets for batch generation, with panel sizes automatically adapted to cabinet dimensions.
How to Use:
- Open an AiHouse project and enter the Cabinets & Wardrobes module. Select a cabinet and right-click to open the generation menu.
- Choose “Capping Panel - Visible Panel”, then select left, right, or bottom visible panel. Set extension values as needed: left and right visible panels support top/bottom extension; bottom visible panels support left/right extension; the default extension is 0.
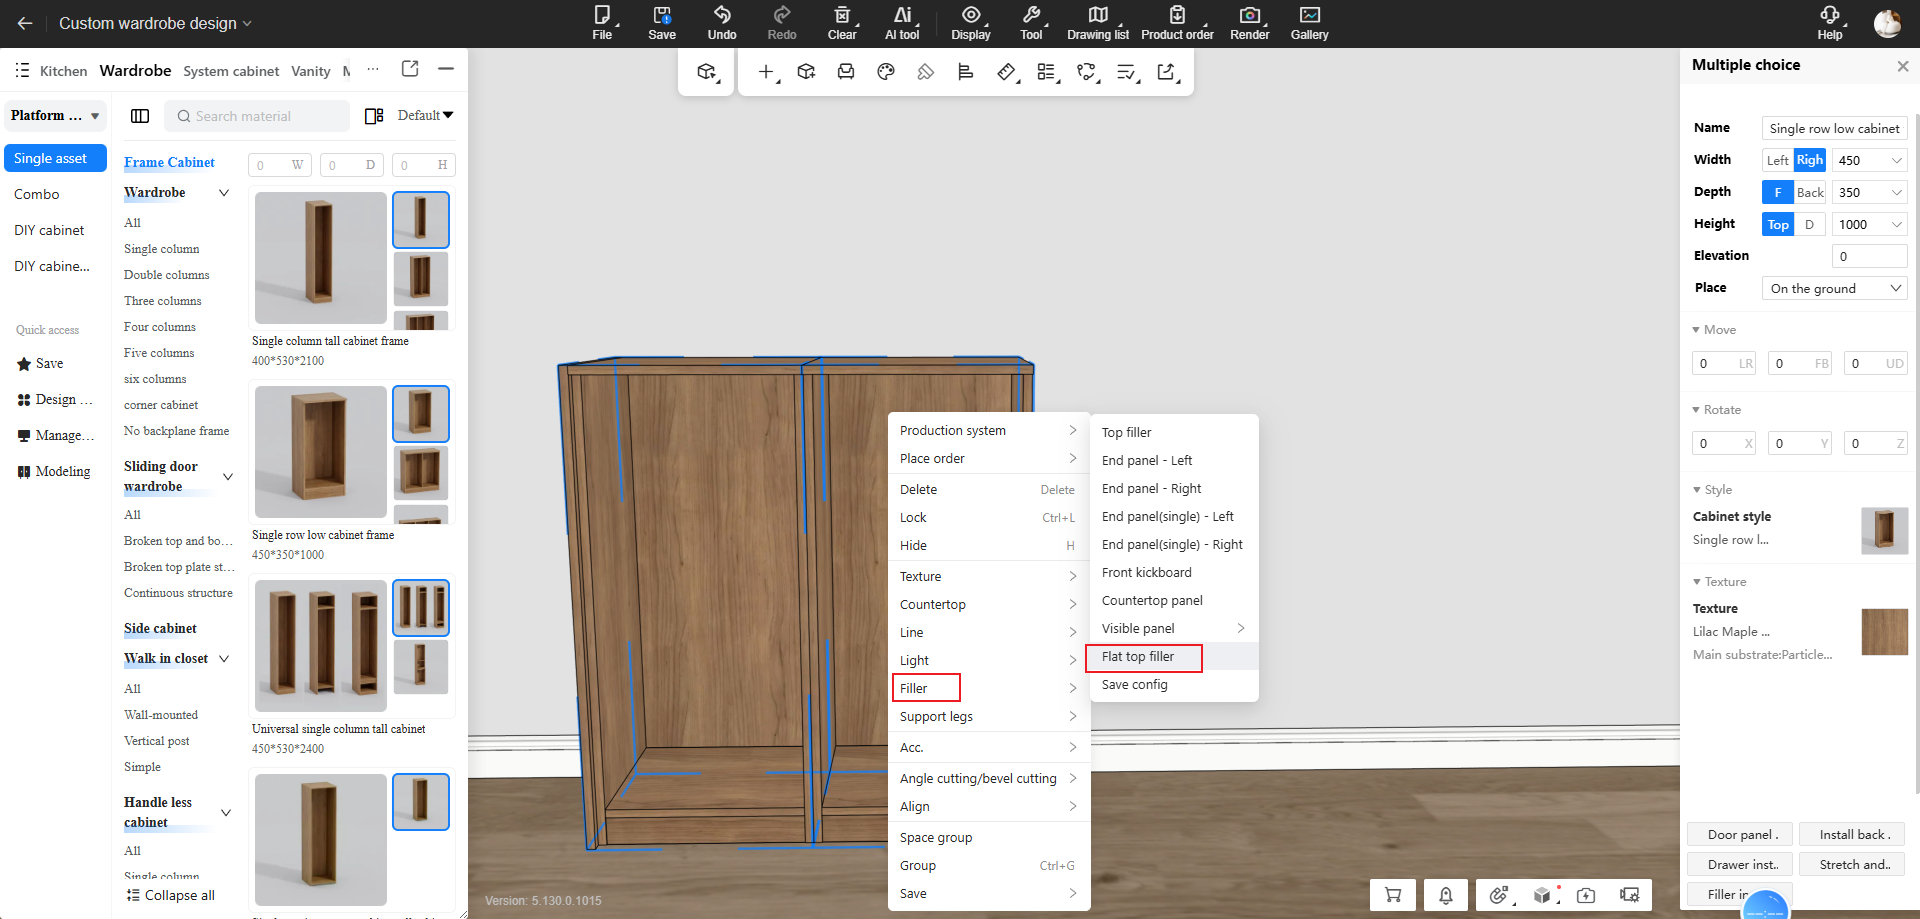
- You can also choose “Countertop Panel” and generate after setting the left/right extension.
- When multiple cabinets are selected, batch generation applies: left/right visible panels use the overall height, while bottom visible panels and countertop panels use the overall width.
For enterprise administrators:
- Go to Whole-House backend management and add or maintain the process configurations: Visible panel (panel thickness), Countertop panel (panel thickness).
2. Scene Filter Improvements
Highlights:
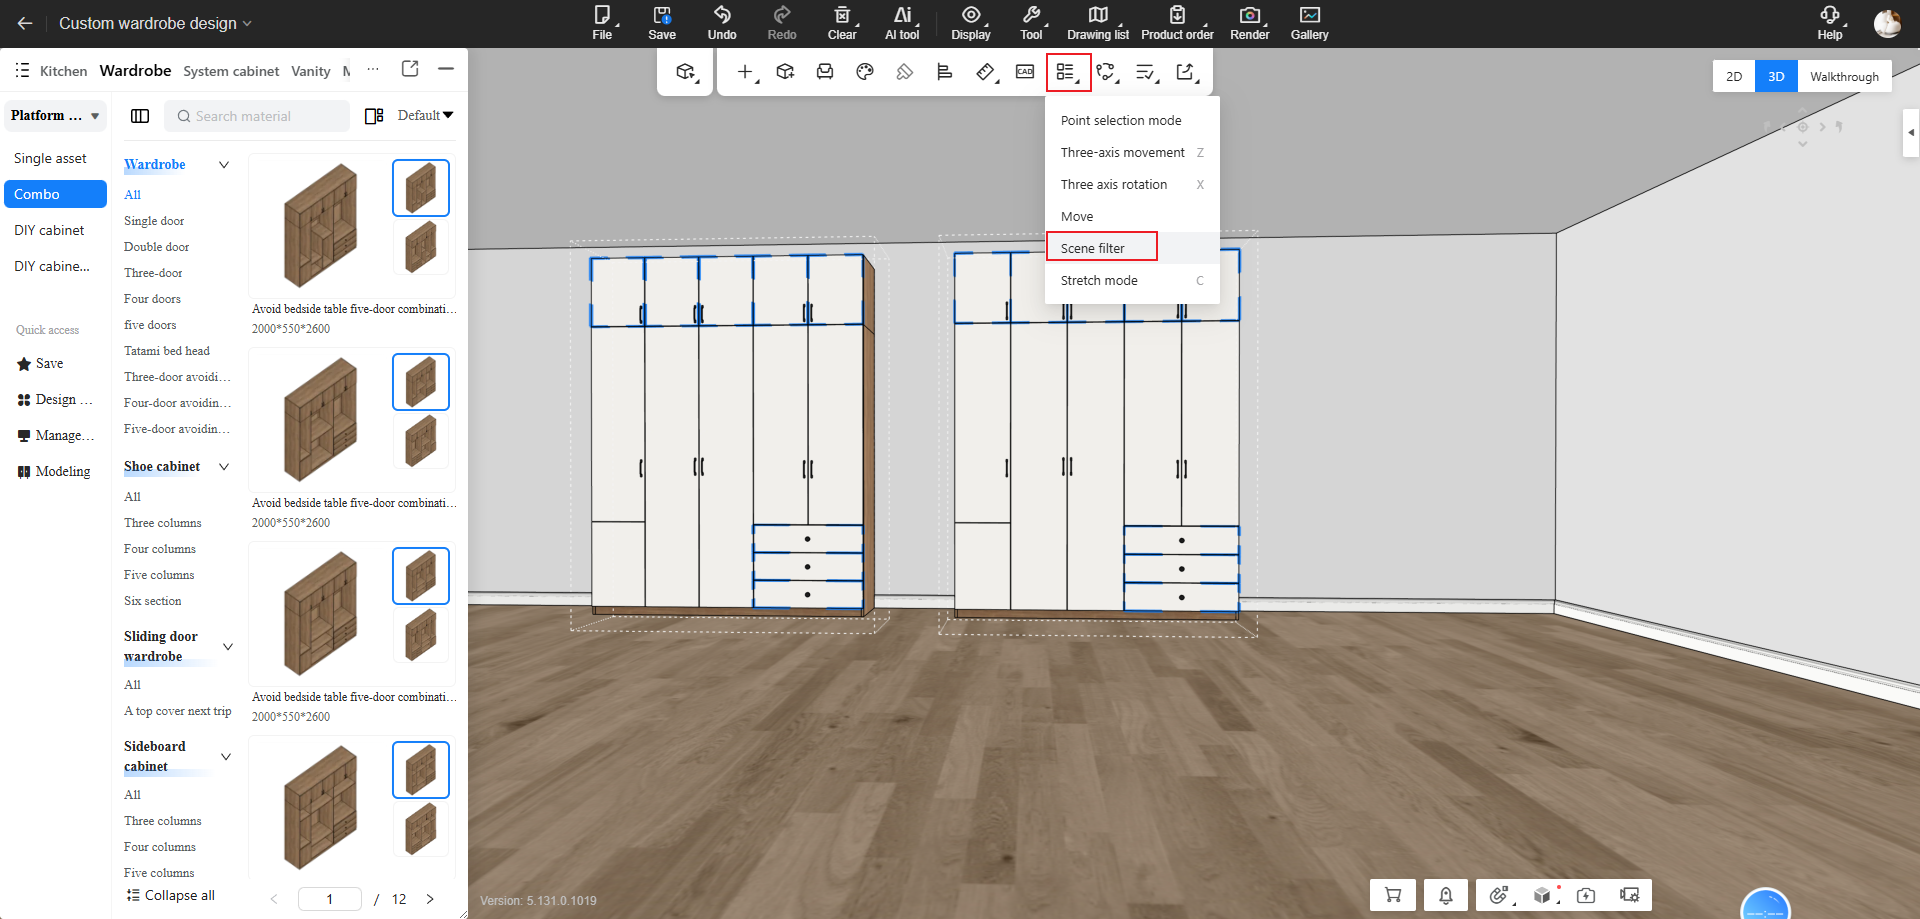
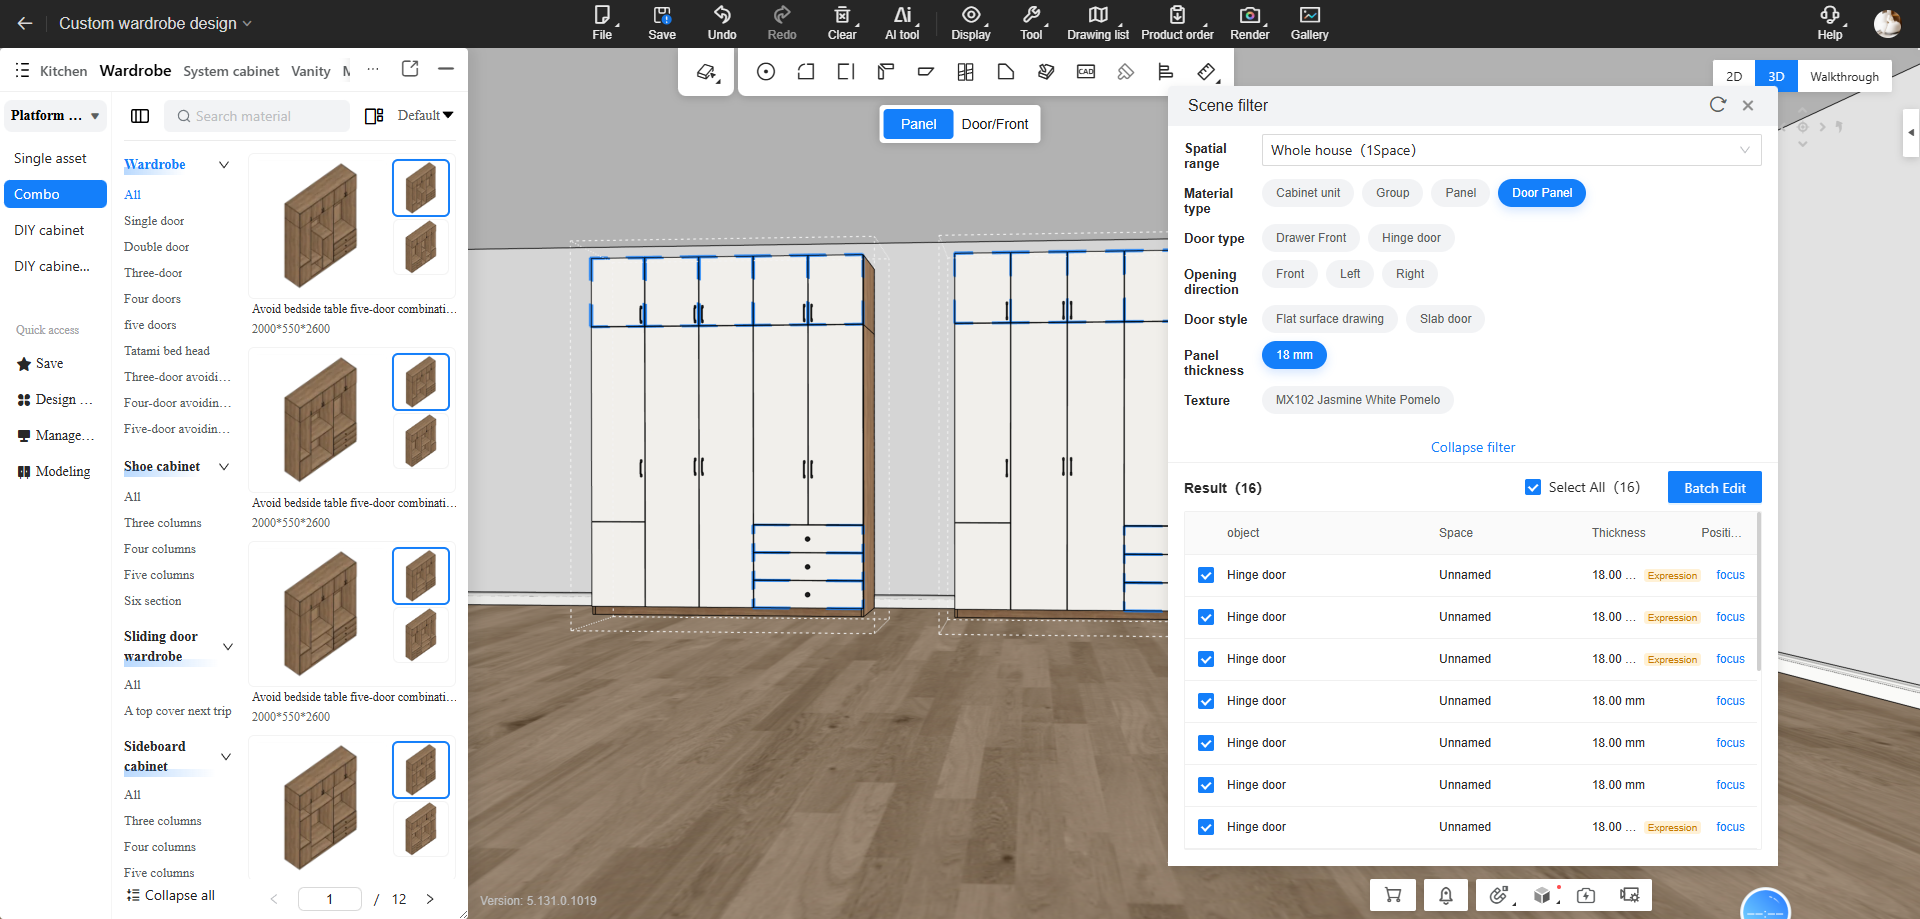
- Filter by single space, combination, and door panel thickness.
- Batch-modify door panel thickness in the filtered results.
How to Use:
- Open an AiHouse project and enter the Cabinets & Wardrobes module.
- Open Scene Filter and select the space range, item type, and attribute conditions.
- Review the results and focus on target objects. Select door panels and batch-modify thickness.
- If formula-based thickness exists, confirm whether to continue when prompted.
Note: Changing door panel thickness invalidates the original thickness formula. Before batch changes, confirm the selected objects and the affected scope.
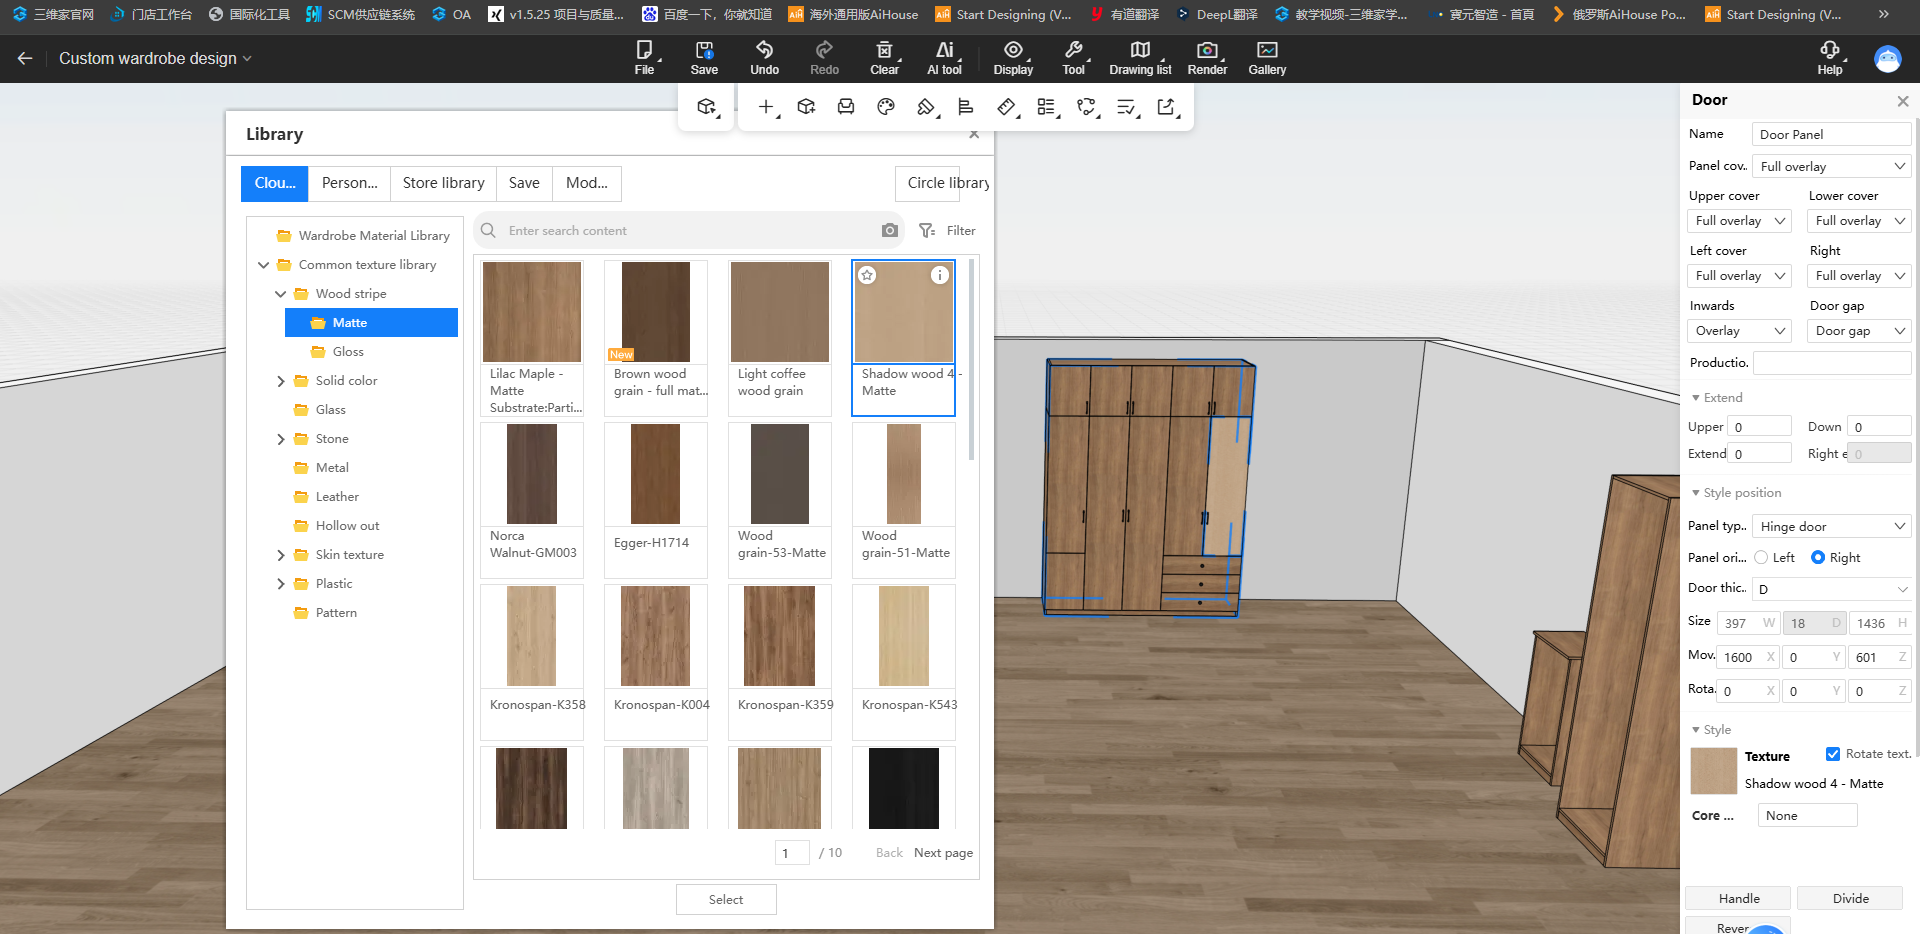
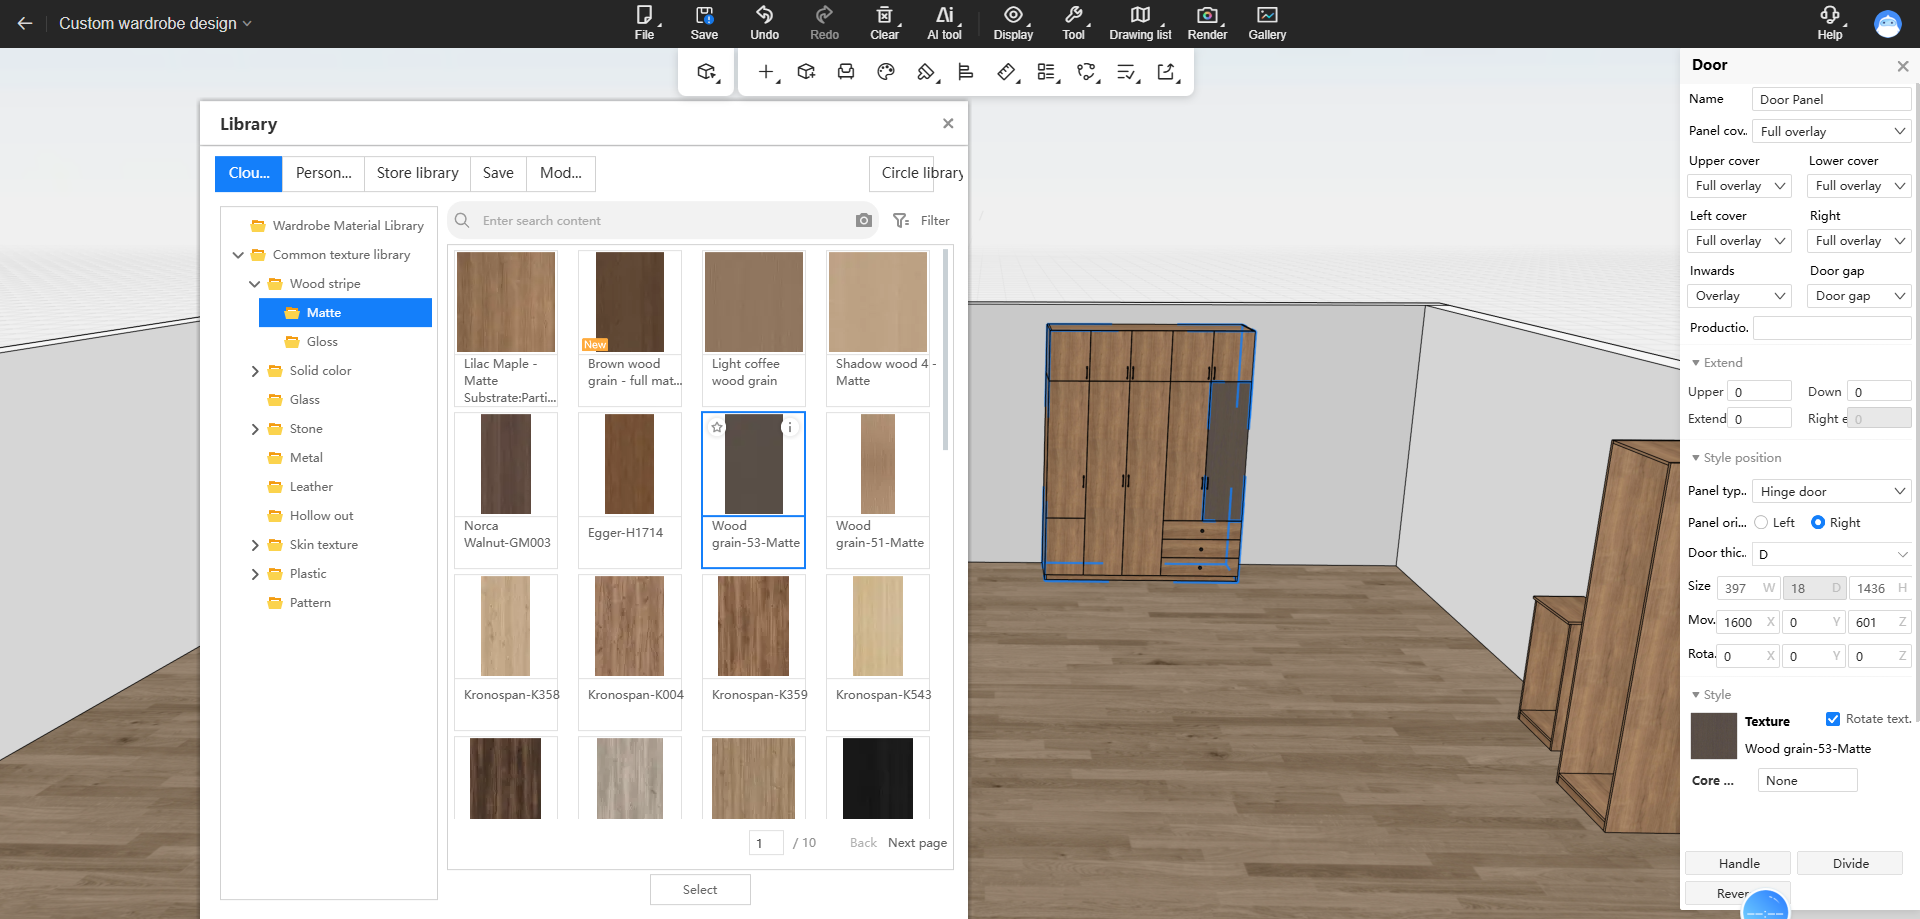
3. Quick Repeated Material/Door Panel Replacement in Cabinets & Wardrobes
Highlights:
- After double-clicking to apply a material or door panel, the asset panel stays open so you can keep replacing materials or styles from the same asset.
How to Use:
- Open an AiHouse project and enter the Cabinets & Wardrobes module.
- Select an item and open the style or material replacement panel.
- Double-click to apply the target material or door panel, then continue double-clicking other assets while the library stays open
- Replace assets through the bottom selection button; the panel closes automatically
4. Material Replacement Entry Added for Handles
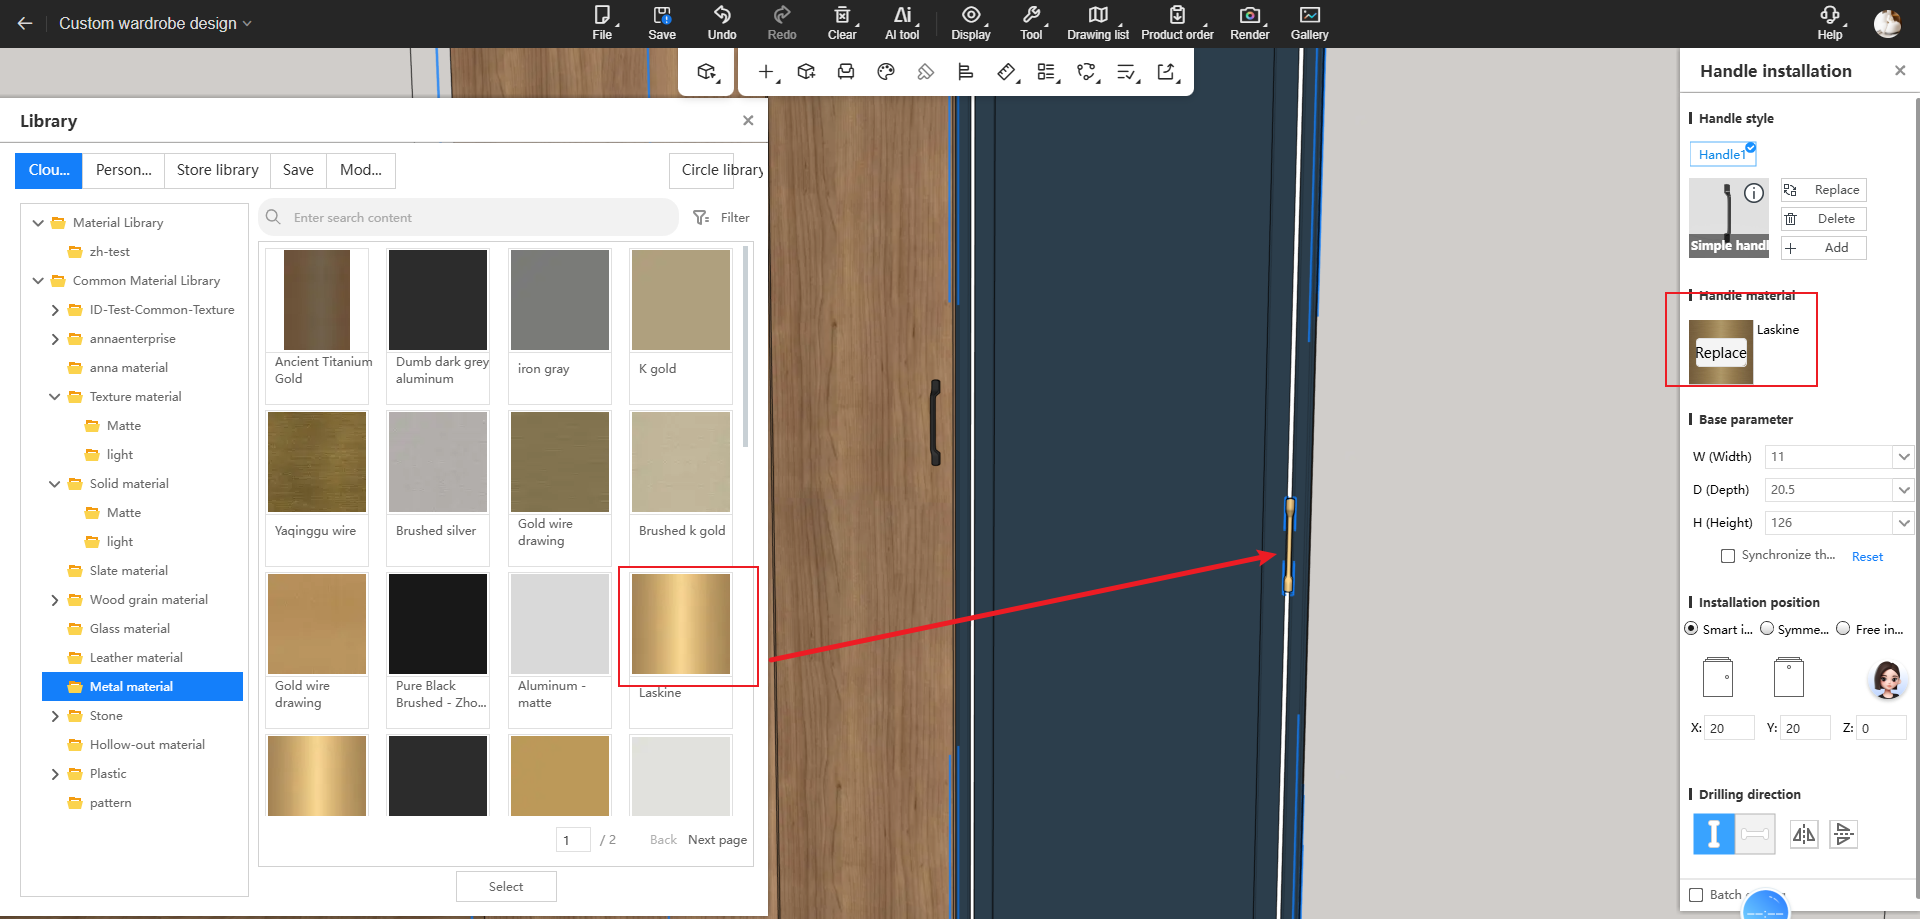
Highlights:
- A material replacement entry is added to the handle panel, allowing you to select and replace handle materials directly.
How to Use:
- Open an AiHouse project and enter the Cabinets & Wardrobes module.
- Right-click a cabinet or door panel, choose Handle Editing, and open the handle panel.
- Click the material replacement entry, select the target material, and confirm the result.
5. Material Replacement Now Locates the Original Asset Page
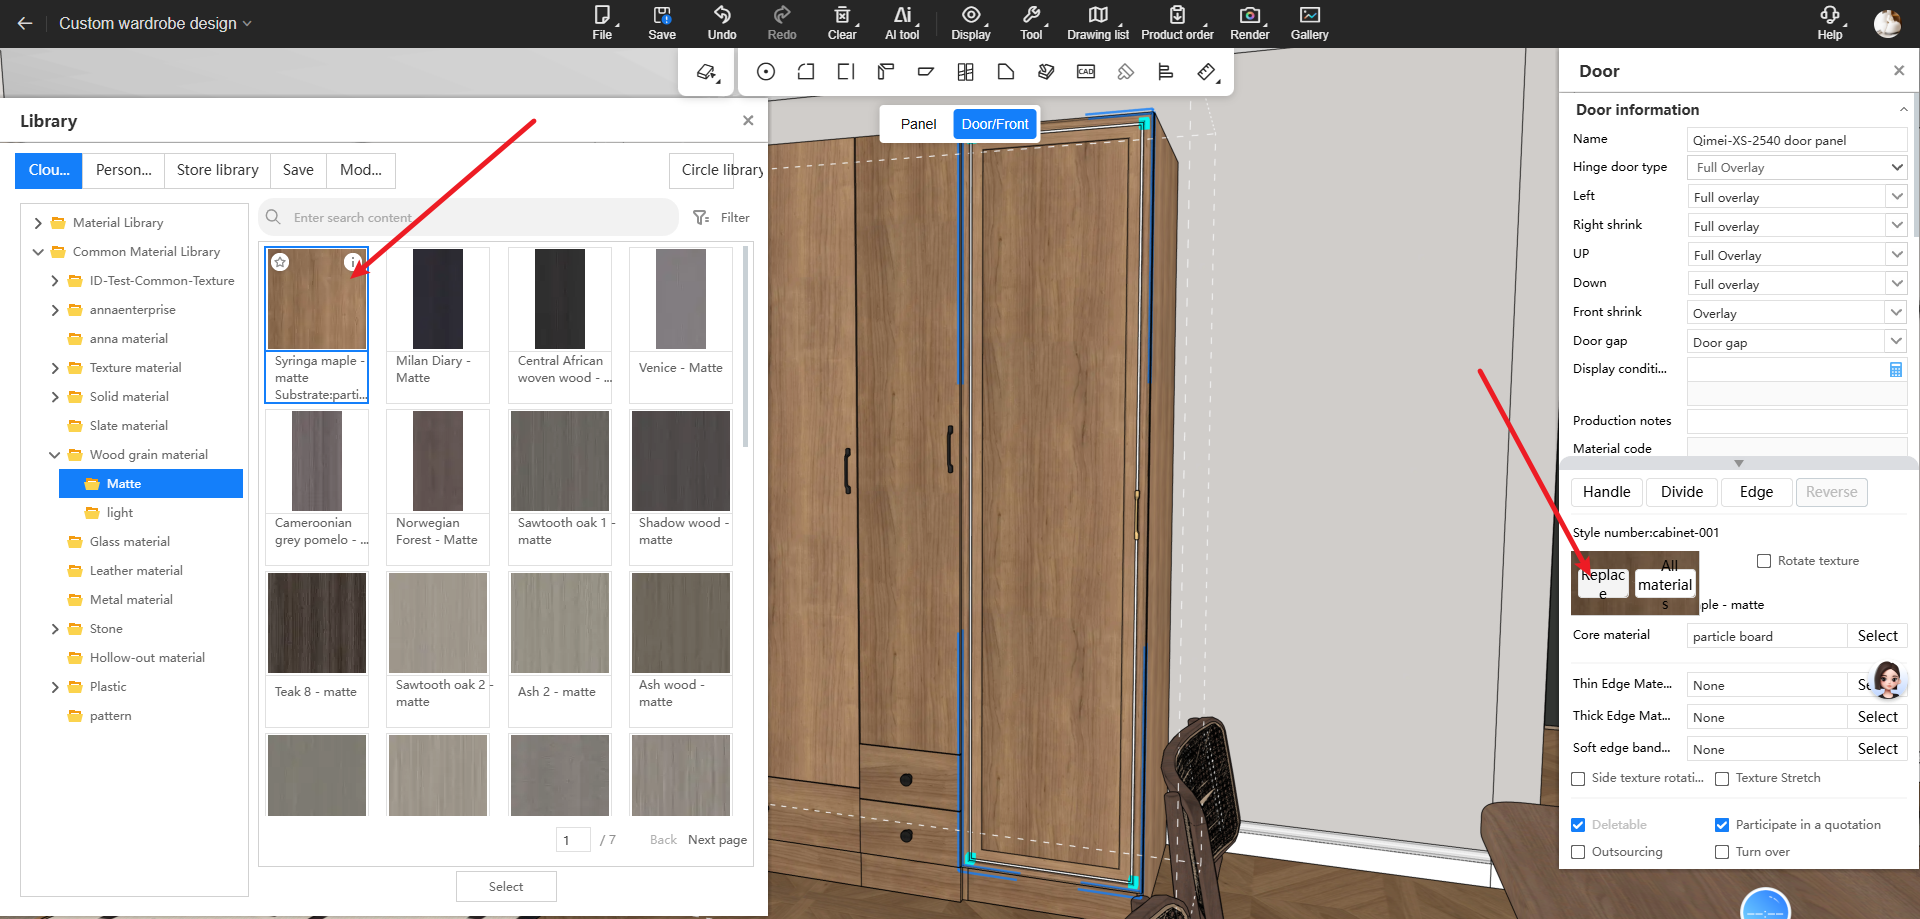
Highlights:
- When replacing materials or door panels, the panel opens on the page of the original asset, so you can continue choosing near the currently used asset.
How to Use:
- Open an AiHouse project and enter the Cabinets & Wardrobes module.
- Select the cabinet material or door panel.
- Open the replacement panel; it jumps directly to the original asset page
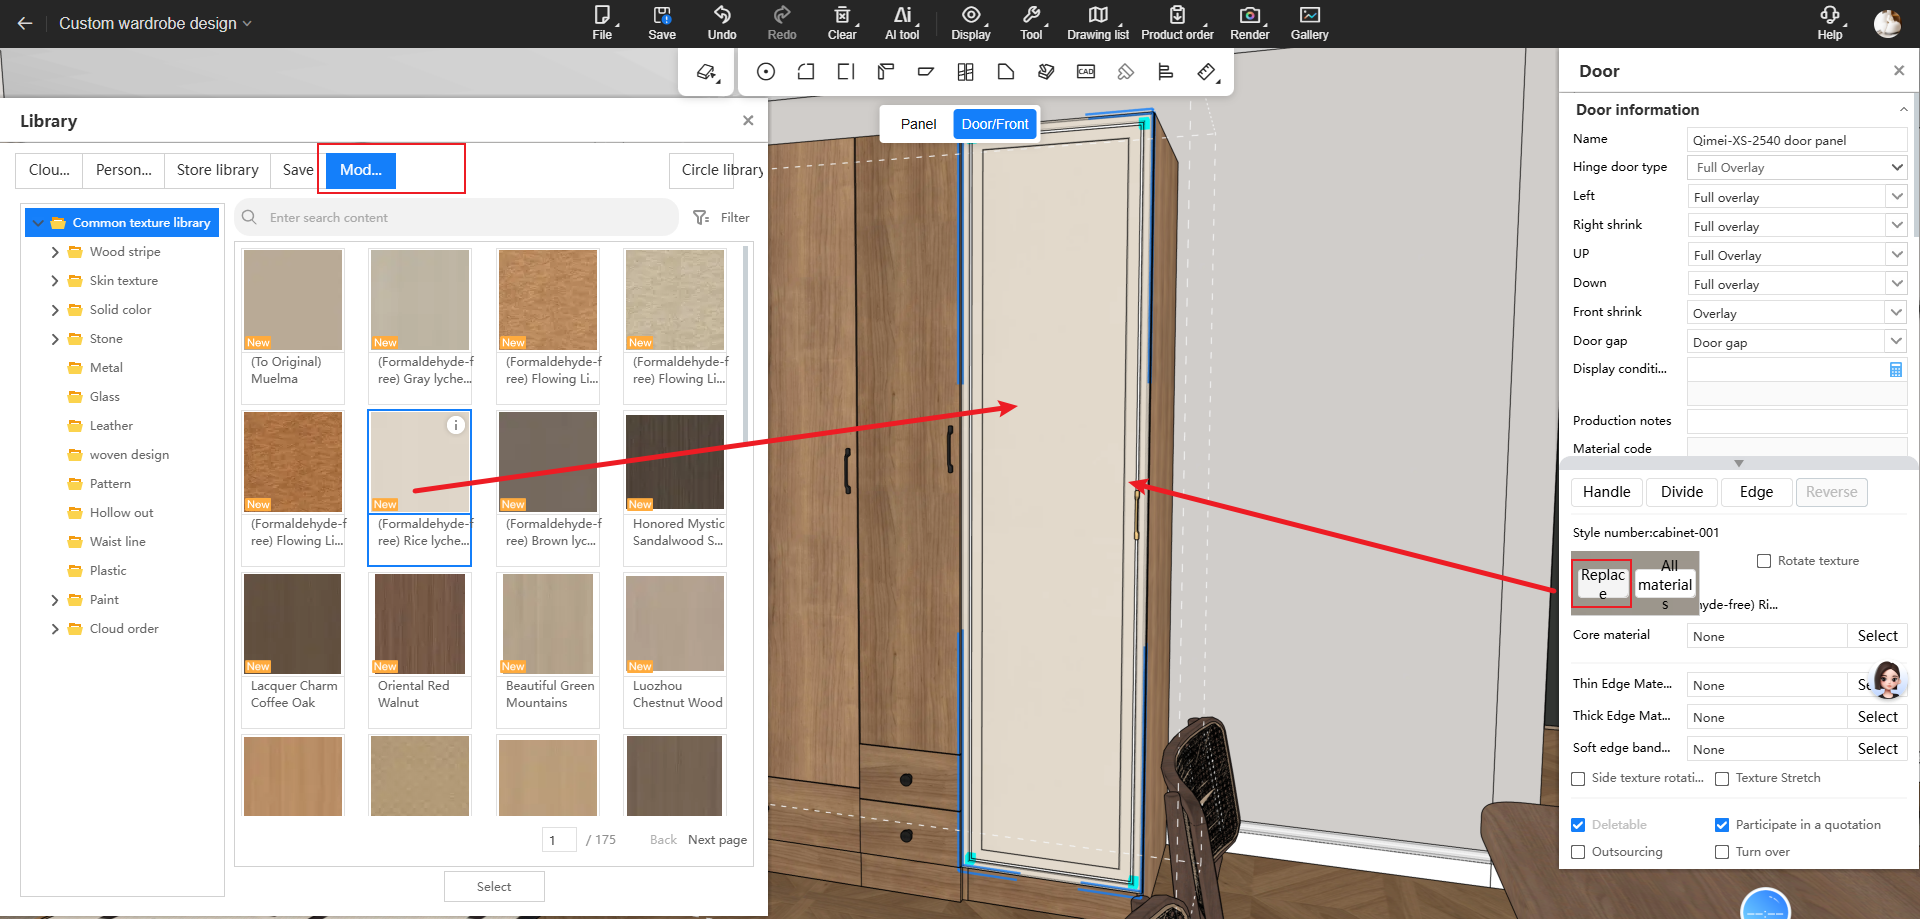
6. Replace Materials with Asset Plaza Textures
Highlights:
- Replace materials with textures from Asset Plaza - previously, Asset Plaza textures could not be retrieved when replacing materials.
How to Use:
- Open an AiHouse project and enter the Cabinets & Wardrobes module.
- Click a material entry such as a cabinet or door panel.
- Open the replacement panel, switch to the Asset Plaza tab, and select a material to apply.
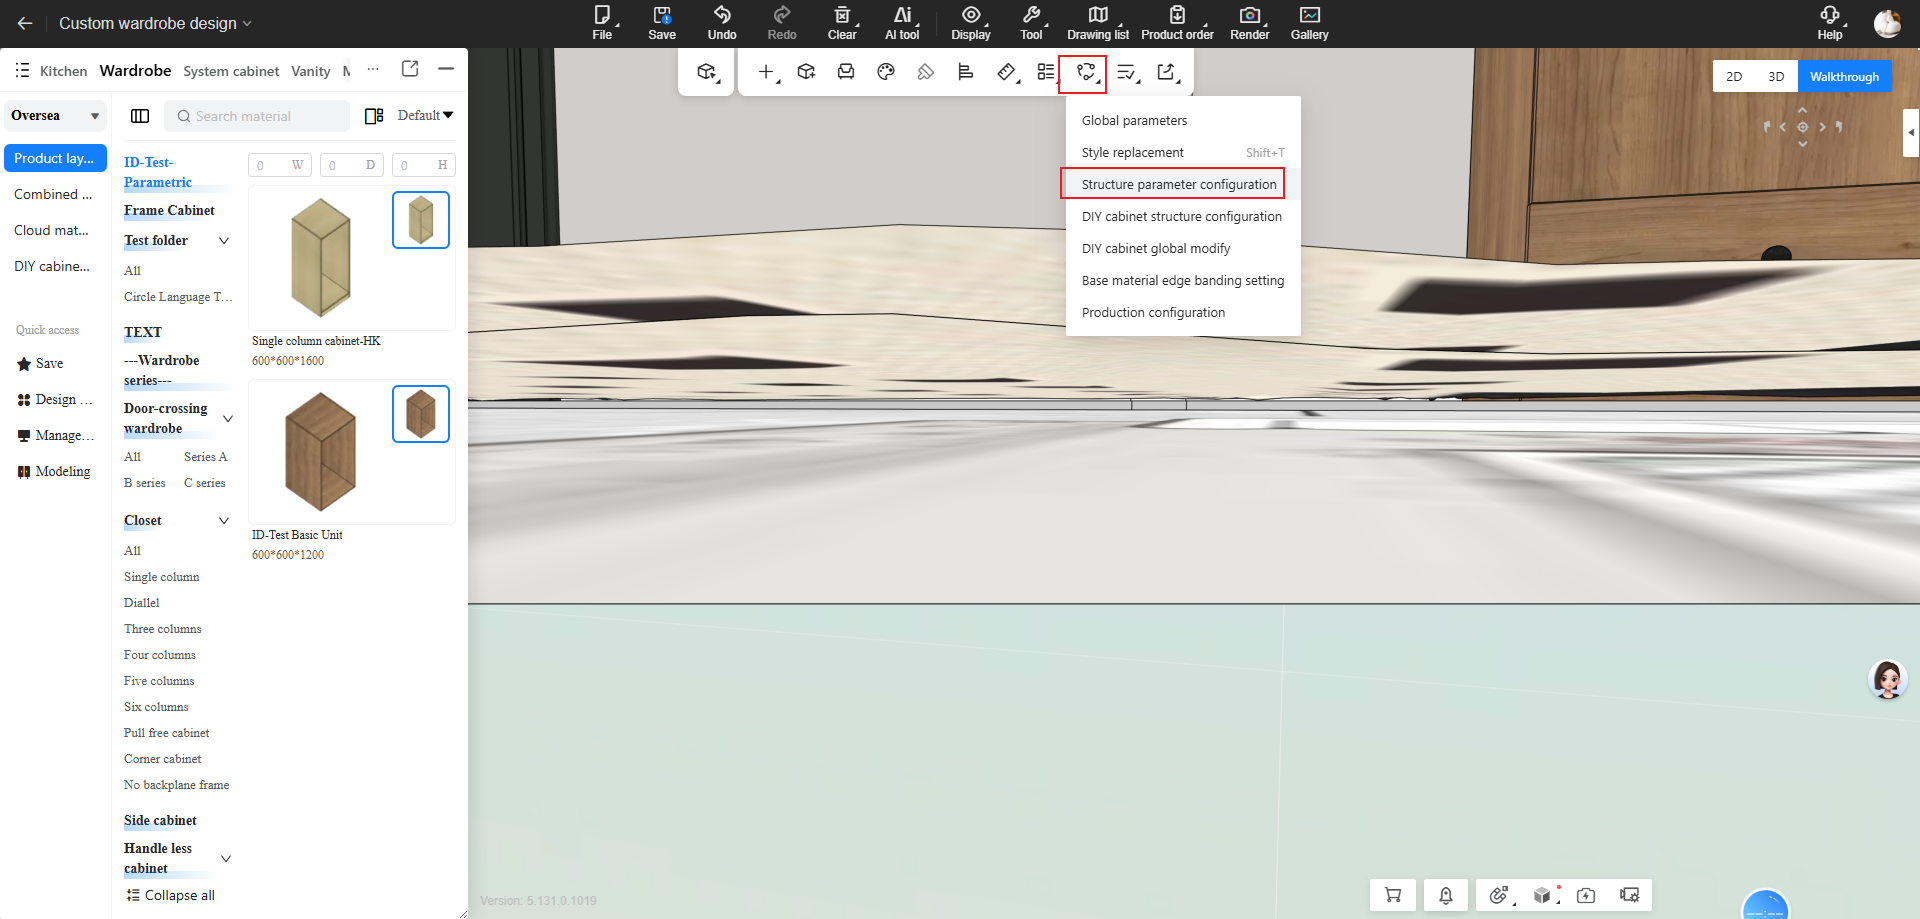
7. Apply Process Parameters to Same Type
Highlights:
- Adds “Same Type” to the application scope of process parameters, so you can apply parameter changes to similar objects at once.
How to Use:
- Open an AiHouse project and enter the Cabinets & Wardrobes module.
- Modify process parameters and select the application scope.
- Choose “Same Type” or another scope.
- Confirm the result.
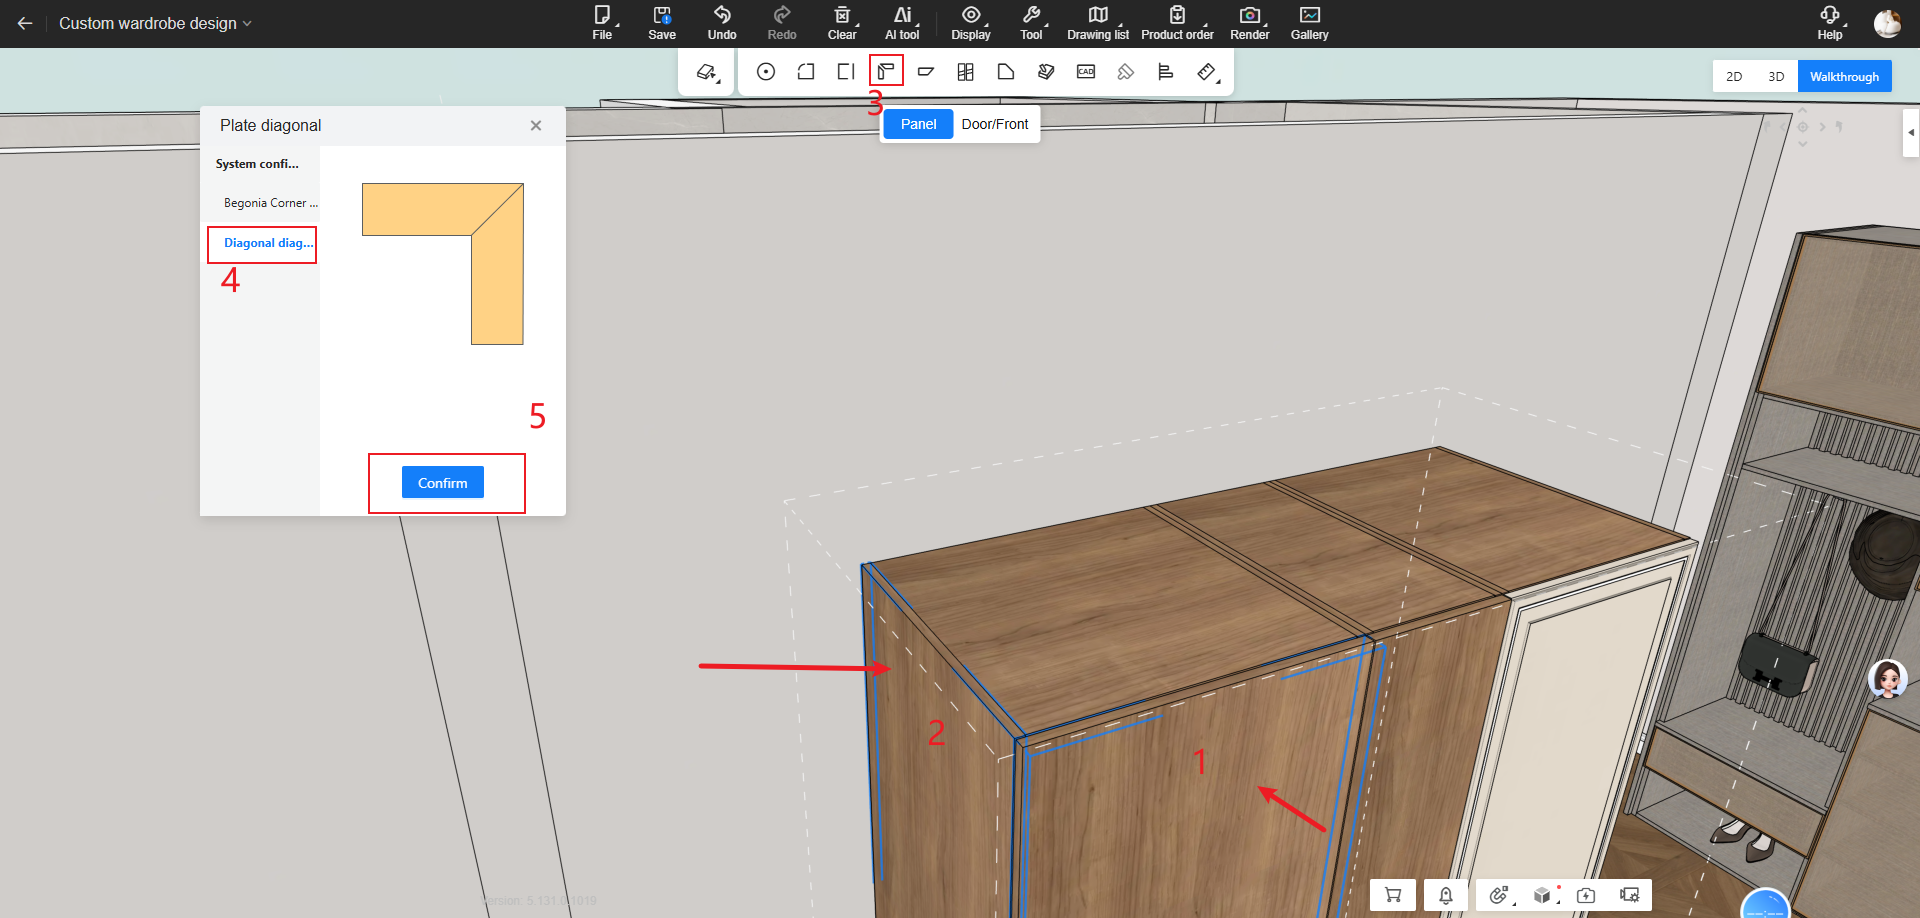
8. Mitered Joints Between Door Panels and Cabinet Panels
Highlights:
- Supports mitered joints between door panels and side panels to meet special cabinet design needs.
How to Use:
- Open an AiHouse project and enter the Cabinets & Wardrobes module.
- Enter Panel mode and select the door panel and panel.
- Click Mitered Joint in the top menu, configure settings, and confirm.
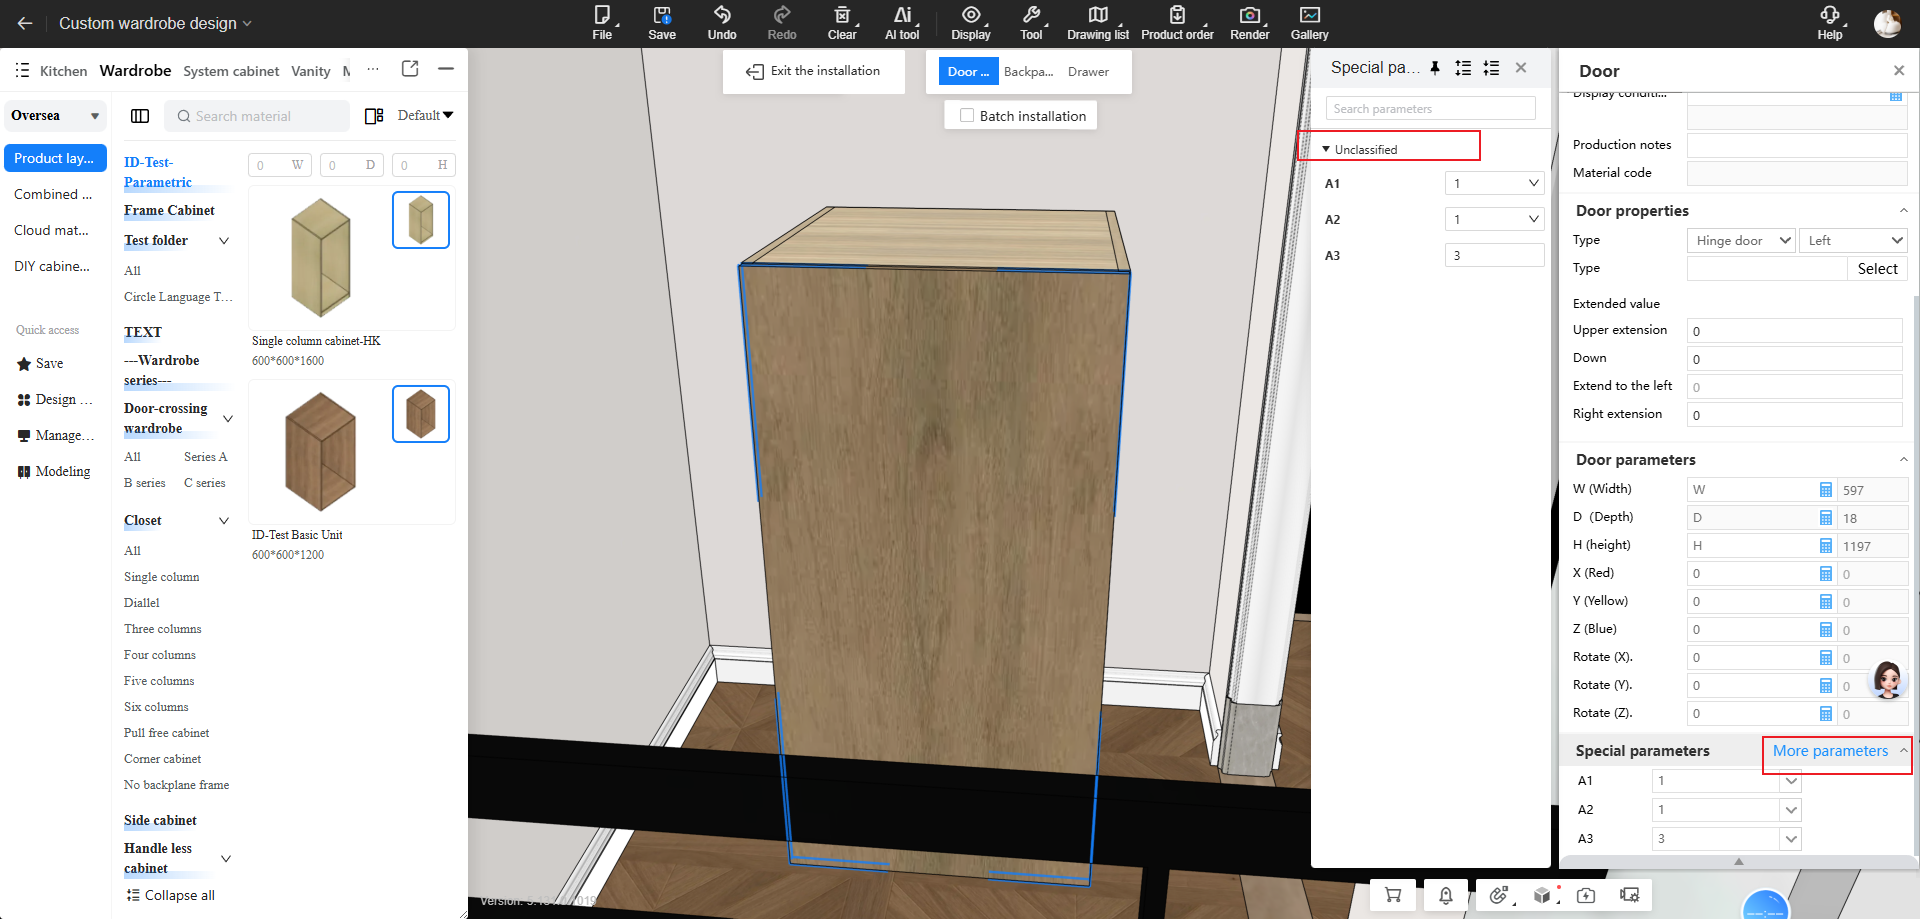
9. Door Panel Parameter Categories Now Displayed on the Front End
Highlights:
- Displays door panel parameter categories configured in the backend, so you can view and edit by category when there are many parameters.
How to Use:
- Open an AiHouse project and enter the Cabinets & Wardrobes module.
- Select a door panel and open the door panel parameter panel.
- View and edit target parameters by category.
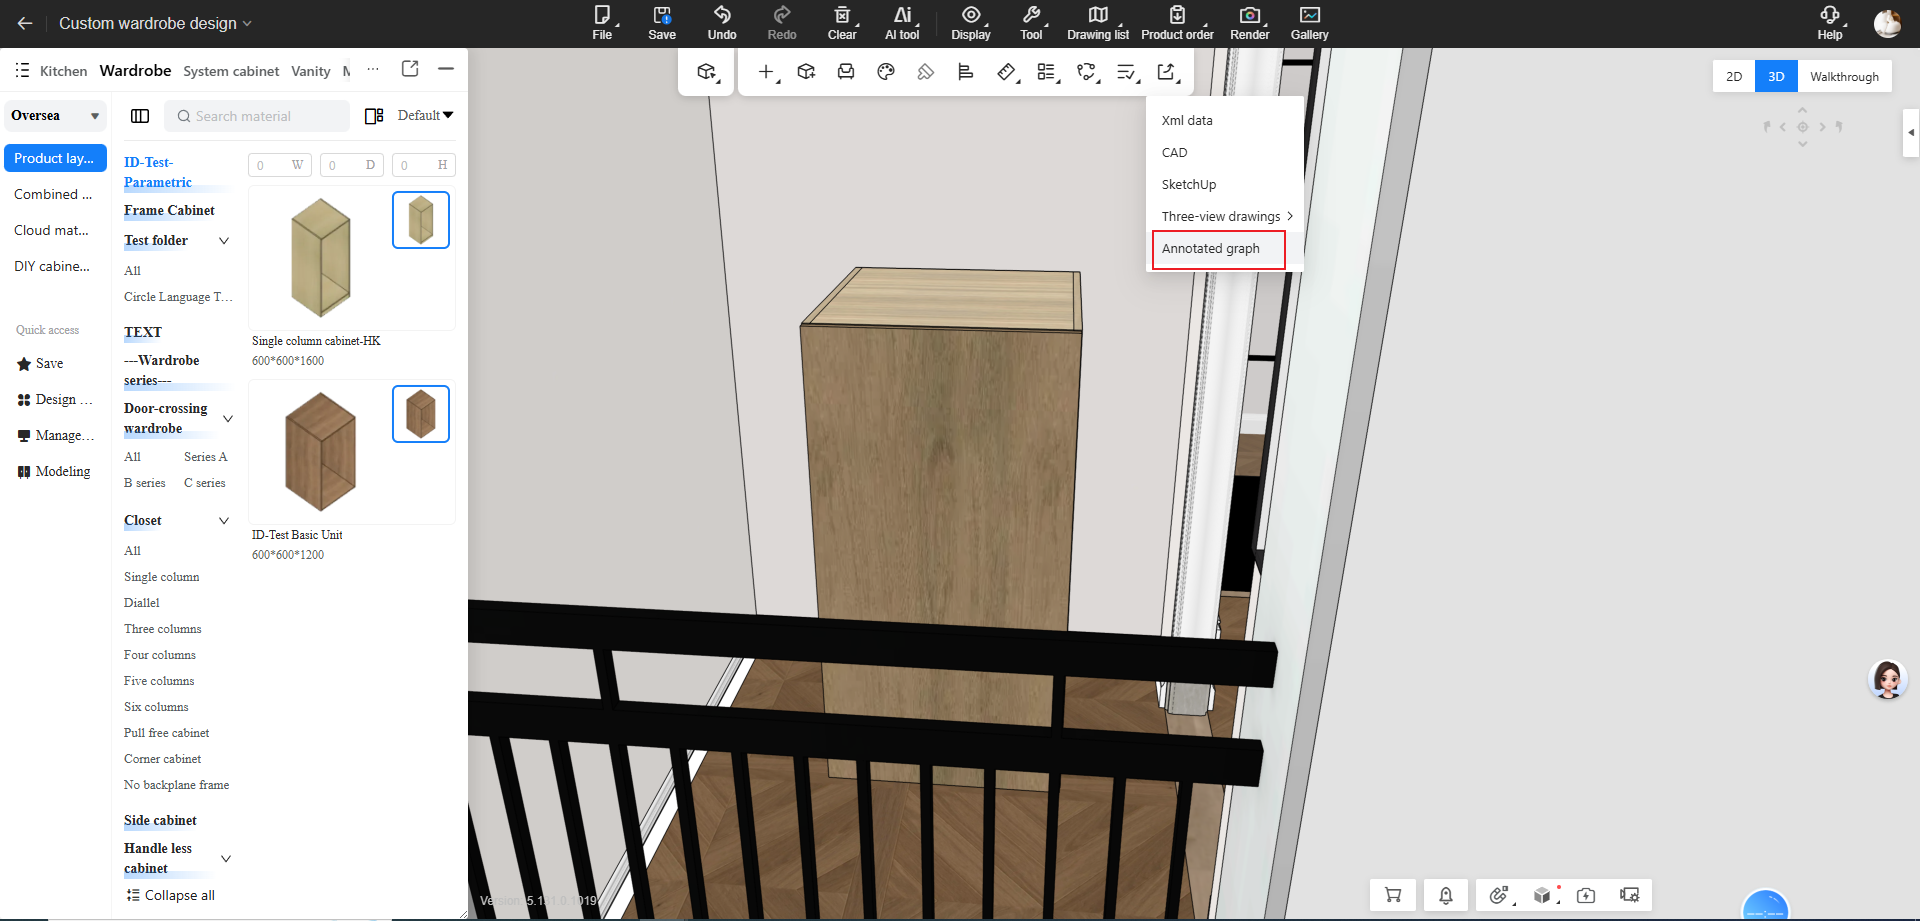
10. Precise Measurement Added to Annotation Mode
Highlights:
- Precise measuring is added to the layout annotation page, so you can obtain space and object dimensions more accurately.
How to Use:
- Open an AiHouse project and enter the Cabinets & Wardrobes module.
- Go to the annotation drawing page, select the Precise Measurement tool, and choose the object or position to measure.
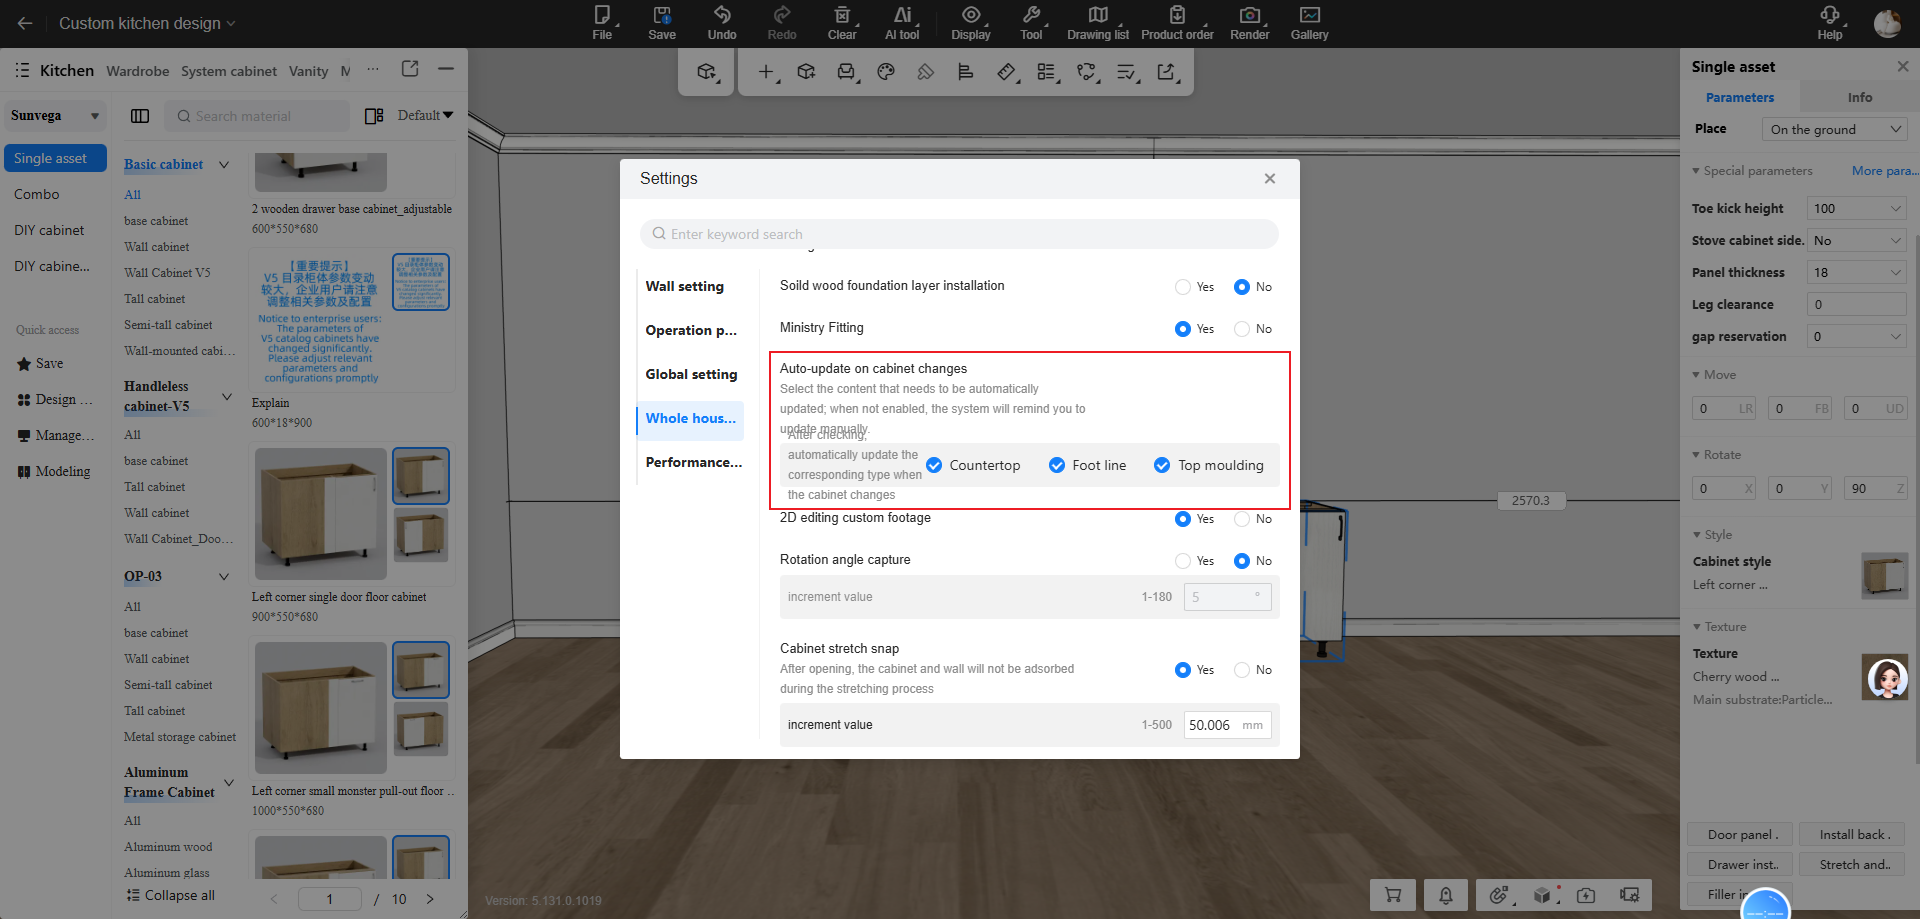
11. Automatic Countertop Updates
Highlights:
- After cabinets are added, deleted, moved, or resized, the system can automatically update affected countertops, top trim, and base trim according to account settings. If auto-update is off, you are prompted to confirm.
How to Use:
- Open an AiHouse project and enter the Cabinets & Wardrobes module.
- Go to Settings > Whole-House Customization > Auto-Update When Cabinets Change and enable “Countertop” as needed.
- Add, delete, move, or resize cabinets.
- If auto-update is on, countertops update automatically; if off, choose “Update Now” or “Keep Current” when prompted.
- During updates, the system first re-adapts the main countertop, then handles backsplashes, cutouts, side countertops, and stepped countertops.
Note: Old countertops in historical projects are not updated; delete and regenerate them before the new countertop can use auto-update.
12. Top Trim and Base Trim Updates
Highlights:
- After cabinet changes, top trim and base trim can update automatically based on account settings or be confirmed manually in the editing panel, preserving existing parameters where possible.
How to Use:
- Open an AiHouse project and enter the Cabinets & Wardrobes module.
- Go to “Settings > Whole-House Customization > Auto-Update When Cabinets Change” and enable “Top Trim” or “Base Trim” as needed.
- Add, delete, move, or resize cabinets.
- If auto-update is on, the matching top trim or base trim updates automatically; if off, choose “Update Now” or “Keep Current” when prompted.
- During updates, the system preserves existing path, profile, material, edge banding, and corner settings where possible.
Note: Top/base trim and freehand-drawn lines in historical projects are not included in this auto-update.
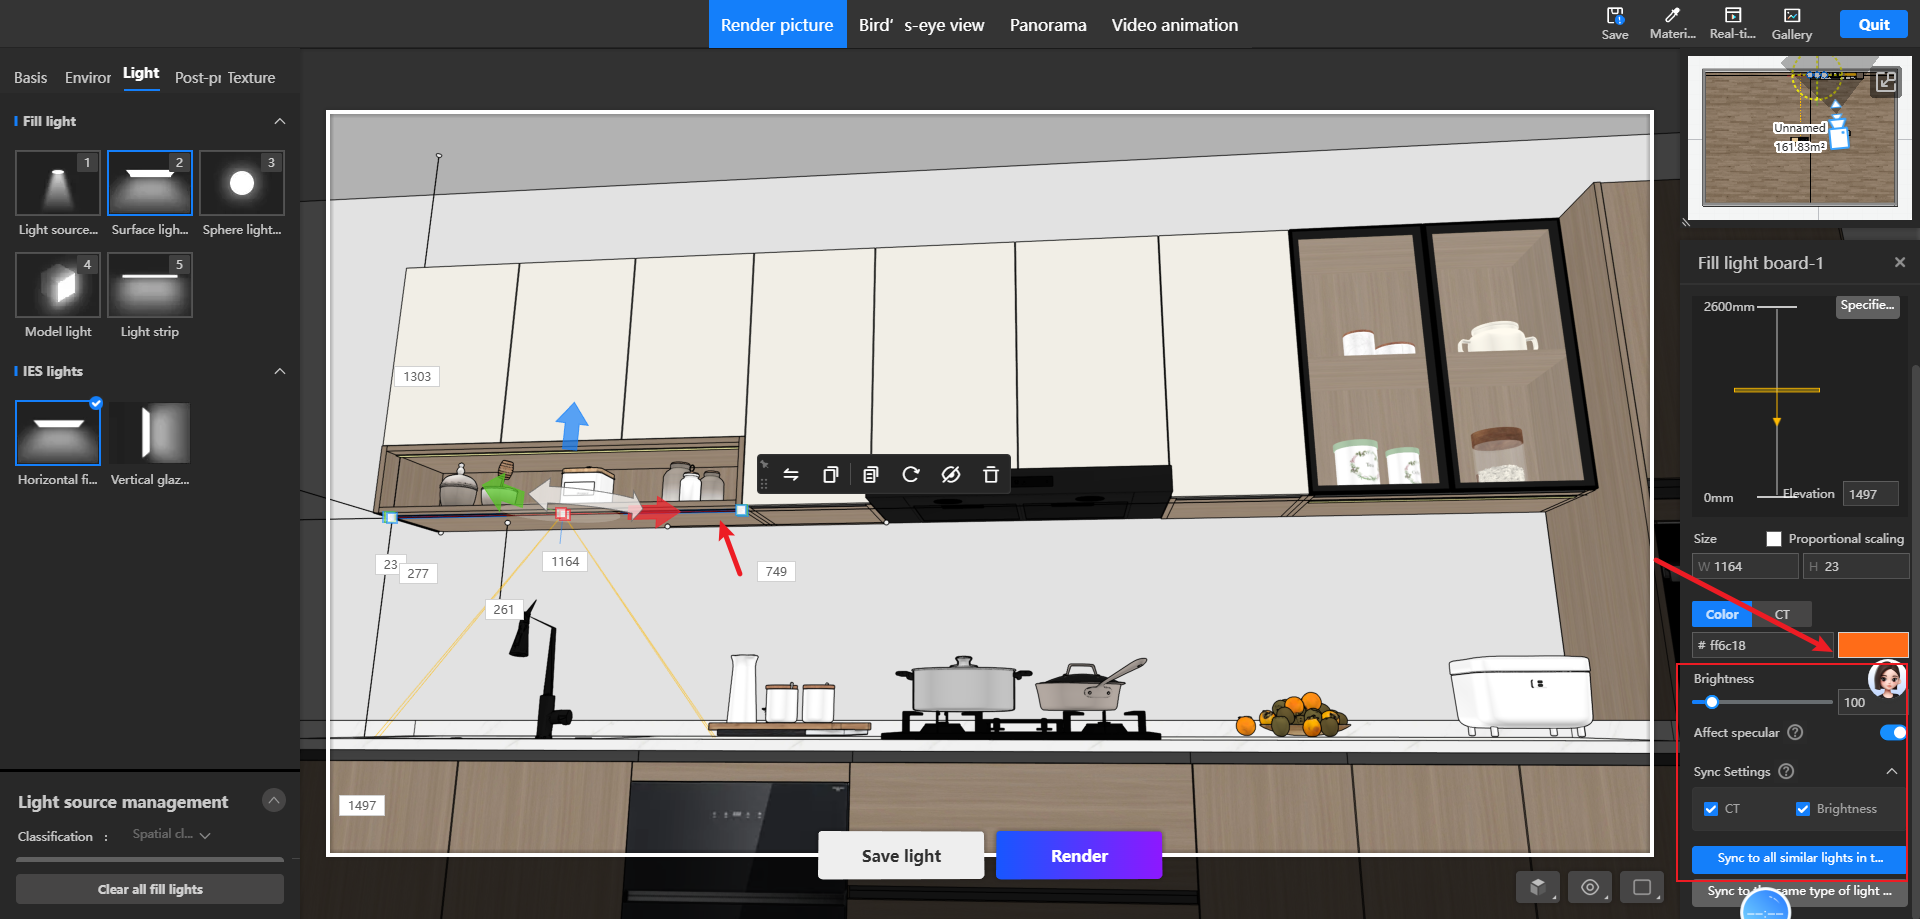
13. Select Custom Cabinet Lights and Light Strips in the Render View
Highlights:
- Select custom cabinet lights and product light strips in the render view, and toggle whether light strips affect highlights.
How to Use:
- Open an AiHouse project and enter the Cabinets & Wardrobes module
- After installing lights with modeled light on cabinets or panels, enter the render view.
- Select modeled lights on cabinets or panels directly.
- Adjust whether highlights are affected.
14. Grain Matching
Highlights:
- A Grain Matching tool is added to Panel mode.
- Grain-matched panels are managed by group, with in-group adjustments and whole-group texture rotation.
- Supports MCS integration.
How to Use:
- Enter Panel mode and use the Grain Matching tool.
Note: Grain-matched panels must share a common edge.
Construction
1. Opening Drawing
Highlights:
- Draw openings freely on walls at actual dimensions.
- Opening positions and sizes can be adjusted at any time.
How to Use:
- Draw the floor plan, then select the opening type from the component panel on the left
- Place a standard opening or enter freehand drawing mode
- Draw along the opening, then click Finish to generate it
- Check the opening position and save the project.
Note: Overlapping openings are merged into one cut, while the opening objects remain separate.
2. Free Modeling Supports Business Attributes
Highlights:
- Free Modeling components can be bound to business attributes and identified, filtered, and reused in subsequent workflows.
- After editing business attributes, the object supports moving, resizing, deletion, locking, and snapping or alignment with other objects.
How to Use:
- In Free Modeling, group the entities that should receive attributes
- After grouping, select the entity and assign business attributes
Note: The entity must be grouped before business attributes can be assigned.
3. Free Modeling Walls Support Doors and Windows
Highlights:
- Free Modeling walls support placing door and window components directly.
- Doors and windows remain editable as walls are adjusted and adapt automatically to wall changes.
How to Use:
- Assign the Free Wall attribute to the Free Modeling wall.
- Drag doors and windows onto the wall, or double-click the wall in the Aluminum Doors & Windows module to enter the drawing canvas.
Note: The Free Modeling entity must have the Free Wall business attribute before doors and windows can be placed. The entity must have wall characteristics: six faces forming a closed standard solid object.
Aluminum Doors & Windows
1. Folding Door Design
Highlights:
- Quickly design folding door schemes and adjust the number of leaves.
- Leaf count, size, and opening direction are previewed together, with a direct 3D preview model.
How to Use:
- Double-click a project to enter “Aluminum Doors & Windows” drawing.
- Select a folding door type and place it in the target opening.
- Adjust leaf count, size, and opening direction.
- Confirm the preview and save the project.
Note: After generating folding door leaves, to change the leaf design method, remove the current area and drag to generate the folding door leaves again.
2. Shaped Windows Support AI Render Generation
Highlights:
- Shaped windows can generate AIGC scene renderings, quickly presenting the design atmosphere and scheme effects of complex window shapes.
- Broad coverage: supports shaped windows, planar arcs, 3D arcs, and 3D arc corner windows.
How to Use:
- After drawing shaped doors and windows, enter the AIGC rendering page.
- Select the shaped window component and open the render generation entry; configure the position mask parameters as prompted.
- Choose a scene or style and start generation.
- Wait for generation to finish and view the shaped door/window rendering files.
Note: Generated results are for presentation reference only. Some 3D arcs may have jagged edges; resubmit the render task if needed.