
Feature Updates
Monthly Updates
- July 2026
- April 2026
- February 2026
- January 2026
- December 2025
- November 2025
- October 2025
- September 2025
- August 2025
- July 2025
- June 2025
- April & May 2025
- March 2025
- February 2025
- January 2025
- December 2024
- November 2024
- October 2024
- September 2024
- Photo Gallery - Categories
- Photo Gallery - Recycle Bin
- Photo Gallery - Large Image Browser
- August 2024
- July 2024
Drawings and Quotation
Drawings
- How to export cabinet CAD drawings
- How to import CAD into the board for special-shaped modeling
- The rendering have been queuing up for a long time
- How to save half of the drawings
- Where are the download drawings?
- How to Settings CAD Drawing Logo in Software
- How to export the model space drawing
- How to send the finished drawings to the customer's mobile phone
- Ceiling drawing export
- One-click export of Tile flat drawings
- How to export CAD Construction drawings
- How to delete imported drawings
- Floor plans and Unfinished Drawings
- Specifications for Imported Floorplan Image and CAD
- CAD Frame Upload Tutorial
Get Started with AiHouse
Software Introduction
- Beginner guidance
- How to save skp file as old version
- How to replace texture in SKP?
- How can I set the graphic card of higher performance to run Aihouse?
- Account information setting
- Why is the font size so small/large in 3D Cloud Design?
- How to change the project name?
- How to upload a floor plan?
- Why are the previous projects missing?
- How do I switch back to the old version?
- How to draw a wavy line?
- Why is the ceiling not showing after placement?
- How do I hide the floor plan?
- How to clear the browser cache?
- Freehand wall drawing
- How to modify the material of a finished model?
- How to cut a hole in the wall?
- How to view the history log?
- Where can I find models and textures?
- How do I hide the floor plan?
- Where can I find study materials?
- How to add doorways?
- How to perform software settings?
- How to view the shortcut keys?
- How to use tempanels?
- Why can't I rotate with the right-click?
- Why does it lag during operation?
- Computer configuration requirements for software use
- Browser recommendation for running AiHouse
- Why are the shortcut keys not working?
Getting Started
- How to use my materials
- How to log out of the account and switch accounts
- Why is the login account and password always reminded of being wrong
- How to add sub-accounts
- How to enter the wireframe mode
- How to find a designer for the design plan
- System Logo Setting
- Computer configuration recommendation
- How to register an account
Software Basic Operations
- Combination model supports replacement function
- Material library - The material library pop-up box in customization is adaptive to the screen size
- How do designers upload models
- Space type adds "Master Bathroom"
- Quick search / filter model
- Left navigation collapse/expand shortcut keys
- Add the shortcut key function for rotating the object by 45°
- Finished product locking and unlocking
- Real-time preview rendering effect
- How to view the current version
- Mouse operation habit optimization
- Object toolbar optimization
- Design common shortcut keys
- How to set the transparency of the wall
- For beginners
- How to enter the design interface
- The layout display optimization of the canvas
- Optimize the dragging and adsorption of materials in 2D and 3D
- How to modify the size of ornaments
- New history record
- How to make custom cabinets not be limited by craftsmanship
- "About" panel adds key information
- Model saving logic optimization: models not authorized by the creator cannot be saved
- Style rendering optimization
- Camera Settings
- Optimize the top menu
- How to delete unnecessary carcass panel
- How to quickly switch scenes
- My collection directory page, add custom directory sorting
- Finished product combination mirror image function
- How to save the project
- How to change the moving speed
- How to measure the distance on the floor plan
- Top menu adds a shortcut entry for the custom module
- Application effect to increase color temperature and brightness of the same product
- Set and hide the space name
- How to adjust the perspective
- Basic module supports placing ornaments in the cabinet
- Why doesn't the wall drawing adhere
- Object controls (movement, rotation, scaling)
- How to save the floor plan
- Custom shortcut keys
- Search Images by Image - Effect Optimization
Q&A
- How to view the content of software updates
- How to save local files
- Why is the operation stuck?
- How to make holes in the original ground
- Why is there no change even after adjusting the floor height
- Why opening the plan only shows the cabinet
- Can't find the previously designed plan. How to deal with it
- Why was forced to log out
- How to view the validity period of the package
- What is the shortcut key for copy and paste
- How to add windows to circular arc walls
- Why does a prompt for a long time of no operation on the software pop up
- Why there is no ceiling
- How to change the display ratio of the browser interface
- How to zoom in and out the client window
- Why does it prompt that it cannot be saved when clicking Save
- How to set the path for saving files
- How to mirror the house type
- How to clear the browser cache
- Manufacturing System - JEGA Lite for Production
- Furni AI Question
- Contact Us-Request a Sales Demo or Get Support
Rendering
Rendering Lighting
Rendering Setting
- How to deal with the rendering of the ceiling without the light strip effect
- Real-time rendering
- Model self-illumination setting
- New lighting template
- Snapshot interaction optimization
- How to enhance the quality rendering
- Specified irradiation direction setting of supplementary light
- Later parameters - Bloom
- Lighting template adds five brightness levels
- How to adjust the rendering angle
- How to render the picture with lighting
- Custom upload of exterior scenes
- Different supplementary lighting effects
- What is the reason that the downlight model cannot be seen in the rendering image
- Understanding solar light settings
- Snapshot re-shooting function
- Later parameter adjustment
- Understand rendering quality and resolution
- Depth of field rendering
- Real-time rendering queuing
Q&A
- How to use the camera shear
- How to view panorama
- How to modify the name of the panoramic image tag
- Why can't the panoramic editor add scenes
- Why will rendering be exposed
- Why is the rendered image very blurry
- Why the rendering remains unchanged after the model modifies the material
- Why is there no ceiling when rendered
- Why is the water jet not displayed in the rendered panorama
- How to replace the watermark of the effect picture?
- The difference between bird's-eye view and effect drawing
- How to render the renderings
- Why there is no render button
- Why will rendering be queued
- How to modify the exterior view image
- Why is NO Photo displayed or the rendering fails
- How to add renderings in the panorama
Panorama
- Hot topic tags how to modify and delete
- How to associate the scene space of the panoramic image
- Scene addition
- How to modify the default scene of the panorama
- How to add background music to the panorama
- How to merge the panoramic views of the two schemes
- How to change the panoramic rendering record
- Short video production method
- How to make the shared panoramic image invalid
- Panoramic Image Rendering Tutorial
Render
- How to render a more realistic renderings
- How to render a small space
- How to handle the lighting of the aisle position
- How to render the arial view
- Why does an exterior scene appear during rendering
- Why the rendered image has no ceiling
- Why are there many rendering noise points
- Why does the rendering fail
- How to associate and edit the new panorama
- Why the rendered picture turns black
- How to use supplementary lighting
- How to set advanced lighting
- How to modify the color of the light
- What kind of angle is the best for rendering the renderings
- Why is the rendering displayed in the line
- Why does an exterior scene appear during rendering
- Rendering Tips
- AI Rendering Guide
- AiHouse AI Credits Usage Guide
- AI Video
Design Material
Textures
- How to upload textures
- How to add single-sided wall wallpaper
- How to add/change the ground material
- Where is the wood grain texture map
- How to delete the divider line
- How to divide the area
- How to draw the skirting line
- Where is the metal texture mapping
- Where is the leather texture mapping
- How to replace the material color of the finished model
- How to delete wallpaper
- How to delete the divider
- Where is the metal texture mapping
- Why divide the area
- How to replace the material color of the finished model
Model and Texture Uploading
- How to add downlights on a flat ceiling
- Where is the corner guard board
- Finished product - Model processing
- How to upload and use custom tiled tiles
- Where is the decorative cabinet rack
- Tutorial for making balcony cabinets
- How to make a glass wall
- Seamless processing of the pasted image
- Where is the universal light strip
- How to do integrated ceiling
- Where is the wallpaper
- Where is the wainscot
- How to add circular LED strips
- Where is the railing
- Where are the lamps?
- Where is the single sliding door
- Where is the grid model
- Finished model upload
3D Models
- Where is the full-length mirror
- How to make the furniture against the wall
- How to hide / show the model
- How to groupand ungroup the model
- How to mirror the model
- How to hide or restore the model
- Where is the mirror
- Why does a certain model still show up even after being deleted
- AI room intelligent layout
- How to embed a squat toilet in the ground
- How to adjust the model size
- How to make concave-convex shape cabinets
Common Models
- How to modify the beam sticker material
- Where is the mahjong table
- Where is the fish tank
- Where is the coat rack
- Where is the pipeline
- Where is the natural gas meter
- Where is the exterior scene?
- Where is the socket
- Where is the piano
- Where is the soft-packaged background wall
- Where is the wine glass
- Where is the frameless glass
- Where are the heater
- Where is the bunk bed
- Where are the cosmetics
- Where is the hook
- Where is the exterior scene?
- Switch? Where?
- Where is Tatami?
- Where are the wall-mounted bookshelves/shelves?
- How to modify the beam sticker material
- Partition screen
- Where is the upholstered bed?
- Where is the buddha statue?
- Where is the wine?
- Where is the mattress?
- Where is the bead curtain?
- Where is the piano?
- Where is the antique shelves?
- Where is the gas meter?
- Where is the soft background wall?
- Where is the wine glass?
- Where is the frameless glass?
Construction
- How to add platform
- How to remove toe kick/top molding in a single space
- How to add beam
- How to adjust door/window elevation
- How to use Free modeling
- Corner bay window
- How to draw a balcony
- How to change ceiling light color
- How to draw opening
- How to add ceilings
- How to draw stairs
- How to adjust the direction of door
- How to pull down kitchen/bathroom ceilings
- How to draw curved ceilings
- How to add a bay window
- How to create a outdoor garden
- How to use platform to design stairs
- How to draw a threshold stone
- How to make a sun room
- How to add top molding/toe kick
- Doors & windows not showing
- How to add a central air conditioner on the side of the ceiling trend
- How to Draw Curved Ceilings
Model Design Tools
- How to place Chandelier
- Decoration model layout and Settings
- Finished product material brush
- Model Mirroring Settings
- Intelligent Recommended Products
- The material squares
- How to restore the original material of the model
- model array
- How to quickly find soft furnishings
- How to quickly align the finished model
Furnishing Customization
Wardrobe / system Cabinets
Unit
- How to install lights for L-shaped cabinet
- How to place a light panel with a top cabinet
- Cabinet body stretching and dimension modification
- How to make Tatami
- How to add back panel
- How to add a door of corner cabinets
- How to ungroup
- How to make a divider cabinet
- How to make a triangular cabinet
- How to use the inner space display
- How to modify cabinet elevation
- How to operate the cabinet corner cutting
- How to make a stair cabinet
- Where is the arc cabinet?
- How to make Tatami
- How to make a drawer
- Where is the push-pull cabinet?
- How to export Cabinet wardrobe CAD
- How to add door hinges and other accessories
- How to use wall paneling
- How to make a wall wardrobe
- How to collect the grouped cabinets
- How to place the closing board
- How to place roman columns with top cabinets
- Special-shaped plate editing
- Why is the cabinet made of plates not on the list of collections after collection?
- How to ungroup a group cabinet
- How to use the annotation
- How to add back panel
- How to rotate groups
- Sliding door wardrobe tutorial
- How to draw wardrobe tatami desk
- What to design corner desk
- How to make wine storage
- How to copy the cabinet?
- Corner cabinet template add top cover side settings
- Where is the corner cabinet
- How to place a roman column with a top cabinet
- How to install cabinet filler
- How to design bay window cabinet
- How to make an arched arc cabinet?
- Why is there no product layout category for the customized module?
- How to make a bevel desk
- How to stretch the cabinet
- Why is there no design library in the custom cabinet module?
- How to add cabinet shelf lights
- How to design a sliding door cabinet
- Where is the slopped frame cabinet?
- Customized left free cabinet library classification display
- Where is the hands-free cabinet?
- How to add side panels
- Free cabinet design tutorial
- When the size of the cabinet is changed, the interior accessories of the cabinet move along
- How to align the cabinets
- How to check the distance between cabinets
- How to modify the size of the board separately?
- How to use the cabinet bevel cut
- How to mirror the customized cabinet
- Plug-IN Installation guideline for CAD cabinet/panel profile import
Function Parts
- Where is the arc shelf?
- How to use the parametric wine rack
- The use of plate uniform distribution function
- Why can't the material of Roman columns be modified?
- Filler position
- How to add cloth rod?
- How to add a mirror?
- How to modify the material of the light board
- Back panel of the cabinet how to change to glass
- Why does the lintel disappear after modifying the size of the lintel?
- How to add a vitical board
- How to modify the handle size?
- How to add edge banding and modify the material of the laminate of the cabinet?
- Where are the feet of the custom cabinet?
- Where is the arc filler panel?
- Generating filler, corner cutting plate supports application of process parameters
- How to place the slopped filler
- Where is the adjustable arc plate?
- How to change the size of the drawer?
- Translational alignment supports parametric panels and functional components
- Where's the bevel shelf?
- When placing a function part, it prompts that the function part does not belong to this unit
- Why do drawers jump out of the door wardrobe after adding?
- Import CAD modeling function to increase board editing permission verification
- Plate point editing is optimized at the edge
- The specific location of the horn handle
- Create drawer with new stepped opening
- Vertical plate uniform distribution prompt is not parallel to the object selected for the first time
Door
- Generate multiple doors added symmetrical opening settings
- How to modify door core to louver
- Door show, hide support settings shortcut key
- How to generate a door cover for a pentagonal cabinet(
- How to make a door shape with a light board
- How toopen the cabinet door
- How corner cabinets generate doors
- How to design an aluminum frame glass door
- Generate door scaling settings
- How to make a grille door panel
- How to divide doors precisely
- Where is the gold frame door panel?
- How to edit an arched door hole on a Door(门板上怎么编辑挖拱形门洞)
- How to change cabinet door to flip door?
- Door batch extension
- How to replace a handle free door
- How to quickly modify the size of the sliding door waistline
- Generate door panel cover value adaptation
- How to replace glass doors?
- How to change door waist line
- How arc cabinet generates doors
- How to install staggered external door
- Generate door, drawer location base settings
- Door opening angle, drawer opening proportional settings
- How to make a slant door
- How to turn a door into a drawer
- Why is the door black?
- How to make a door shape with a light board
- How to change door to inner or outer cover
- Drag and drop function components to the cabinet door panel for automatic hiding
- How to replace a handle free door
- How to replace glass doors
Molding Line
- How to generate a single cabinet kick board
- How to add arc top molding
- How to make the gypsum line go around the wardrobe
- How to generate the top molding line
- How to generate a pentagon top molding
- How to add arc top molding
- How to install the bevel cabinet top and base molding line
- What should I do if the line direction is reversed?
- How to choose to generate unilateral top/base molding line
- Why is it prompted when generating a foot line that this condition cannot generate a foot line?
- How to modify toe kick material and size
- How to make an arc cabinet foot line
- How to generate a pentagon top molding line
- How to modify the texture of a line
- Why does the cabinet top line and skirting line move when generated
- Why does the topline / baseline rendering appear black?
Parameters Setting
- Function part generation drawer supports ruler change linkage
- How to use the cabinet for accurate measurement
- Ruler numerical input optimization
- Slot path supports the function of choosing whether to open or not
- How to open a hole in the plate
- Wall paneling attribute material paving adsorption
- Cabinet internals follow door cover and hardware accessories indentation
- How to edit a board into beveled cuts
- The designer can release the free editing of array objects
- Multi-selection doors can add structure connectors
- How to move the panel
- Drawing annotation auxiliary settings
- Free cabinet global parameter application
- Retail users block personal production configuration entry
- Plate modeling editor adds a list of production data and supports adjusting the order
- How to modify the size of the panel
- How to modify the thickness of the side panel of the cabinet
- How to round the plate
- Ruler display Add one button to mark the size of the cabinet
- [Production Check] Select hardware mode chart red display
- Plate modeling editor 1: side opening
- Cabinet corner cutting process value configuration, top baseplate corner cutting configuration
- Input parameter value exceeds limit prompt
- Feature ruler settings detailed and concise mode
- Scene filter (formerly quick select)
- 2D interface optimization of plate modeling editing
- How to rotate the cabinet
- Plate modeling edit 3: select points to increase the ruler to modify the distance
- Operation optimization of stretching and ruler changing function
- How to display cabinet parameters
- Automatic hidden door function for placing function pieces and accessories added switch control
- Groove path supports adding knife section function
- Plate styling edit 2: ruler spacing, mesh settings
- Free cabinet parameter grouping settings
- Panel Division for Parametric Cabinets
Texture
- Why can't the frame door modify the material of the middle door core?
- How to modify all door core materials
- How to modify the materials of different plates in the same cabinet?
- How to modify the material of door core
- How to rotate the material
- How to modify the material of the door border
- Why hasn't the rendered material changed?
- Why hasn't the rendered material changed?
- How to change the materials of the upper and lower tracks?
- Why can't the lintel modify the material?
- Why don't highlight doors render reflective effects?
- Why is the material library not displayed?
- Why is the rendered material different from the actual one?
- How to make the color of finished furniture and customized furniture uniform
- How to change the texture size
- Where is glass texture?
- Why can't the material brush be used?
- How to modify the cabinet material
- How to modify all door panel materials
- Replace material packs to add search function
Custom wood door and window
Q&A
- Solid wood how to add engraving
- Solid wood door replacement Lock
- How to open the room door
- Solid wood set line how to add foot pier
- Solid wood casing how to install the casing thickened strip
- Solid wood installation wall light strip
- How to install foot piers on Solid wood wall panels
- How to change solid wood door size
- How to copy solid wood windows
- How to paint the color of solid wood wall panels
- How to hide solid wood doors
- Solid wood threshold stone how to change color
- Solid wood module how to remove the door lock
- Solid wood wall panels paving evenly
- Solid wood door replace the casing line style
- How to group solid wood
- Solid wood add material right click - New background floor design entrance
- Solid wood how to add Door roof?
Aluminum Door and Window
Q&A
- How to change the material of aluminum doors and windows(V5)
- How to modify the door top window size of aluminum doors and windows (V5)
- How to design custom aluminum doors and windows
- How to modify the color of aluminum door and window glass(V5)
- Aluminum corner doors and windows(V5)
- How to export aluminum doors and windows CAD(V5)
- How to set aluminum doors and windows opening direction(V5)
- How to change the color of aluminum doors and windows door core(V5)
- How to hide\collect aluminum doors and windows(V5)
- How to move aluminum doors and windows(V5)
- How to install custom aluminum doors and windows handles
- How to set aluminum doors and windows size(V5)
- Aluminum doors and windows copy\delete(V5)
- Tutorial for custom aluminum doors and windows
- How to open aluminum doors and windows
Kitchen Cabinets
Molding Line
- Top molding can not add
- Base molding line material modification
- Why is it prompted when generating a foot line that this condition cannot generate a foot line?
- Why the top molding line / base molding line rendering is black
- How to install light line
- What should I do if the molding line direction is reversed?
- Top molding/foot line generation is incomplete
- How to choose to generate unilateral top molding/base molding line
Units
- How to group?
- Kitchen cabinet CAD export
- In countertop installation, the countertop is too high
- How to make a corner cutting cabinet
- Where is the arc wall cabinet?
- How to add a visible panel
- How to make a kitchen cabinet
- How to choose a whole cabinet?
- Kitchen cabinet annotation and CAD export
- Back panel of aluminum frame cabinet Settings
- Kitchen cabinet island design
- Kitchen cabinet intelligent layout
- How to align the cabinets
Countertop
- Can't edit after the advanced countertop is generated?
- How to generate high and low countertop?
- How to modify the extension value of the countertop?
- Countertop installation
- How to generate a countertop in a special-shaped space
- Why not show the sink?
- Why is there no rear water barrier on the generated countertop?
- countertop landing
- How to generate a countertop water barrier
- Why is the countertop black?
- Why does the countertop flicker with shadows
- Why can't corner cabinets avoid corners to generate water barriers?
- Why is there no back splash when generating the countertop?
- Integrated stove on both sides of the water block
- How to modify top molding line
- Countertop landing
- How to delete the water barrier at a certain location
- Can the countertop be moved?
- Counter fracture
Texture
- How to replace the material of the drawer?
- Why can't the material of the drawer panel be brushed?
- How to change texture of bar stones
- Why the material of Roman columns can not be modified?
- How to rotate custom materials
- Why is the rendered material different from the actual one?
- Why hasn't the rendered material changed?
Door
- How to divide doors
- How to change door to grid door
- How to change door style
- How to change cabinet door to flip door
- How to generate a door
- How to turn a door into a drawer
- Why is the door black?
- Why did the conversion of the drawer fail
- How to change door to louver door style
- How to make a door shape with a light board
- The renderings disappear behind closed doors
- There is no option to convert door by right clicking on the light board
- Door without handle does not install surface handle
- How to change cabinet door to flip door
- Kitchen cabinet door can't open
- Veneer mounted function parts placed on door added ruler move
- Upload door
- How to make door panel shapes with visible panels
- How to convert doors to drawers
- Kitchen cabinet door how to add ventilation hole
Construction Design
Free Modeling
Q&A
- What is the deletion operation of free modeling?
- How to use free modeling feature to design doorways
- Free modeling how to import CAD and SKP files
- How to separate free modeling faces
- Free modeling how to make a cylinder
- How to copy move free modeling models
- How to mirror free modeling objects
- Free modeling ceilings
- How to make free modeling lines smoother
- How to make a toe kick on the second floor
- I want to move free modeling objects, how to do?
- How to design arc wall paneling in free modeling
- How to stretch free modeling
- Free modeling route lofting
- Tile floor plan export in free modeling
- What are the steps to draw an inverted circle in free modeling?
- How to make a sunken ground
- How to open a hole in the original top surface of the apartment type
- How to add a window to a slanted roof?
- How to modify the material of the free modeling model
- How to design a shaped platform?
- Free modeling group/ungroup multiple models
- How to draw arc in free modeling
- SketchUp Plugin Installation Guide
Tiling
How to pave tiles
- How to make tile parquet
- How to make ceramic tile corner cut mosaic
- How to design windmill tile
- How to conduct I-shaped tiling
- How to pave herringbone tile
- How to lay bricks with rounded corners
- How to cut hexagonal bricks
- diamond tile paving
- Oblique wavy line
- How to make corrugated corner bricks
- Tile parquet explanation
- How to pave bricks with rounded corners
- Oblique wavy line
- How to do I-shaped tile design
- How to make a crosscutting line
Q&A
- Why do render bricks reflect light?
- Why is the render brick texture unclear?
- Bricks in 3D state after brick paving are not displayed complete
- How to clear tiles quickly
- Do you have a tutorial for customized tiles?
- How to make a double wave line
- Why can't I see the old version of the waterjet imported by the new version?
- How to change tile size
- How to modify the tile grout joint material
- How to modify the tile grout joint size
- How to align the tile grout joint?
- How to cancel automatic adsorption for multi-segment lines
- How to rotate tiles?
- Copy tile
- How to group tiles
- When paving tiles how to set starting point?
- How to quote tiles
- Export whole house tile floor plan
- How to pave tile to the exterior wall?
- How to add text and other annotations of the tiling floor plan
- How to pave tile to the exterior wall?
- How to change customized tile size
- Why can not select the brick?
- Why do render tiles reflect light?
- How to pave tiles continuous
- Why does the brick render black?
- Why do bricks flash and have shadows?
Water Jet
- The waterjet pattern is the treatment of splines
- Where to upload parquet
- Parquet processing failed
- How does the water jet show the grout joint?
- Modify waterjet parquet size
- Where is the uploaded parquet?
- CAD import recognition is wrong
- The imported water jet cannot fill the tile
- Enter MY shortcut key to convert domain failed
- Waterjet import tile page area missing
- Waterjet CAD line is spline curve input ipp is converted into multi-line segment CAD crash
- There is parquet's waterjet treatment in the middle
- After entering BO, it prompts that the closed boundary cannot be determined
- The processing method of waterjet graphics as block
- After entering bo, it prompts that the closed boundary cannot be determined
- Enter MY Shortcut key to convert domain failed
Construction Design Tips
- Material Brush for ustomized Models and Finished Product
- Wall material data synchronization
- Embedded Settings for Toe Kick/ Skirting Line
- One-click floor/wall paving
- Recess placement
- How to Tile Areas
- Where is the Decorative?
- Roof Balcony Design
- Finished ceilings and background wall arrangement
- How to Remove Toe kick(aka skirting line)
- How to Quickly Find Finishing Materials
- How to Settings Library Ceiling Height
Ceiling and Wall
Area Design
- Why can't the second ceiling layer be displayed in 3D after drawing the second layer ?
- How to choose more gussets
- How to generate a light trough
- How to make a chamfer on the wall
- How to get into the ceiling wall that you customed before and how to delete the customed wall/ceiling
- How to choose more gussets
- How to custom ceilings
- Ceiling CAD Drawings Export
- How to Add Light Strip to Double Layer Style Ceiling
- Why does the area disappear after painting?
- How to Draw Alien Areas
- How to Draw a Circular Area
- How to Import Special Style Ceilings in CAD
- How to import special shaped ceiling
- How to custom ceiling to the middle
- How to Go back to the Custom Mode for the Customed Ceiling or Delete it
- How to Create Ceilings
- Ceiling CAD Drawings Export
- How to change the size of the Ceiling area
- How to add lines to a flat top
- How to Draw Rectangular Areas
- How to change the size of the Ceiling area
- No Main Light Ceiling Tutorial
- Gypsum Line Ceilings
Lofting Line
- How to add a filler
- How to modify the color of the light strip on the ceiling
- How to modify the position distance of the filler
- Tutorial for Customizing Guideline Lines to Create a Background Wall
- How to mirror the Filler
- Adding Metal Strip for Ceiling
- How to delete the Filler
- How to put the multi fillers
- How to modify the Filler material
- Why the light strip on the ceiling show black in rendering
- How to add/modify light strips
- How to place skiring line(aka toe kick)
- How to delete the edge line
Irregular Design
- Array multi-panel&line in ceiling custom
- How to draw the staircase opening on the second floor
- How to Generate Unilateral Light Strip
- How to Draw Irregular Ceilings
- How to add light strips without plaster lines?
- How to shape the facade of the ceiling
- How to Make Stairs
- How to Create Irregular Wall Shapes
- Tutorial for Making Ceilings to drop down
- How to set joint type for Integrated Wall Panel
- How to Make Downstairs Ceiling
- How to shape the facade
- Tutorial for building a recessed ceiling in a 'return' shape”
- How to design a curved LED strip on the wall
- How to dig a hole in a wall
- How to make a sloping top
- Facade Custom(Draw/Offset/Place Sideline...)
- How To Build Swimming Pool
- How to make dropped ceiling with layered levels
- How to make stairs
- Tutorial for Grille Background Wall
- How to make wall panels
- How to build wall panels
Q&A
- How to install downlights
- How to Delete Ceilings
- How to Convert the straight edge to arc edge in ceiling custom
- How to install the Dado
- Customized Ceiling How to modify the distance from the top
- Why Ceilings Don't Show
- How to install aluminum beam
- Why does the rendered picture turn black?
- How to Hide Ceilings
- Where is the gusset?
- How can Ceilings leak?
- Tutorial for Arched Doorway in Background Wall
- How to Make Double-Layer Ceilings
- How to partition Ceiling
- How to deal with Black Shadow in Ceiling
- How to make a circular arc
- How to do two ceiling
- Why Ceilings Can't Be Filled
- How to do arc shape bckground floor
- How to hide or modify the top molding and skirting line(aka toe kick)
- How to design lighting line on the wall
- How to design suspended background wall
Gusset Paving
- How to increase the size of the gusset
- Why can't I see it after putting on Spotlight?
- How to change the material of the gusset?
- How to move the gusset
- How to rotate the gusset
- The difference between spaced paving and continuous paving
- How to increase the size of the gusset
- How to arrange the gussets equally spaced
- Why can't the styling strip be put on?
- Gusset rendering goes black
Floor Plan
Draw Walls
- How to draw an angled wall?
- How to create a circular hole?
- Hidden exterior wall setting
- How to display wall dimensions?
- How to edit wall shapes?
- How to make 3D fonts on the wall surface
- How to determine the position of a beam or a column?
- How to modify the height of a single space independently
- The splitting and merging of walls
- How to lock the wall
- Outer bulge drawing of the wall
- How to display the included angle of the wall
- How to select a single space for drawing
- How to modify the size of doors and windows
- How to draw inclined walls
- How to quickly modify the materials of the wall or the floor
- Why doesn't the ground show
- How to solve the prompt of too large file when importing cad
- How to draw an arc-shaped wall
- How to draw a low wall
- How to build a duplex building
- How to modify the height of the wall
- Why is the floor not displaying?
- How to draw the wall
- How to delete the wall
- How to mirror the uploaded floor plan image
- How to modify the wrongly drawn wall
- How to adjust the length of the wall
- How to drag and draw rectangles to draw rooms
- How to upload CAD floor plan
- How to upload the floor plan image
- How to draw a low wall
- How to adjust the thickness of the wall
- How to upload CAD floor plan
- Why is the wall transparent
- AiHouse - AutoCAD Linkage for Cabinets and Wardrobes
Door and Window Adding
- How to make an open-air balcony
- Where is the corner sliding door
- Where is the door of the house type
- How to make an L-shaped door opening
- Arc-shaped door opening addition
- How to add doors and windows
- How to add doors and windows to the pillar
- Where is the sliding door
- How to make a invisible door
- Where is the door opening without a pass?
Enterprise Admin Opeartion
- Model Association Recommended and Similar Recommended Settings
- How to View Lincense Records?
- When allocating permissions, a message indicates that the current account has no permissions available for allocation.
- Can the incorrectly allocated permissions from the main account be reclaimed?
- How to assign permissions to the designer?
- Can permissions incorrectly assigned by the primary account be reclaimed?
- How to check the recharge history?
- Why can't you settle a registered account as a designer account?
- How to add a designer account
- Hardware Prompt Optimization - Examples by Scenario
- Maximize Drawer Box Height for Generated Drawers
- The customization settings are now in the workbench
Feature Updates
Monthly Updates
- July 2026
- April 2026
- February 2026
- January 2026
- December 2025
- November 2025
- October 2025
- September 2025
- August 2025
- July 2025
- June 2025
- April & May 2025
- March 2025
- February 2025
- January 2025
- December 2024
- November 2024
- October 2024
- September 2024
- Photo Gallery - Categories
- Photo Gallery - Recycle Bin
- Photo Gallery - Large Image Browser
- August 2024
- July 2024
Drawings and Quotation
Drawings
- How to export cabinet CAD drawings
- How to import CAD into the board for special-shaped modeling
- The rendering have been queuing up for a long time
- How to save half of the drawings
- Where are the download drawings?
- How to Settings CAD Drawing Logo in Software
- How to export the model space drawing
- How to send the finished drawings to the customer's mobile phone
- Ceiling drawing export
- One-click export of Tile flat drawings
- How to export CAD Construction drawings
- How to delete imported drawings
- Floor plans and Unfinished Drawings
- Specifications for Imported Floorplan Image and CAD
- CAD Frame Upload Tutorial
Get Started with AiHouse
Software Introduction
- Beginner guidance
- How to save skp file as old version
- How to replace texture in SKP?
- How can I set the graphic card of higher performance to run Aihouse?
- Account information setting
- Why is the font size so small/large in 3D Cloud Design?
- How to change the project name?
- How to upload a floor plan?
- Why are the previous projects missing?
- How do I switch back to the old version?
- How to draw a wavy line?
- Why is the ceiling not showing after placement?
- How do I hide the floor plan?
- How to clear the browser cache?
- Freehand wall drawing
- How to modify the material of a finished model?
- How to cut a hole in the wall?
- How to view the history log?
- Where can I find models and textures?
- How do I hide the floor plan?
- Where can I find study materials?
- How to add doorways?
- How to perform software settings?
- How to view the shortcut keys?
- How to use tempanels?
- Why can't I rotate with the right-click?
- Why does it lag during operation?
- Computer configuration requirements for software use
- Browser recommendation for running AiHouse
- Why are the shortcut keys not working?
Getting Started
- How to use my materials
- How to log out of the account and switch accounts
- Why is the login account and password always reminded of being wrong
- How to add sub-accounts
- How to enter the wireframe mode
- How to find a designer for the design plan
- System Logo Setting
- Computer configuration recommendation
- How to register an account
Software Basic Operations
- Combination model supports replacement function
- Material library - The material library pop-up box in customization is adaptive to the screen size
- How do designers upload models
- Space type adds "Master Bathroom"
- Quick search / filter model
- Left navigation collapse/expand shortcut keys
- Add the shortcut key function for rotating the object by 45°
- Finished product locking and unlocking
- Real-time preview rendering effect
- How to view the current version
- Mouse operation habit optimization
- Object toolbar optimization
- Design common shortcut keys
- How to set the transparency of the wall
- For beginners
- How to enter the design interface
- The layout display optimization of the canvas
- Optimize the dragging and adsorption of materials in 2D and 3D
- How to modify the size of ornaments
- New history record
- How to make custom cabinets not be limited by craftsmanship
- "About" panel adds key information
- Model saving logic optimization: models not authorized by the creator cannot be saved
- Style rendering optimization
- Camera Settings
- Optimize the top menu
- How to delete unnecessary carcass panel
- How to quickly switch scenes
- My collection directory page, add custom directory sorting
- Finished product combination mirror image function
- How to save the project
- How to change the moving speed
- How to measure the distance on the floor plan
- Top menu adds a shortcut entry for the custom module
- Application effect to increase color temperature and brightness of the same product
- Set and hide the space name
- How to adjust the perspective
- Basic module supports placing ornaments in the cabinet
- Why doesn't the wall drawing adhere
- Object controls (movement, rotation, scaling)
- How to save the floor plan
- Custom shortcut keys
- Search Images by Image - Effect Optimization
Q&A
- How to view the content of software updates
- How to save local files
- Why is the operation stuck?
- How to make holes in the original ground
- Why is there no change even after adjusting the floor height
- Why opening the plan only shows the cabinet
- Can't find the previously designed plan. How to deal with it
- Why was forced to log out
- How to view the validity period of the package
- What is the shortcut key for copy and paste
- How to add windows to circular arc walls
- Why does a prompt for a long time of no operation on the software pop up
- Why there is no ceiling
- How to change the display ratio of the browser interface
- How to zoom in and out the client window
- Why does it prompt that it cannot be saved when clicking Save
- How to set the path for saving files
- How to mirror the house type
- How to clear the browser cache
- Manufacturing System - JEGA Lite for Production
- Furni AI Question
- Contact Us-Request a Sales Demo or Get Support
Rendering
Rendering Lighting
Rendering Setting
- How to deal with the rendering of the ceiling without the light strip effect
- Real-time rendering
- Model self-illumination setting
- New lighting template
- Snapshot interaction optimization
- How to enhance the quality rendering
- Specified irradiation direction setting of supplementary light
- Later parameters - Bloom
- Lighting template adds five brightness levels
- How to adjust the rendering angle
- How to render the picture with lighting
- Custom upload of exterior scenes
- Different supplementary lighting effects
- What is the reason that the downlight model cannot be seen in the rendering image
- Understanding solar light settings
- Snapshot re-shooting function
- Later parameter adjustment
- Understand rendering quality and resolution
- Depth of field rendering
- Real-time rendering queuing
Q&A
- How to use the camera shear
- How to view panorama
- How to modify the name of the panoramic image tag
- Why can't the panoramic editor add scenes
- Why will rendering be exposed
- Why is the rendered image very blurry
- Why the rendering remains unchanged after the model modifies the material
- Why is there no ceiling when rendered
- Why is the water jet not displayed in the rendered panorama
- How to replace the watermark of the effect picture?
- The difference between bird's-eye view and effect drawing
- How to render the renderings
- Why there is no render button
- Why will rendering be queued
- How to modify the exterior view image
- Why is NO Photo displayed or the rendering fails
- How to add renderings in the panorama
Panorama
- Hot topic tags how to modify and delete
- How to associate the scene space of the panoramic image
- Scene addition
- How to modify the default scene of the panorama
- How to add background music to the panorama
- How to merge the panoramic views of the two schemes
- How to change the panoramic rendering record
- Short video production method
- How to make the shared panoramic image invalid
- Panoramic Image Rendering Tutorial
Render
- How to render a more realistic renderings
- How to render a small space
- How to handle the lighting of the aisle position
- How to render the arial view
- Why does an exterior scene appear during rendering
- Why the rendered image has no ceiling
- Why are there many rendering noise points
- Why does the rendering fail
- How to associate and edit the new panorama
- Why the rendered picture turns black
- How to use supplementary lighting
- How to set advanced lighting
- How to modify the color of the light
- What kind of angle is the best for rendering the renderings
- Why is the rendering displayed in the line
- Why does an exterior scene appear during rendering
- Rendering Tips
- AI Rendering Guide
- AiHouse AI Credits Usage Guide
- AI Video
Design Material
Textures
- How to upload textures
- How to add single-sided wall wallpaper
- How to add/change the ground material
- Where is the wood grain texture map
- How to delete the divider line
- How to divide the area
- How to draw the skirting line
- Where is the metal texture mapping
- Where is the leather texture mapping
- How to replace the material color of the finished model
- How to delete wallpaper
- How to delete the divider
- Where is the metal texture mapping
- Why divide the area
- How to replace the material color of the finished model
Model and Texture Uploading
- How to add downlights on a flat ceiling
- Where is the corner guard board
- Finished product - Model processing
- How to upload and use custom tiled tiles
- Where is the decorative cabinet rack
- Tutorial for making balcony cabinets
- How to make a glass wall
- Seamless processing of the pasted image
- Where is the universal light strip
- How to do integrated ceiling
- Where is the wallpaper
- Where is the wainscot
- How to add circular LED strips
- Where is the railing
- Where are the lamps?
- Where is the single sliding door
- Where is the grid model
- Finished model upload
3D Models
- Where is the full-length mirror
- How to make the furniture against the wall
- How to hide / show the model
- How to groupand ungroup the model
- How to mirror the model
- How to hide or restore the model
- Where is the mirror
- Why does a certain model still show up even after being deleted
- AI room intelligent layout
- How to embed a squat toilet in the ground
- How to adjust the model size
- How to make concave-convex shape cabinets
Common Models
- How to modify the beam sticker material
- Where is the mahjong table
- Where is the fish tank
- Where is the coat rack
- Where is the pipeline
- Where is the natural gas meter
- Where is the exterior scene?
- Where is the socket
- Where is the piano
- Where is the soft-packaged background wall
- Where is the wine glass
- Where is the frameless glass
- Where are the heater
- Where is the bunk bed
- Where are the cosmetics
- Where is the hook
- Where is the exterior scene?
- Switch? Where?
- Where is Tatami?
- Where are the wall-mounted bookshelves/shelves?
- How to modify the beam sticker material
- Partition screen
- Where is the upholstered bed?
- Where is the buddha statue?
- Where is the wine?
- Where is the mattress?
- Where is the bead curtain?
- Where is the piano?
- Where is the antique shelves?
- Where is the gas meter?
- Where is the soft background wall?
- Where is the wine glass?
- Where is the frameless glass?
Construction
- How to add platform
- How to remove toe kick/top molding in a single space
- How to add beam
- How to adjust door/window elevation
- How to use Free modeling
- Corner bay window
- How to draw a balcony
- How to change ceiling light color
- How to draw opening
- How to add ceilings
- How to draw stairs
- How to adjust the direction of door
- How to pull down kitchen/bathroom ceilings
- How to draw curved ceilings
- How to add a bay window
- How to create a outdoor garden
- How to use platform to design stairs
- How to draw a threshold stone
- How to make a sun room
- How to add top molding/toe kick
- Doors & windows not showing
- How to add a central air conditioner on the side of the ceiling trend
- How to Draw Curved Ceilings
Model Design Tools
- How to place Chandelier
- Decoration model layout and Settings
- Finished product material brush
- Model Mirroring Settings
- Intelligent Recommended Products
- The material squares
- How to restore the original material of the model
- model array
- How to quickly find soft furnishings
- How to quickly align the finished model
Furnishing Customization
Wardrobe / system Cabinets
Unit
- How to install lights for L-shaped cabinet
- How to place a light panel with a top cabinet
- Cabinet body stretching and dimension modification
- How to make Tatami
- How to add back panel
- How to add a door of corner cabinets
- How to ungroup
- How to make a divider cabinet
- How to make a triangular cabinet
- How to use the inner space display
- How to modify cabinet elevation
- How to operate the cabinet corner cutting
- How to make a stair cabinet
- Where is the arc cabinet?
- How to make Tatami
- How to make a drawer
- Where is the push-pull cabinet?
- How to export Cabinet wardrobe CAD
- How to add door hinges and other accessories
- How to use wall paneling
- How to make a wall wardrobe
- How to collect the grouped cabinets
- How to place the closing board
- How to place roman columns with top cabinets
- Special-shaped plate editing
- Why is the cabinet made of plates not on the list of collections after collection?
- How to ungroup a group cabinet
- How to use the annotation
- How to add back panel
- How to rotate groups
- Sliding door wardrobe tutorial
- How to draw wardrobe tatami desk
- What to design corner desk
- How to make wine storage
- How to copy the cabinet?
- Corner cabinet template add top cover side settings
- Where is the corner cabinet
- How to place a roman column with a top cabinet
- How to install cabinet filler
- How to design bay window cabinet
- How to make an arched arc cabinet?
- Why is there no product layout category for the customized module?
- How to make a bevel desk
- How to stretch the cabinet
- Why is there no design library in the custom cabinet module?
- How to add cabinet shelf lights
- How to design a sliding door cabinet
- Where is the slopped frame cabinet?
- Customized left free cabinet library classification display
- Where is the hands-free cabinet?
- How to add side panels
- Free cabinet design tutorial
- When the size of the cabinet is changed, the interior accessories of the cabinet move along
- How to align the cabinets
- How to check the distance between cabinets
- How to modify the size of the board separately?
- How to use the cabinet bevel cut
- How to mirror the customized cabinet
- Plug-IN Installation guideline for CAD cabinet/panel profile import
Function Parts
- Where is the arc shelf?
- How to use the parametric wine rack
- The use of plate uniform distribution function
- Why can't the material of Roman columns be modified?
- Filler position
- How to add cloth rod?
- How to add a mirror?
- How to modify the material of the light board
- Back panel of the cabinet how to change to glass
- Why does the lintel disappear after modifying the size of the lintel?
- How to add a vitical board
- How to modify the handle size?
- How to add edge banding and modify the material of the laminate of the cabinet?
- Where are the feet of the custom cabinet?
- Where is the arc filler panel?
- Generating filler, corner cutting plate supports application of process parameters
- How to place the slopped filler
- Where is the adjustable arc plate?
- How to change the size of the drawer?
- Translational alignment supports parametric panels and functional components
- Where's the bevel shelf?
- When placing a function part, it prompts that the function part does not belong to this unit
- Why do drawers jump out of the door wardrobe after adding?
- Import CAD modeling function to increase board editing permission verification
- Plate point editing is optimized at the edge
- The specific location of the horn handle
- Create drawer with new stepped opening
- Vertical plate uniform distribution prompt is not parallel to the object selected for the first time
Door
- Generate multiple doors added symmetrical opening settings
- How to modify door core to louver
- Door show, hide support settings shortcut key
- How to generate a door cover for a pentagonal cabinet(
- How to make a door shape with a light board
- How toopen the cabinet door
- How corner cabinets generate doors
- How to design an aluminum frame glass door
- Generate door scaling settings
- How to make a grille door panel
- How to divide doors precisely
- Where is the gold frame door panel?
- How to edit an arched door hole on a Door(门板上怎么编辑挖拱形门洞)
- How to change cabinet door to flip door?
- Door batch extension
- How to replace a handle free door
- How to quickly modify the size of the sliding door waistline
- Generate door panel cover value adaptation
- How to replace glass doors?
- How to change door waist line
- How arc cabinet generates doors
- How to install staggered external door
- Generate door, drawer location base settings
- Door opening angle, drawer opening proportional settings
- How to make a slant door
- How to turn a door into a drawer
- Why is the door black?
- How to make a door shape with a light board
- How to change door to inner or outer cover
- Drag and drop function components to the cabinet door panel for automatic hiding
- How to replace a handle free door
- How to replace glass doors
Molding Line
- How to generate a single cabinet kick board
- How to add arc top molding
- How to make the gypsum line go around the wardrobe
- How to generate the top molding line
- How to generate a pentagon top molding
- How to add arc top molding
- How to install the bevel cabinet top and base molding line
- What should I do if the line direction is reversed?
- How to choose to generate unilateral top/base molding line
- Why is it prompted when generating a foot line that this condition cannot generate a foot line?
- How to modify toe kick material and size
- How to make an arc cabinet foot line
- How to generate a pentagon top molding line
- How to modify the texture of a line
- Why does the cabinet top line and skirting line move when generated
- Why does the topline / baseline rendering appear black?
Parameters Setting
- Function part generation drawer supports ruler change linkage
- How to use the cabinet for accurate measurement
- Ruler numerical input optimization
- Slot path supports the function of choosing whether to open or not
- How to open a hole in the plate
- Wall paneling attribute material paving adsorption
- Cabinet internals follow door cover and hardware accessories indentation
- How to edit a board into beveled cuts
- The designer can release the free editing of array objects
- Multi-selection doors can add structure connectors
- How to move the panel
- Drawing annotation auxiliary settings
- Free cabinet global parameter application
- Retail users block personal production configuration entry
- Plate modeling editor adds a list of production data and supports adjusting the order
- How to modify the size of the panel
- How to modify the thickness of the side panel of the cabinet
- How to round the plate
- Ruler display Add one button to mark the size of the cabinet
- [Production Check] Select hardware mode chart red display
- Plate modeling editor 1: side opening
- Cabinet corner cutting process value configuration, top baseplate corner cutting configuration
- Input parameter value exceeds limit prompt
- Feature ruler settings detailed and concise mode
- Scene filter (formerly quick select)
- 2D interface optimization of plate modeling editing
- How to rotate the cabinet
- Plate modeling edit 3: select points to increase the ruler to modify the distance
- Operation optimization of stretching and ruler changing function
- How to display cabinet parameters
- Automatic hidden door function for placing function pieces and accessories added switch control
- Groove path supports adding knife section function
- Plate styling edit 2: ruler spacing, mesh settings
- Free cabinet parameter grouping settings
- Panel Division for Parametric Cabinets
Texture
- Why can't the frame door modify the material of the middle door core?
- How to modify all door core materials
- How to modify the materials of different plates in the same cabinet?
- How to modify the material of door core
- How to rotate the material
- How to modify the material of the door border
- Why hasn't the rendered material changed?
- Why hasn't the rendered material changed?
- How to change the materials of the upper and lower tracks?
- Why can't the lintel modify the material?
- Why don't highlight doors render reflective effects?
- Why is the material library not displayed?
- Why is the rendered material different from the actual one?
- How to make the color of finished furniture and customized furniture uniform
- How to change the texture size
- Where is glass texture?
- Why can't the material brush be used?
- How to modify the cabinet material
- How to modify all door panel materials
- Replace material packs to add search function
Custom wood door and window
Q&A
- Solid wood how to add engraving
- Solid wood door replacement Lock
- How to open the room door
- Solid wood set line how to add foot pier
- Solid wood casing how to install the casing thickened strip
- Solid wood installation wall light strip
- How to install foot piers on Solid wood wall panels
- How to change solid wood door size
- How to copy solid wood windows
- How to paint the color of solid wood wall panels
- How to hide solid wood doors
- Solid wood threshold stone how to change color
- Solid wood module how to remove the door lock
- Solid wood wall panels paving evenly
- Solid wood door replace the casing line style
- How to group solid wood
- Solid wood add material right click - New background floor design entrance
- Solid wood how to add Door roof?
Aluminum Door and Window
Q&A
- How to change the material of aluminum doors and windows(V5)
- How to modify the door top window size of aluminum doors and windows (V5)
- How to design custom aluminum doors and windows
- How to modify the color of aluminum door and window glass(V5)
- Aluminum corner doors and windows(V5)
- How to export aluminum doors and windows CAD(V5)
- How to set aluminum doors and windows opening direction(V5)
- How to change the color of aluminum doors and windows door core(V5)
- How to hide\collect aluminum doors and windows(V5)
- How to move aluminum doors and windows(V5)
- How to install custom aluminum doors and windows handles
- How to set aluminum doors and windows size(V5)
- Aluminum doors and windows copy\delete(V5)
- Tutorial for custom aluminum doors and windows
- How to open aluminum doors and windows
Kitchen Cabinets
Molding Line
- Top molding can not add
- Base molding line material modification
- Why is it prompted when generating a foot line that this condition cannot generate a foot line?
- Why the top molding line / base molding line rendering is black
- How to install light line
- What should I do if the molding line direction is reversed?
- Top molding/foot line generation is incomplete
- How to choose to generate unilateral top molding/base molding line
Units
- How to group?
- Kitchen cabinet CAD export
- In countertop installation, the countertop is too high
- How to make a corner cutting cabinet
- Where is the arc wall cabinet?
- How to add a visible panel
- How to make a kitchen cabinet
- How to choose a whole cabinet?
- Kitchen cabinet annotation and CAD export
- Back panel of aluminum frame cabinet Settings
- Kitchen cabinet island design
- Kitchen cabinet intelligent layout
- How to align the cabinets
Countertop
- Can't edit after the advanced countertop is generated?
- How to generate high and low countertop?
- How to modify the extension value of the countertop?
- Countertop installation
- How to generate a countertop in a special-shaped space
- Why not show the sink?
- Why is there no rear water barrier on the generated countertop?
- countertop landing
- How to generate a countertop water barrier
- Why is the countertop black?
- Why does the countertop flicker with shadows
- Why can't corner cabinets avoid corners to generate water barriers?
- Why is there no back splash when generating the countertop?
- Integrated stove on both sides of the water block
- How to modify top molding line
- Countertop landing
- How to delete the water barrier at a certain location
- Can the countertop be moved?
- Counter fracture
Texture
- How to replace the material of the drawer?
- Why can't the material of the drawer panel be brushed?
- How to change texture of bar stones
- Why the material of Roman columns can not be modified?
- How to rotate custom materials
- Why is the rendered material different from the actual one?
- Why hasn't the rendered material changed?
Door
- How to divide doors
- How to change door to grid door
- How to change door style
- How to change cabinet door to flip door
- How to generate a door
- How to turn a door into a drawer
- Why is the door black?
- Why did the conversion of the drawer fail
- How to change door to louver door style
- How to make a door shape with a light board
- The renderings disappear behind closed doors
- There is no option to convert door by right clicking on the light board
- Door without handle does not install surface handle
- How to change cabinet door to flip door
- Kitchen cabinet door can't open
- Veneer mounted function parts placed on door added ruler move
- Upload door
- How to make door panel shapes with visible panels
- How to convert doors to drawers
- Kitchen cabinet door how to add ventilation hole
Construction Design
Free Modeling
Q&A
- What is the deletion operation of free modeling?
- How to use free modeling feature to design doorways
- Free modeling how to import CAD and SKP files
- How to separate free modeling faces
- Free modeling how to make a cylinder
- How to copy move free modeling models
- How to mirror free modeling objects
- Free modeling ceilings
- How to make free modeling lines smoother
- How to make a toe kick on the second floor
- I want to move free modeling objects, how to do?
- How to design arc wall paneling in free modeling
- How to stretch free modeling
- Free modeling route lofting
- Tile floor plan export in free modeling
- What are the steps to draw an inverted circle in free modeling?
- How to make a sunken ground
- How to open a hole in the original top surface of the apartment type
- How to add a window to a slanted roof?
- How to modify the material of the free modeling model
- How to design a shaped platform?
- Free modeling group/ungroup multiple models
- How to draw arc in free modeling
- SketchUp Plugin Installation Guide
Tiling
How to pave tiles
- How to make tile parquet
- How to make ceramic tile corner cut mosaic
- How to design windmill tile
- How to conduct I-shaped tiling
- How to pave herringbone tile
- How to lay bricks with rounded corners
- How to cut hexagonal bricks
- diamond tile paving
- Oblique wavy line
- How to make corrugated corner bricks
- Tile parquet explanation
- How to pave bricks with rounded corners
- Oblique wavy line
- How to do I-shaped tile design
- How to make a crosscutting line
Q&A
- Why do render bricks reflect light?
- Why is the render brick texture unclear?
- Bricks in 3D state after brick paving are not displayed complete
- How to clear tiles quickly
- Do you have a tutorial for customized tiles?
- How to make a double wave line
- Why can't I see the old version of the waterjet imported by the new version?
- How to change tile size
- How to modify the tile grout joint material
- How to modify the tile grout joint size
- How to align the tile grout joint?
- How to cancel automatic adsorption for multi-segment lines
- How to rotate tiles?
- Copy tile
- How to group tiles
- When paving tiles how to set starting point?
- How to quote tiles
- Export whole house tile floor plan
- How to pave tile to the exterior wall?
- How to add text and other annotations of the tiling floor plan
- How to pave tile to the exterior wall?
- How to change customized tile size
- Why can not select the brick?
- Why do render tiles reflect light?
- How to pave tiles continuous
- Why does the brick render black?
- Why do bricks flash and have shadows?
Water Jet
- The waterjet pattern is the treatment of splines
- Where to upload parquet
- Parquet processing failed
- How does the water jet show the grout joint?
- Modify waterjet parquet size
- Where is the uploaded parquet?
- CAD import recognition is wrong
- The imported water jet cannot fill the tile
- Enter MY shortcut key to convert domain failed
- Waterjet import tile page area missing
- Waterjet CAD line is spline curve input ipp is converted into multi-line segment CAD crash
- There is parquet's waterjet treatment in the middle
- After entering BO, it prompts that the closed boundary cannot be determined
- The processing method of waterjet graphics as block
- After entering bo, it prompts that the closed boundary cannot be determined
- Enter MY Shortcut key to convert domain failed
Construction Design Tips
- Material Brush for ustomized Models and Finished Product
- Wall material data synchronization
- Embedded Settings for Toe Kick/ Skirting Line
- One-click floor/wall paving
- Recess placement
- How to Tile Areas
- Where is the Decorative?
- Roof Balcony Design
- Finished ceilings and background wall arrangement
- How to Remove Toe kick(aka skirting line)
- How to Quickly Find Finishing Materials
- How to Settings Library Ceiling Height
Ceiling and Wall
Area Design
- Why can't the second ceiling layer be displayed in 3D after drawing the second layer ?
- How to choose more gussets
- How to generate a light trough
- How to make a chamfer on the wall
- How to get into the ceiling wall that you customed before and how to delete the customed wall/ceiling
- How to choose more gussets
- How to custom ceilings
- Ceiling CAD Drawings Export
- How to Add Light Strip to Double Layer Style Ceiling
- Why does the area disappear after painting?
- How to Draw Alien Areas
- How to Draw a Circular Area
- How to Import Special Style Ceilings in CAD
- How to import special shaped ceiling
- How to custom ceiling to the middle
- How to Go back to the Custom Mode for the Customed Ceiling or Delete it
- How to Create Ceilings
- Ceiling CAD Drawings Export
- How to change the size of the Ceiling area
- How to add lines to a flat top
- How to Draw Rectangular Areas
- How to change the size of the Ceiling area
- No Main Light Ceiling Tutorial
- Gypsum Line Ceilings
Lofting Line
- How to add a filler
- How to modify the color of the light strip on the ceiling
- How to modify the position distance of the filler
- Tutorial for Customizing Guideline Lines to Create a Background Wall
- How to mirror the Filler
- Adding Metal Strip for Ceiling
- How to delete the Filler
- How to put the multi fillers
- How to modify the Filler material
- Why the light strip on the ceiling show black in rendering
- How to add/modify light strips
- How to place skiring line(aka toe kick)
- How to delete the edge line
Irregular Design
- Array multi-panel&line in ceiling custom
- How to draw the staircase opening on the second floor
- How to Generate Unilateral Light Strip
- How to Draw Irregular Ceilings
- How to add light strips without plaster lines?
- How to shape the facade of the ceiling
- How to Make Stairs
- How to Create Irregular Wall Shapes
- Tutorial for Making Ceilings to drop down
- How to set joint type for Integrated Wall Panel
- How to Make Downstairs Ceiling
- How to shape the facade
- Tutorial for building a recessed ceiling in a 'return' shape”
- How to design a curved LED strip on the wall
- How to dig a hole in a wall
- How to make a sloping top
- Facade Custom(Draw/Offset/Place Sideline...)
- How To Build Swimming Pool
- How to make dropped ceiling with layered levels
- How to make stairs
- Tutorial for Grille Background Wall
- How to make wall panels
- How to build wall panels
Q&A
- How to install downlights
- How to Delete Ceilings
- How to Convert the straight edge to arc edge in ceiling custom
- How to install the Dado
- Customized Ceiling How to modify the distance from the top
- Why Ceilings Don't Show
- How to install aluminum beam
- Why does the rendered picture turn black?
- How to Hide Ceilings
- Where is the gusset?
- How can Ceilings leak?
- Tutorial for Arched Doorway in Background Wall
- How to Make Double-Layer Ceilings
- How to partition Ceiling
- How to deal with Black Shadow in Ceiling
- How to make a circular arc
- How to do two ceiling
- Why Ceilings Can't Be Filled
- How to do arc shape bckground floor
- How to hide or modify the top molding and skirting line(aka toe kick)
- How to design lighting line on the wall
- How to design suspended background wall
Gusset Paving
- How to increase the size of the gusset
- Why can't I see it after putting on Spotlight?
- How to change the material of the gusset?
- How to move the gusset
- How to rotate the gusset
- The difference between spaced paving and continuous paving
- How to increase the size of the gusset
- How to arrange the gussets equally spaced
- Why can't the styling strip be put on?
- Gusset rendering goes black
Floor Plan
Draw Walls
- How to draw an angled wall?
- How to create a circular hole?
- Hidden exterior wall setting
- How to display wall dimensions?
- How to edit wall shapes?
- How to make 3D fonts on the wall surface
- How to determine the position of a beam or a column?
- How to modify the height of a single space independently
- The splitting and merging of walls
- How to lock the wall
- Outer bulge drawing of the wall
- How to display the included angle of the wall
- How to select a single space for drawing
- How to modify the size of doors and windows
- How to draw inclined walls
- How to quickly modify the materials of the wall or the floor
- Why doesn't the ground show
- How to solve the prompt of too large file when importing cad
- How to draw an arc-shaped wall
- How to draw a low wall
- How to build a duplex building
- How to modify the height of the wall
- Why is the floor not displaying?
- How to draw the wall
- How to delete the wall
- How to mirror the uploaded floor plan image
- How to modify the wrongly drawn wall
- How to adjust the length of the wall
- How to drag and draw rectangles to draw rooms
- How to upload CAD floor plan
- How to upload the floor plan image
- How to draw a low wall
- How to adjust the thickness of the wall
- How to upload CAD floor plan
- Why is the wall transparent
- AiHouse - AutoCAD Linkage for Cabinets and Wardrobes
Door and Window Adding
- How to make an open-air balcony
- Where is the corner sliding door
- Where is the door of the house type
- How to make an L-shaped door opening
- Arc-shaped door opening addition
- How to add doors and windows
- How to add doors and windows to the pillar
- Where is the sliding door
- How to make a invisible door
- Where is the door opening without a pass?
Enterprise Admin Opeartion
- Model Association Recommended and Similar Recommended Settings
- How to View Lincense Records?
- When allocating permissions, a message indicates that the current account has no permissions available for allocation.
- Can the incorrectly allocated permissions from the main account be reclaimed?
- How to assign permissions to the designer?
- Can permissions incorrectly assigned by the primary account be reclaimed?
- How to check the recharge history?
- Why can't you settle a registered account as a designer account?
- How to add a designer account
- Hardware Prompt Optimization - Examples by Scenario
- Maximize Drawer Box Height for Generated Drawers
- The customization settings are now in the workbench
Applicable Users:
- Users who need to process models in SketchUp and work collaboratively with the AiHouse free-modeling module
- Designers, procurement staff, or operations staff using SketchUp connectivity for the first time
Note: Models uploaded using SketchUp plugin are only visible in AI Rendering. They will not appear in standard GPU rendering or real-time rendering. They can be used for design only and cannot be saved in your library or edited using the material brush or texture editor.
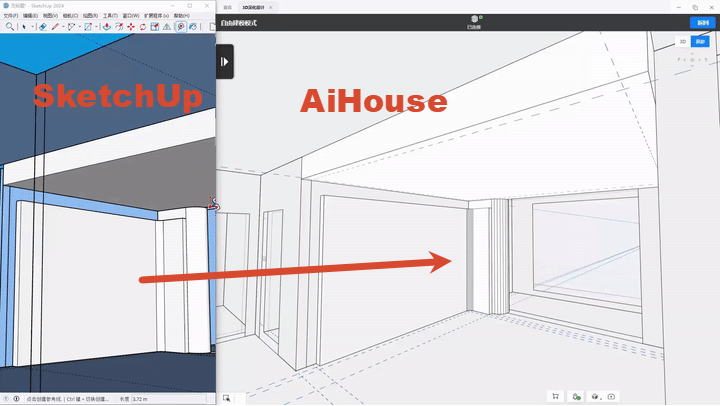
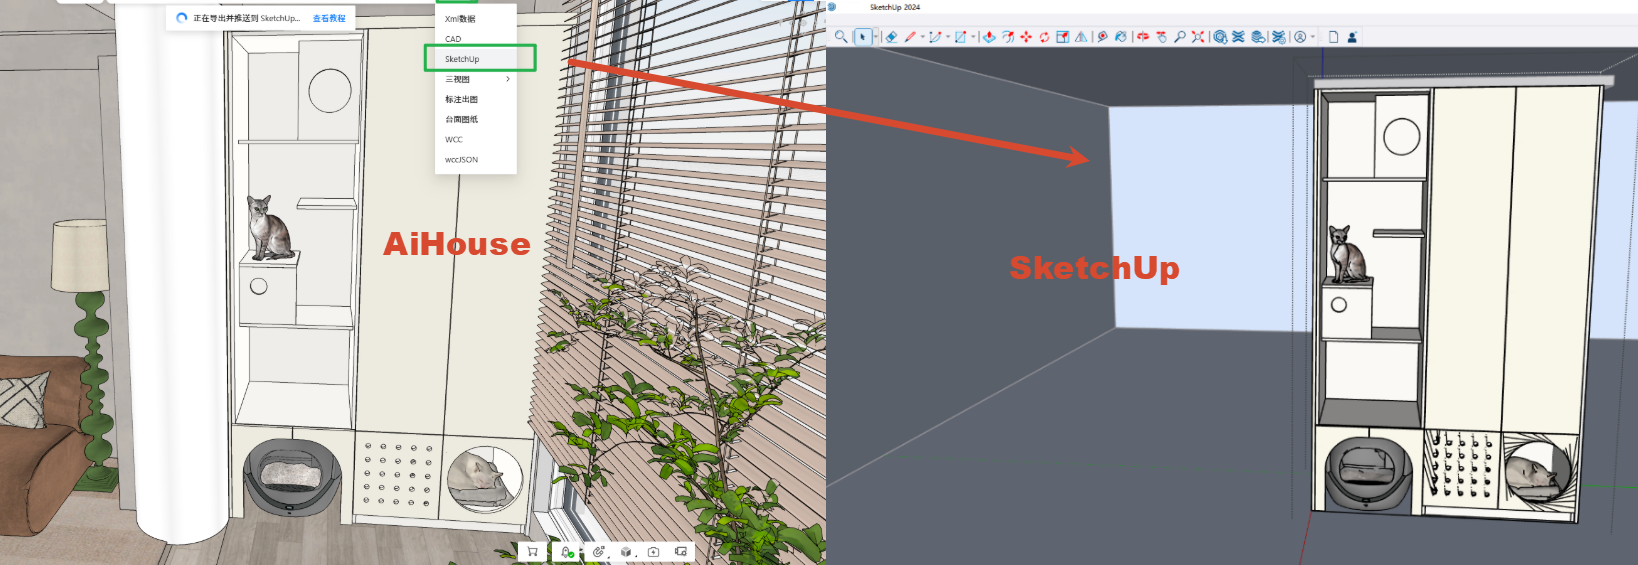
I. Installation Guide
1. Confirm Version Requirements
Before installation, please first confirm the following:
- AiHouse design platform version: [20260630 version or later version]
- SketchUp version: [2024 or later]
If the version is outside the supported range, the plugin may fail to install, the menu may not appear, or the connection may fail.
2. Download the Plugin
Please download the specified plugin installation package through an official channel:
-Plugin name: [skp_exporter.rbz]
-Download URL: https://sunvega-automate.3vjia.com/sketchup/latest/skp_exporter.rbz
-Installation package format: [rbz]
Warning: Do not mix historical old plugin versions or plugins from unofficial sources, otherwise compatibility issues may occur.
3. Install the Plugin
- Open SketchUp
- Go to Extension Manager in SketchUp
- Click Install Extension
- Select the downloaded plugin installation package [skp_exporter.rbz]
- Follow the guide to complete the installation
4. Enable the Plugin
After installation, please confirm in SketchUp that the plugin has been enabled:
- Go to Extension Manager
- Find [skp_exporter.rbz]
- Confirm that its status is enabled
If the plugin is disabled, connectivity cannot be established even if installation was successful.
5. Restart SketchUp
After the plugin installation is complete, fully exit SketchUp and reopen it.
Important: After installation, you must restart SketchUp. If you do not restart it, the plugin capabilities usually will not take effect.
II. How to Use the Plugin
1. Free-Modeling Module
After successful installation and restart, the plugin entry can usually be seen in the following location:
- Top menu bar
- Model Interconnection
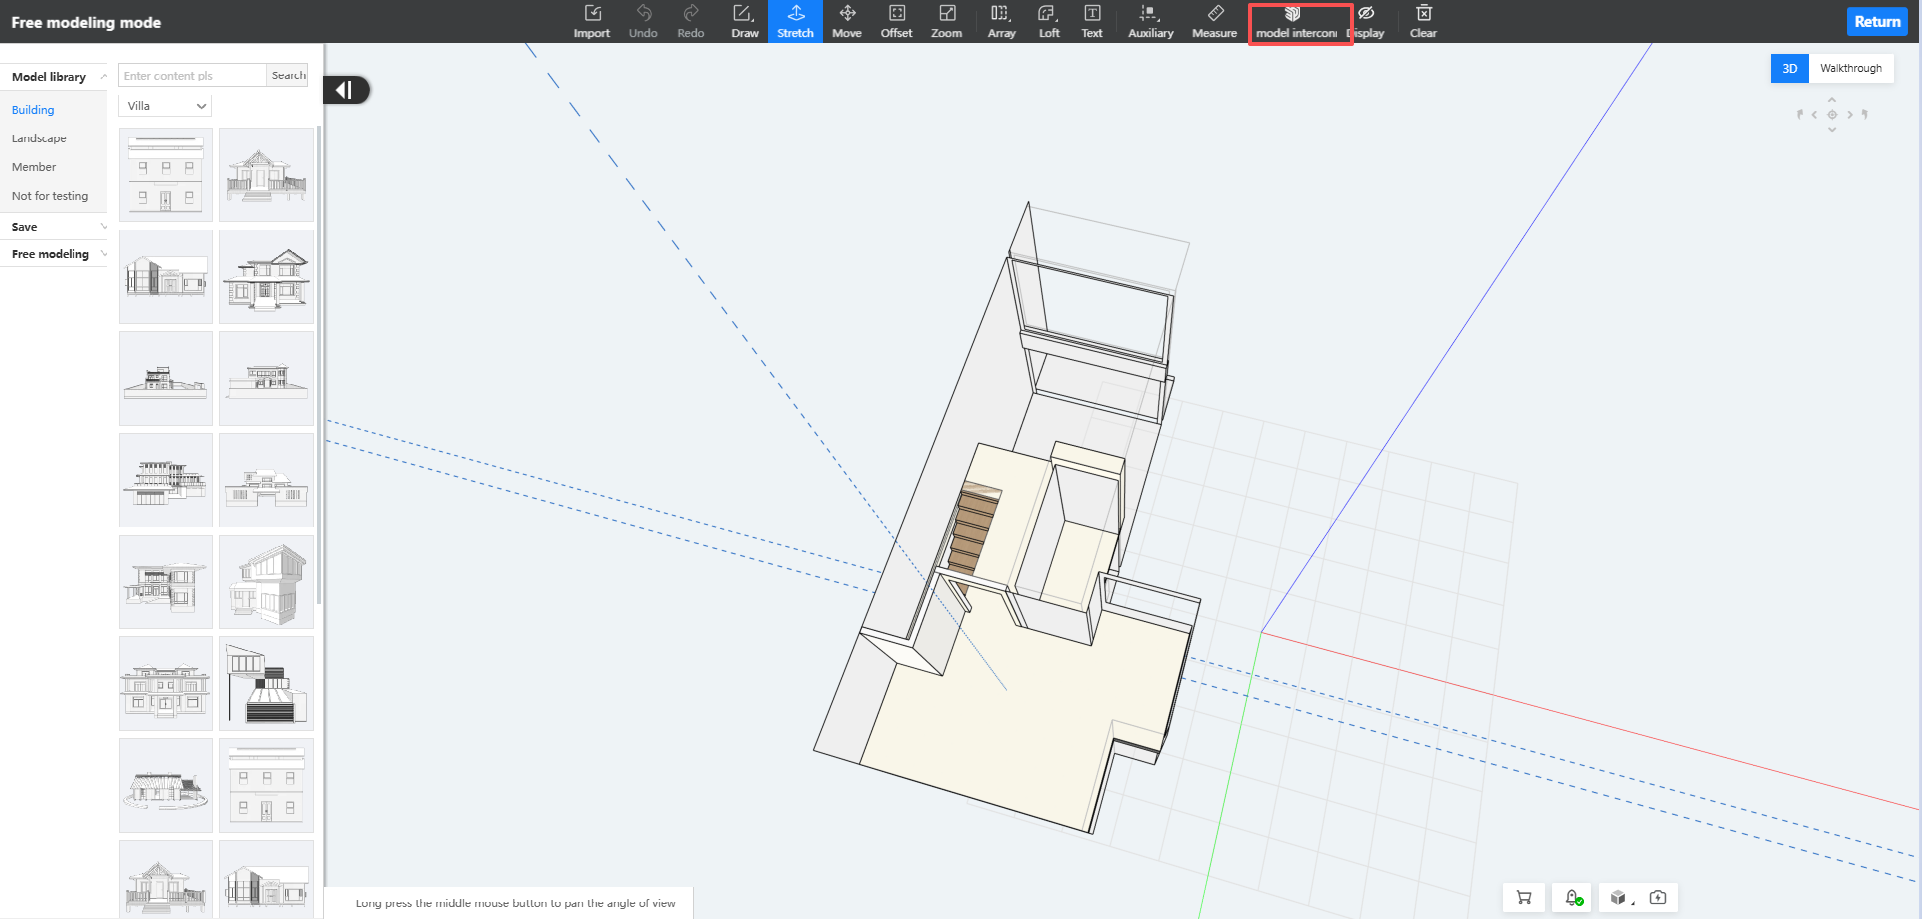
3. Customization Module
- Open an AiHouse project and enter the Custom Cabinets & Wardrobes module.
- Select the cabinet you want to export, then click "Export" in the top toolbar.
- Choose "SketchUp" from the dropdown menu.
- The current cabinet model is then generated in SketchUp.
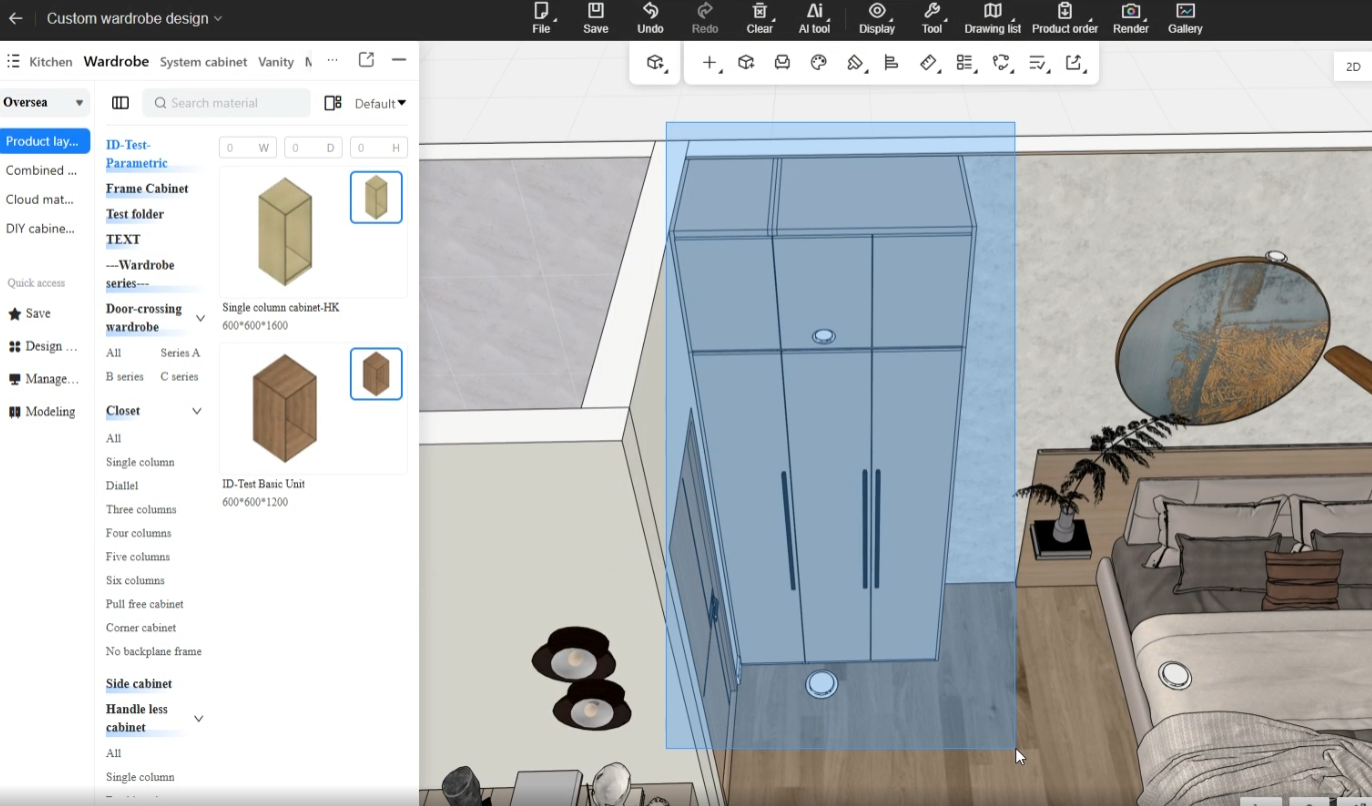
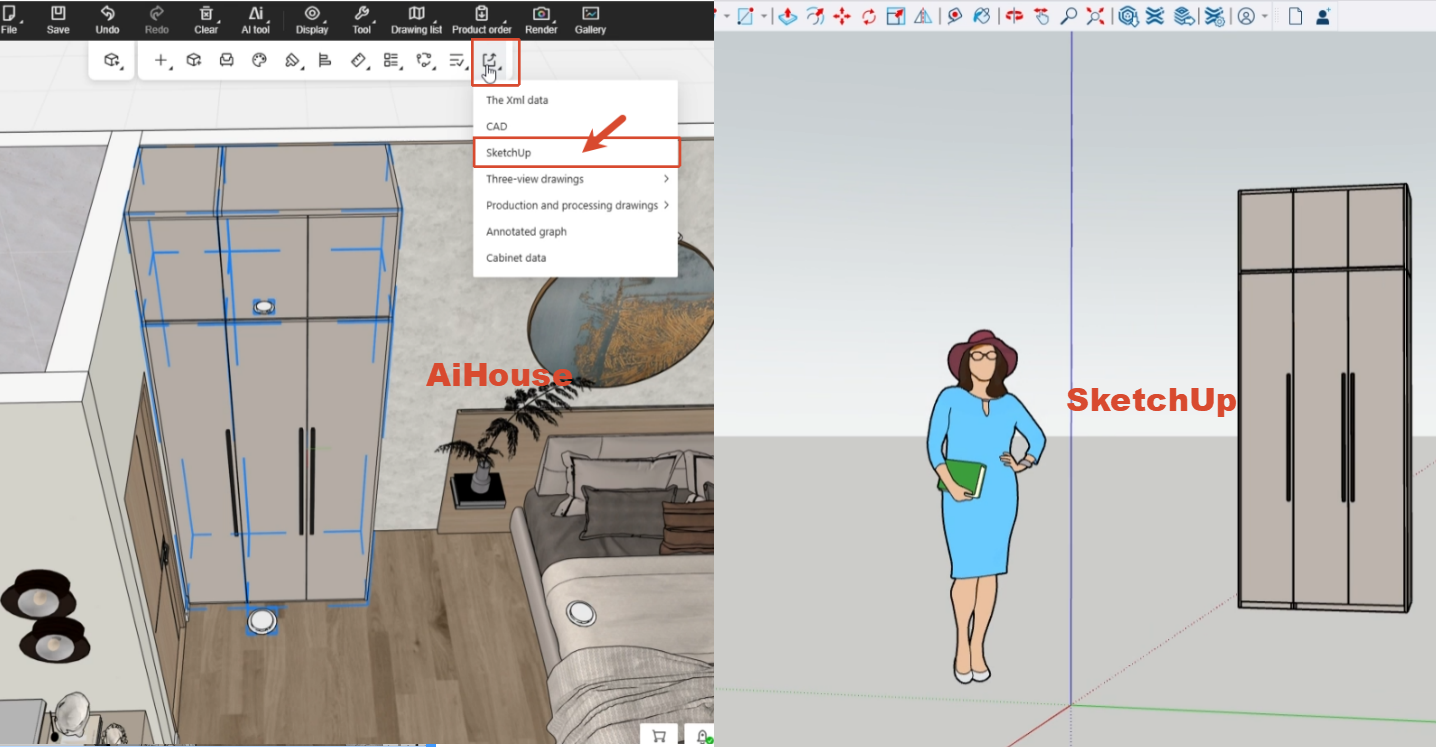
III. Trouble Shooting - Checking Connection Status
1. How to Tell Whether the Connection Succeeded
If any of the following is true, the connection can be considered successful:
- The current software displays a "Connection successful" message
- The connectivity button in free modeling has a green connection indicator
- The Model Connectivity button changes to the connected state
- You can continue performing follow-up actions such as sync, import, and apply
2. How to Tell Whether the Connection Failed
If any of the following occurs, the connection can be considered failed:
- A message indicates connection failure or disconnection
- There is no response for a long time after clicking Connect
- You cannot perform follow-up actions such as sync, import, and apply
3. Recommended Troubleshooting Order
It is recommended to troubleshoot in the following order:
- Confirm whether SketchUp is already open.
- Confirm whether the plugin has been installed and enabled.
- Confirm whether SketchUp was restarted after installation.
- Confirm whether the software version, plugin version, and SketchUp version match.
- Confirm whether the current account has the required permissions.
- Confirm that local security policies and network policies are not blocking plugin communication.
IV. Frequently Asked Questions
1. The Plugin Is Installed, but the Connection Fails
Possible causes:
- SketchUp has not finished initialization
- The plugin version is too old
- The plugin does not match the software version
- Local security software is blocking it
How to handle it:
- Restart SketchUp and reconnect
- Update the plugin to the latest version
- Upgrade the software to a supported version
- Rule out the impact of security software or system permissions
2. The Plugin Still Does Not Work After Upgrading
Possible causes:
- Old and new plugin files are mixed together
- SketchUp is still using old cache files
- Historical versions remain in the installation directory
How to handle it:
- Uninstall the old plugin first
- Clean up old version files
- Reinstall the latest plugin
- Restart SketchUp and verify again