This release focuses on cross-software collaboration, AI-assisted design, rendering output, and day-to-day efficiency. Key highlights include stronger SketchUp and AutoCAD workflows for model import, cabinet export, free modeling sync, and precision component editing.
AI Model and AI Rendering have also been upgraded, alongside improvements to rendering controls, lighting templates, image enhancement, and drawing output. In addition, Workspace, Aluminum Doors & Windows, and Interior Finish Customization received multiple updates to make design, presentation, and collaboration workflows more complete.
Update Overview
- Cross-Software Workflows
- AI Features
- Rendering & Drawings
- Design Efficiency
- Workspace Management
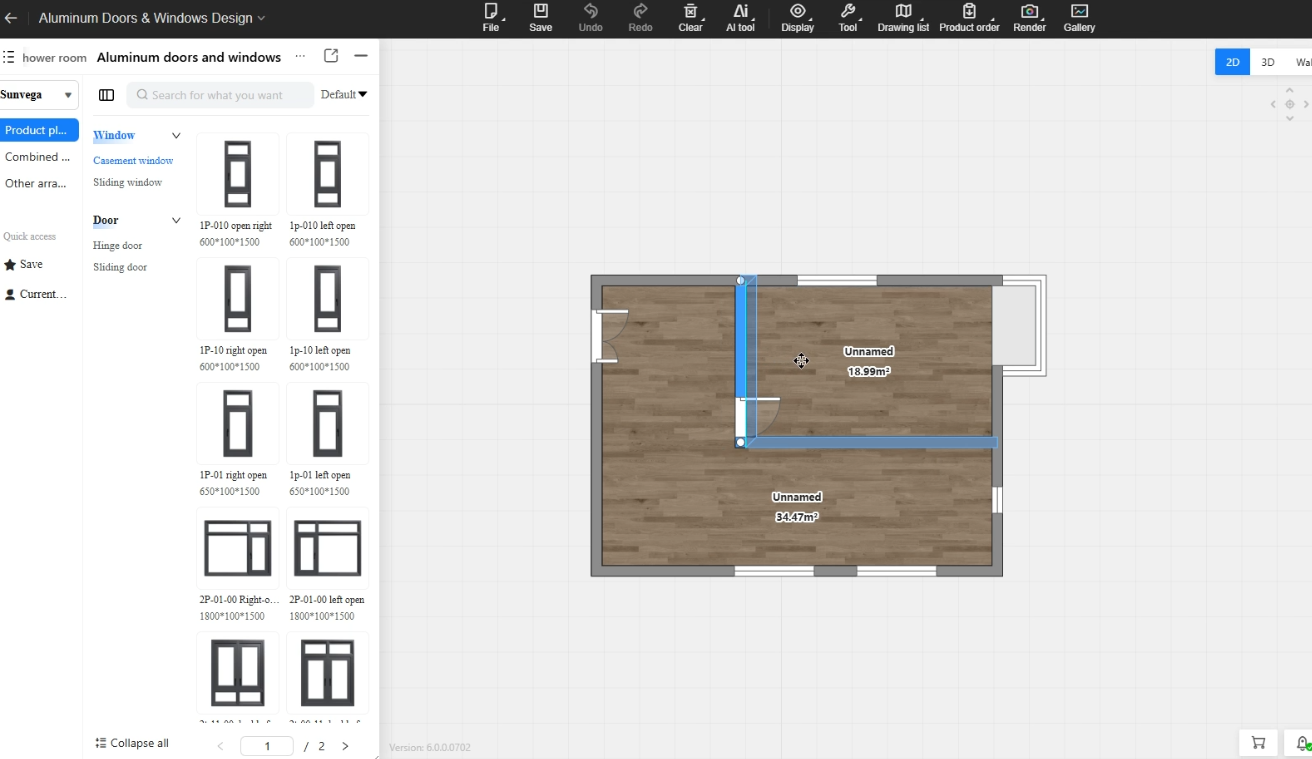
- Aluminum Doors & Windows
- Millwork Customization
Cross-Software Workflows
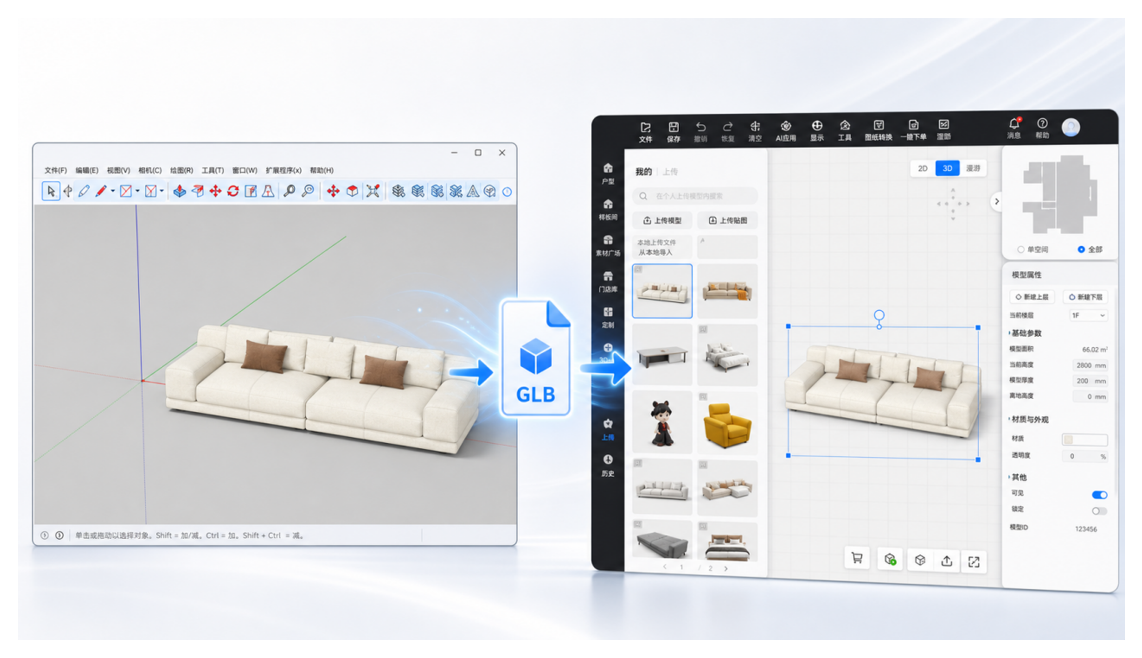
1. SketchUp GLB Import with Auto-Save to Personal Assets
*Only available for paid account
Highlights:
- Import SketchUp models into AiHouse and automatically save them to Personal Assets.
- A "Design Only" mode is available by default so the model can be used in proposals faster.
- After import, the model can be used directly in AiHouse and in AI Rendering.
How to Use:
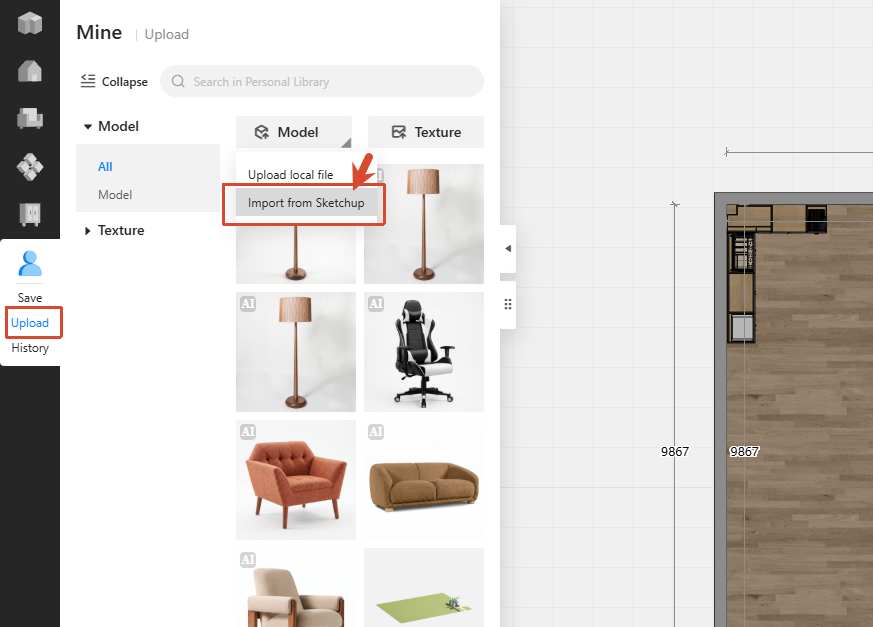
- Open the SketchUp plugin.
- In "My Uploads", choose "Import from SketchUp".
- When the panel opens, go to the "Import to Personal Assets" dialog.
- Fill in the asset name, size, category, placement rules, and other basic information.
- Click "Design Only".
- After import, the model can be used directly in AiHouse and in AI Rendering.
Note: Models uploaded using the SketchUp plugin are only visible in AI Rendering. They will not appear in standard GPU rendering or real-time rendering. They can be used for design only and cannot be saved in your library or edited using the material brush or texture editor.
2. One-Click Cabinet Export from AiHouse to SketchUp
*Only available for paid account
Highlights:
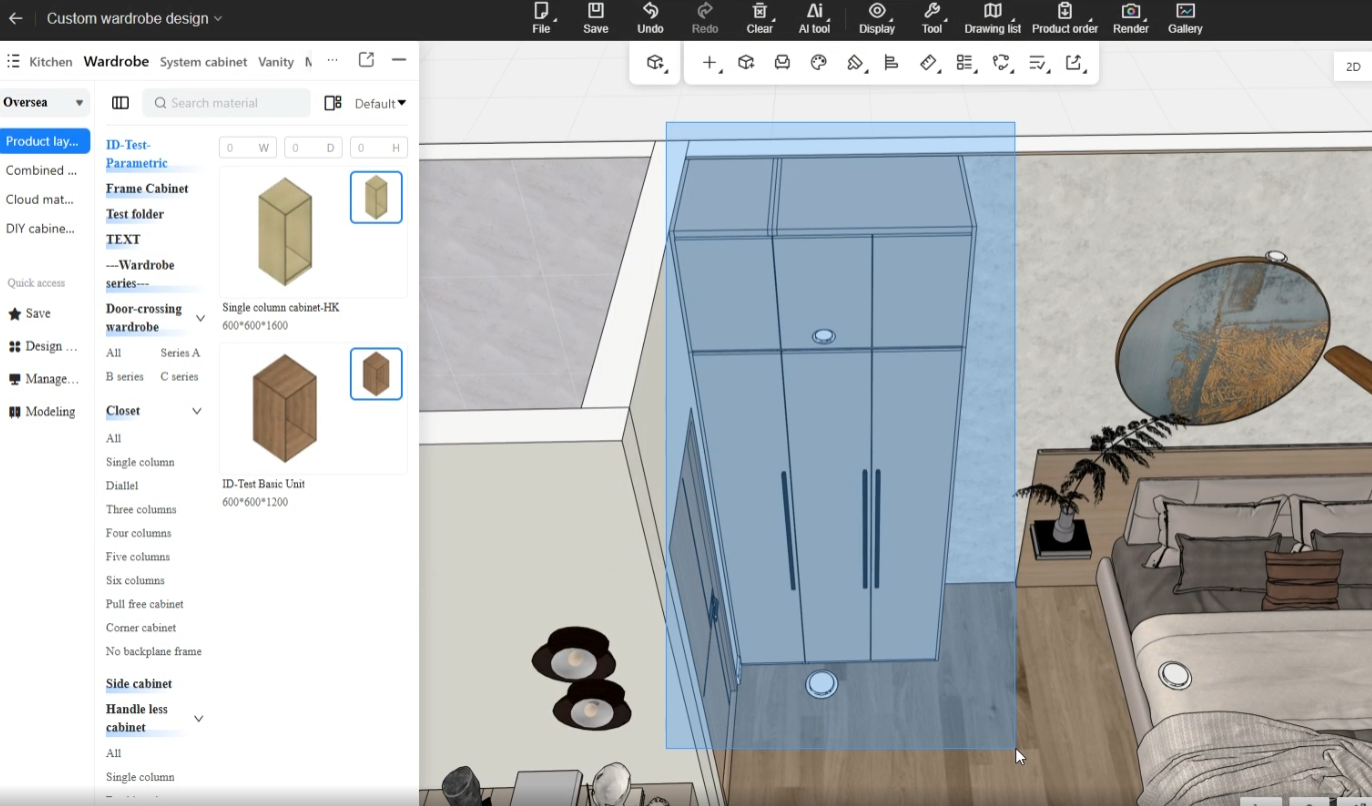
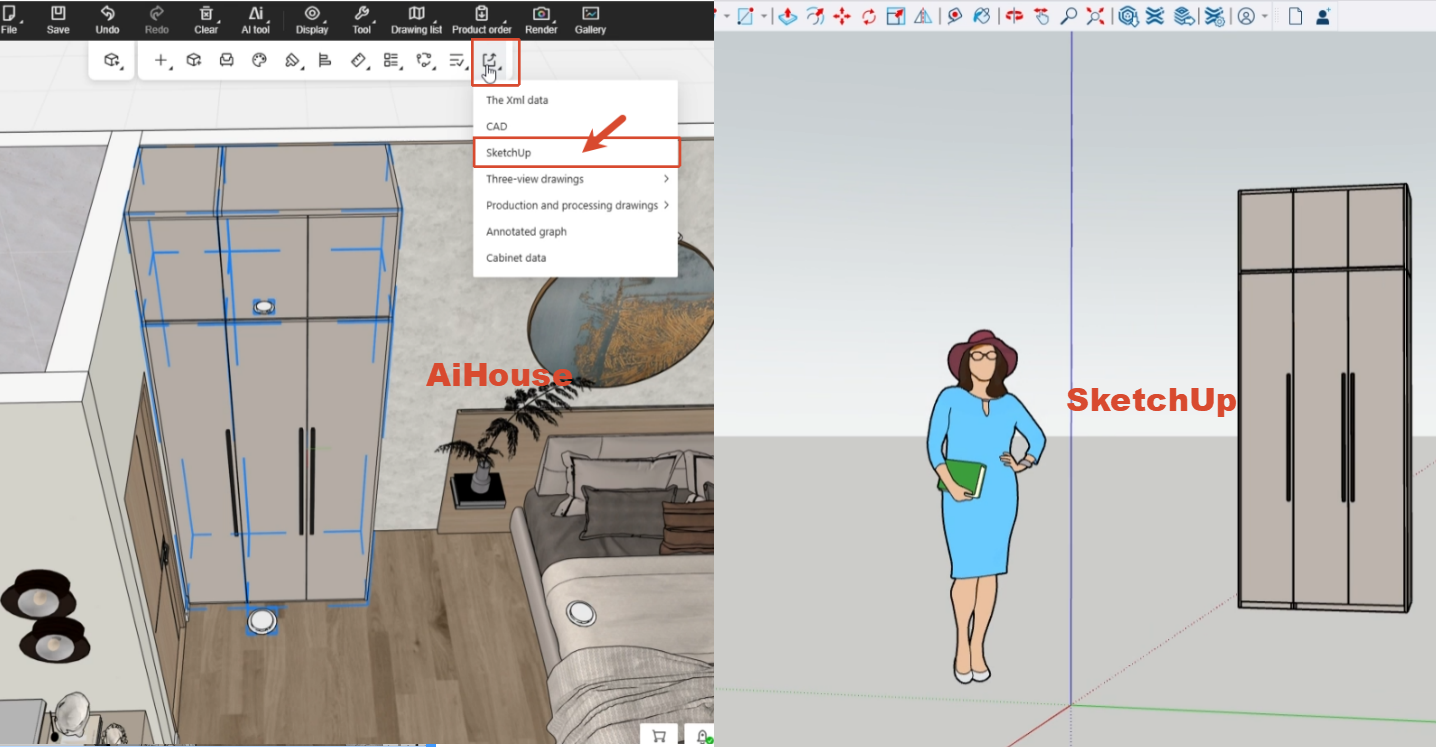
- Select a cabinet and export it to SketchUp with one click. (You need to install SketchUp Plugin)
How to Use:
- Install Sketchup Plugin (Check the tutorial here)
- Open an AiHouse project and enter the Custom Cabinets & Wardrobes module.
- Select the cabinet you want to export, then click "Export" in the top toolbar.
- Choose "SketchUp" from the dropdown menu.
- The current cabinet model is then generated in SketchUp.
Note: Models uploaded using the SketchUp plugin are only visible in AI Rendering. They will not appear in standard GPU rendering or real-time rendering. They can be used for design only and cannot be saved in your library or edited using the material brush or texture editor.
3. Real-Time Sync Between SketchUp and Free Modeling
*Only available for paid account
Highlights:
- Free Modeling now includes a SketchUp connection for one-click linking and real-time model sync.
- Complex shapes created in SketchUp can be sent directly to AiHouse, making advanced modeling more flexible.
You must install Sketchup Plugin to use this function (check the tutorial here).
Note: Models uploaded using the SketchUp plugin are only visible in AI Rendering. They will not appear in standard GPU rendering or real-time rendering. They can be used for design only and cannot be saved in your library or edited using the material brush or texture editor.
4. Fine-Tune AiHouse Panel Components in AutoCAD
*Only available for paid account
Highlights:
- Send panel components to AutoCAD for precise profile editing, then sync the closed profile back to the AiHouse preview automatically.
- Save the result through the AiHouse editing flow, with support for save, undo, and redo.
- Supports precision editing for single or multiple panel components.
How to Use:
- Install AutoCAD plugin (Check tutorial here)
- Open an AiHouse project and enter the Cabinets & Wardrobes module.
- Select the panel component you want to refine, then open "AutoCAD Collaboration" from the editing toolbar.
- Click "Push to CAD" to create a new CAD file with the current panel profile.
- Edit the panel profile in AutoCAD.
- Once the CAD profile is closed and valid, AiHouse updates the latest preview automatically.
- If the result looks correct, click "Confirm" in AiHouse to write it back.
- If you need to bring in geometry from another file, use "CAD Import".
- Save the proposal. If further changes are needed, use undo or redo to restore the editing result.
AI Features
1. New AI Model and AI Layout Entrances & AI Credits
Highlights:
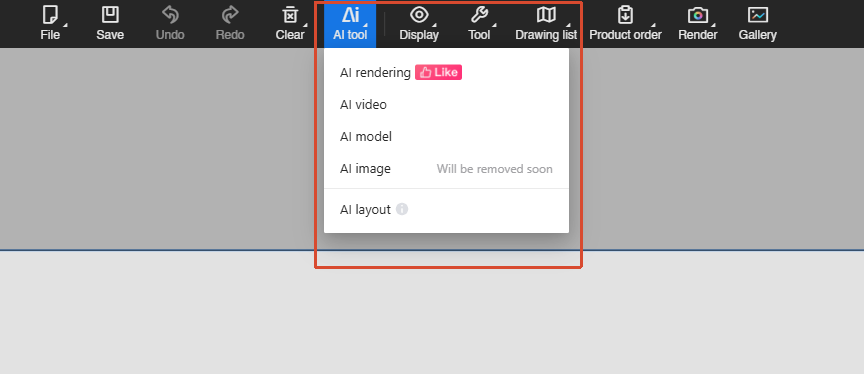
- A unified AI entrance now brings AI Model and AI Layout together in one place for faster access.
How to Use:
- Click the AI entry on the design page.
- Choose AI Model or AI Layout.
- Continue in the selected AI workspace.
To keep providing more stable and higher-quality AI features in AiHouse, the platform is introducing AI Credits. The following advanced AI features consume AI Credits based on the amount shown on the page:
1. AI 3D Model Generation
Use credits when using AI-generated 3D model features.
2. AI Rendering
Use credits when generating or optimizing render results with AI.
3. AI Panorama
Use credits when using advanced AI panorama features.
4. AI Video
Use credits when using advanced AI video features.
Click here to find out how to get AI credits.
2. AI Model
Highlights:
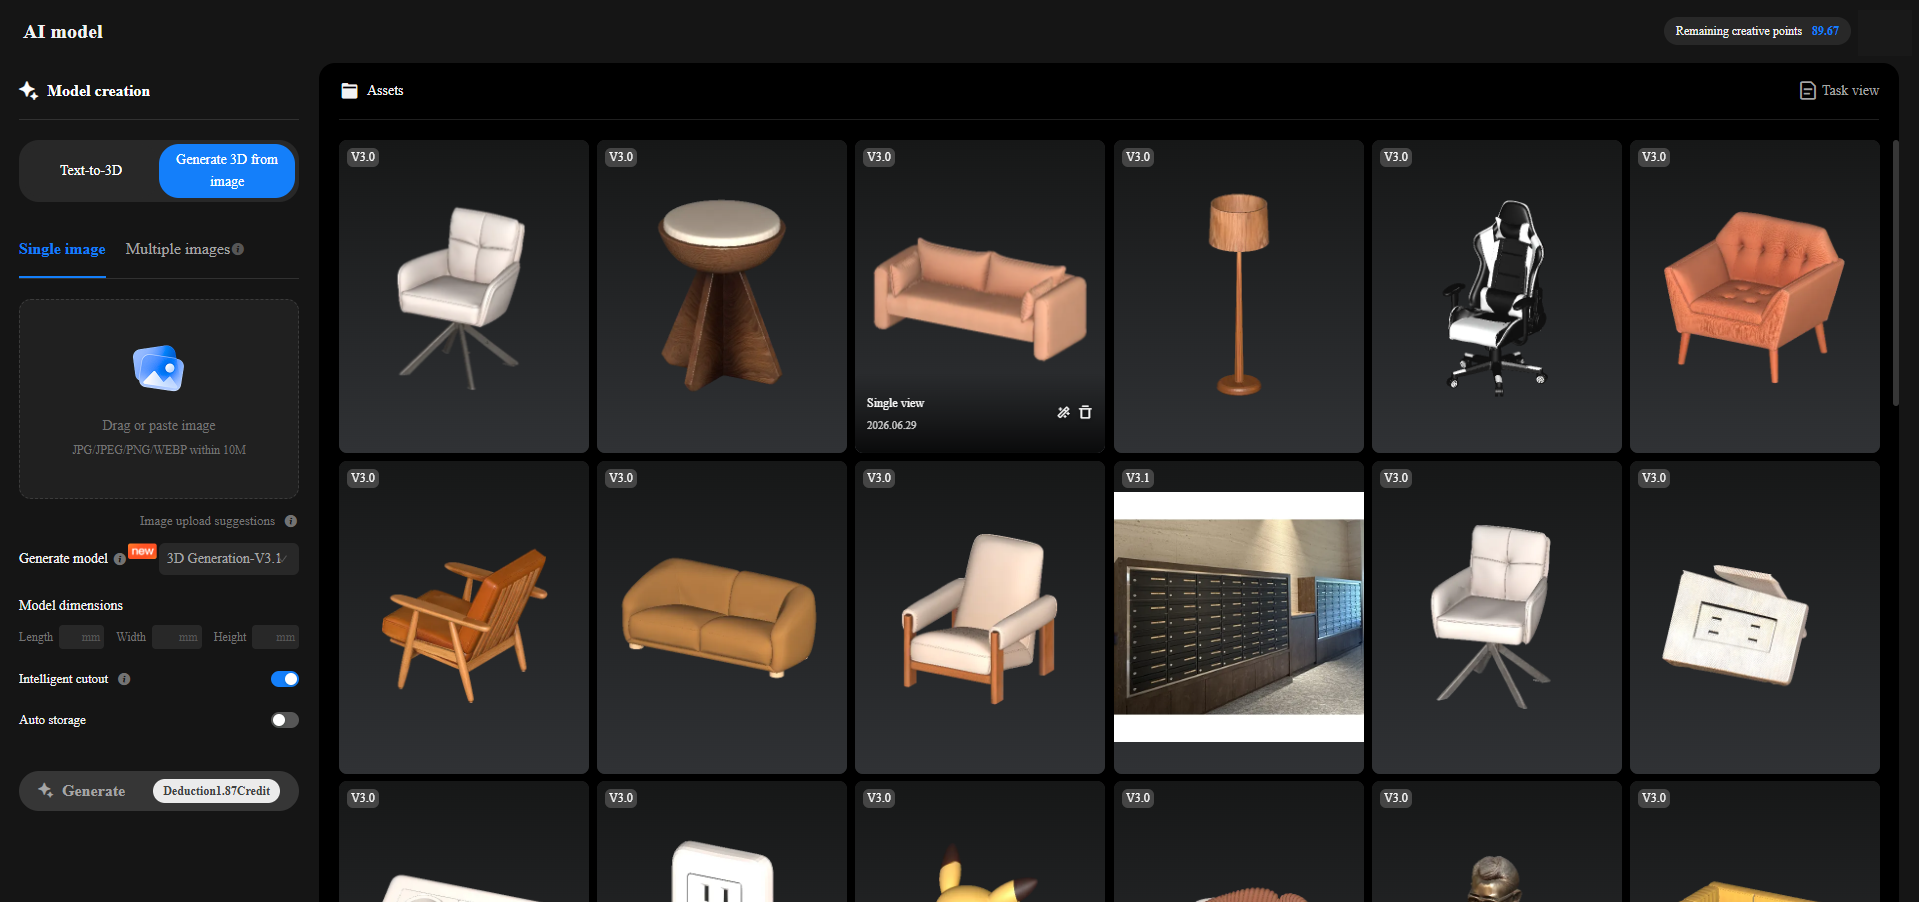
- Added V3.1 model selection for faster generation and better model compatibility in AI rendering scenarios.
- Added model size input for more accurate dimensions and shape restoration.
- Added multiple model save modes to match different usage scenarios.
- Added Smart Cutout for faster background removal, cleaner edges, and more realistic rendering results.
3. AI Rendering
Highlights:
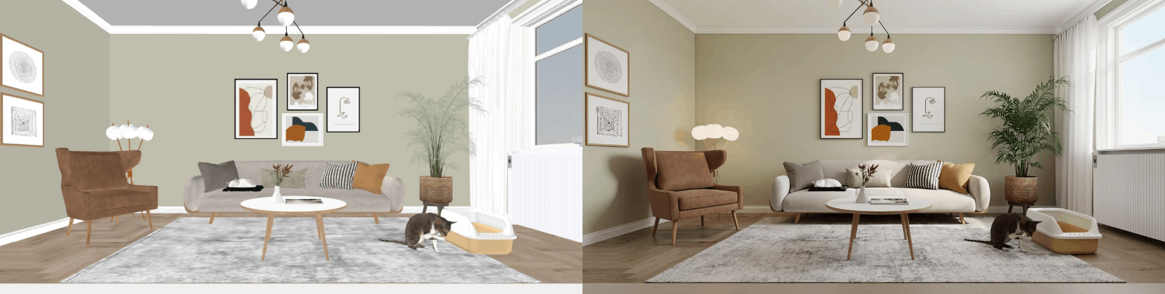
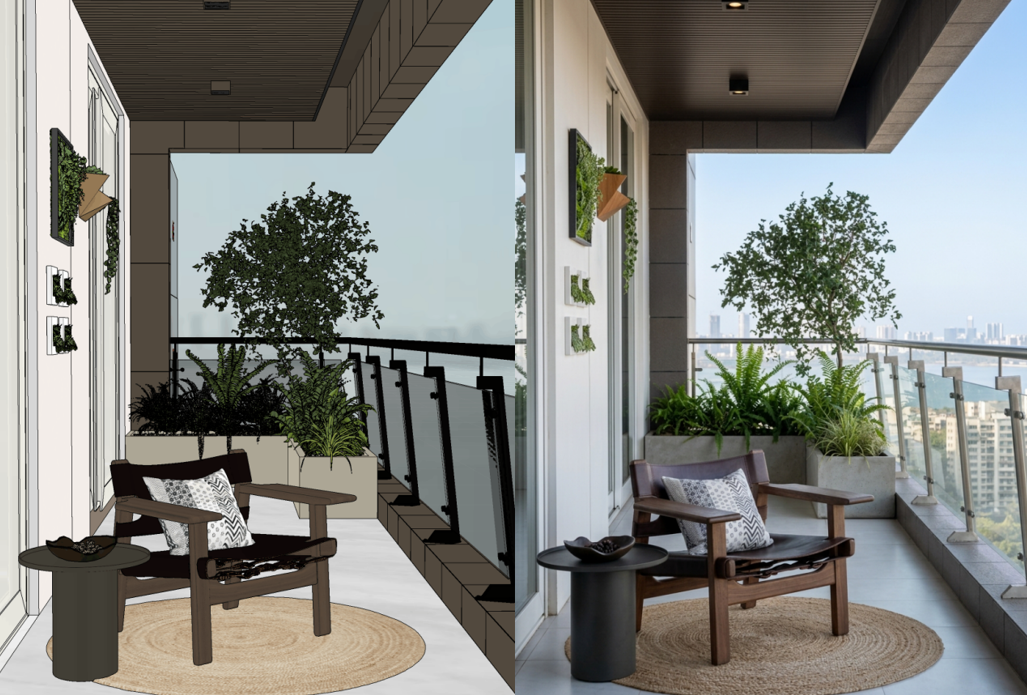
- Use AI to turn product images into 3D models, then reuse them in AI Rendering, AI Panorama, and Style Transfer with strong visual fidelity.
- AI Rendering now supports Nano Banana2 and GPT Image2 for better output quality, more realistic materials, and stronger space presentation.
- Generate renderings and panoramas faster while reducing manual modeling, lighting, rendering, and post-processing work.
- Style Transfer can apply the finish style from a reference image to the original image for faster proposal exploration.
How to Use:
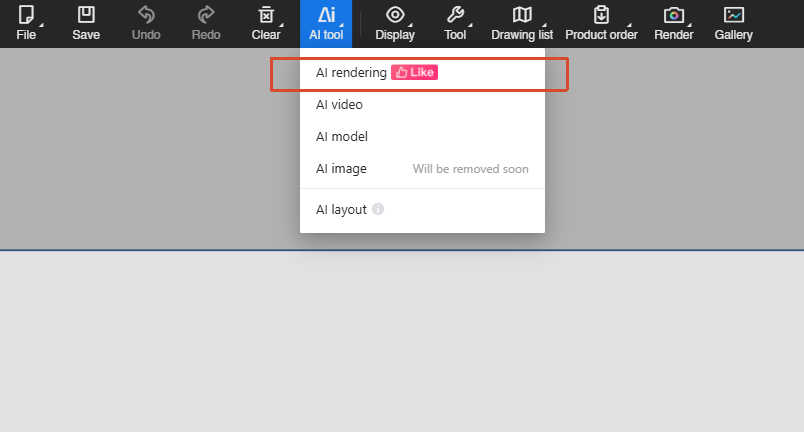
- Open "AI > AI Rendering".
- Choose Render, AI Panorama, or Style Transfer based on the output you need.
- For Render / AI Panorama, choose a recommended effect or custom parameters, adjust camera height, angle, lens, and aspect ratio, then click "Generate Now".
- For Style Transfer, upload or select a reference image. The system applies the finish style from the reference to the original image and creates a new styled proposal.
- After generation, review the result in Generation History, or view, compare, and download it from Album.
- If the image looks too small, use Ultra HD Upscaling on the preview page.
Check tutorial here.
Rendering & Drawings
1. Set a Default HDR Environment
Highlights:
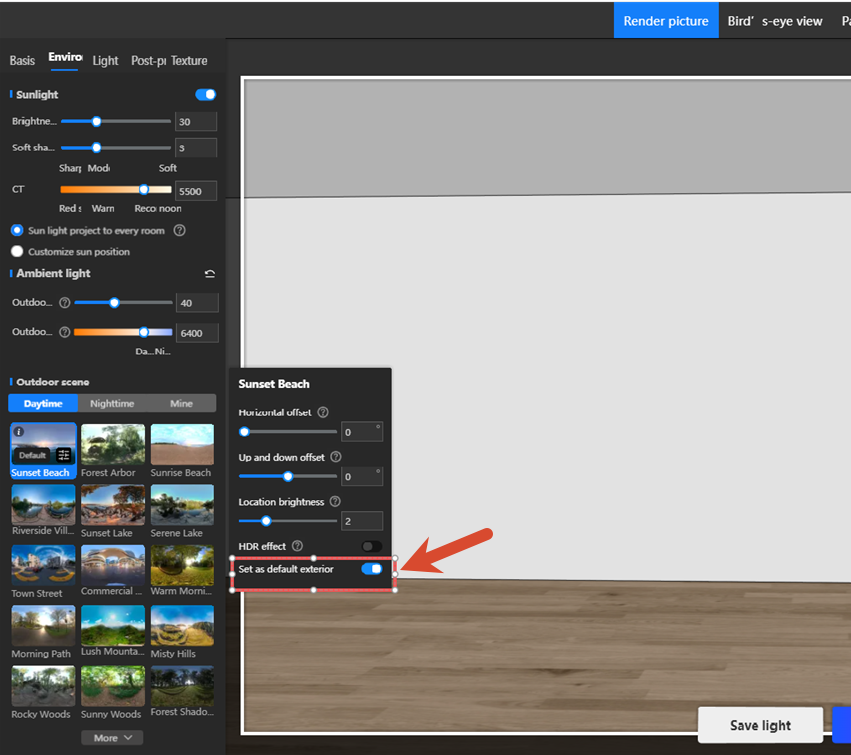
- Set commonly used HDR environments as the default so new proposals enter rendering with the preferred environment already selected.
How to Use:
- Open the environment editing area on the rendering page.
- Choose the HDR environment you want to use.
- Click "Set as Default".
- When a new proposal enters rendering, that HDR environment is selected automatically.
- The default environment setting is saved per user.
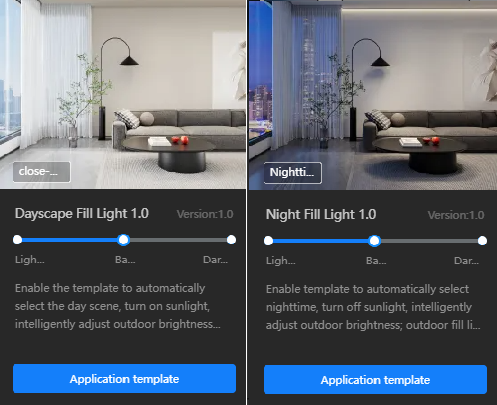
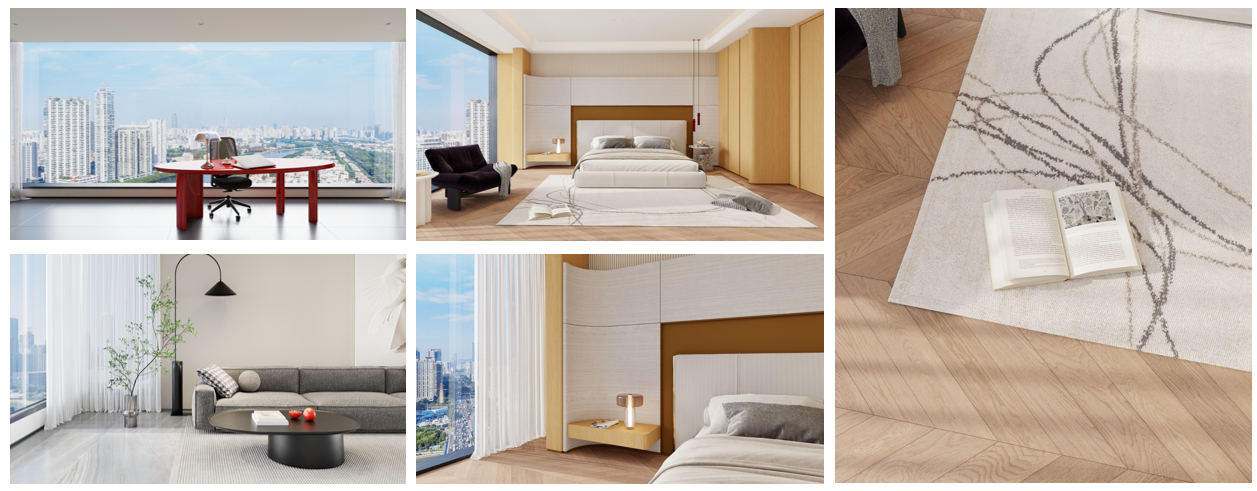
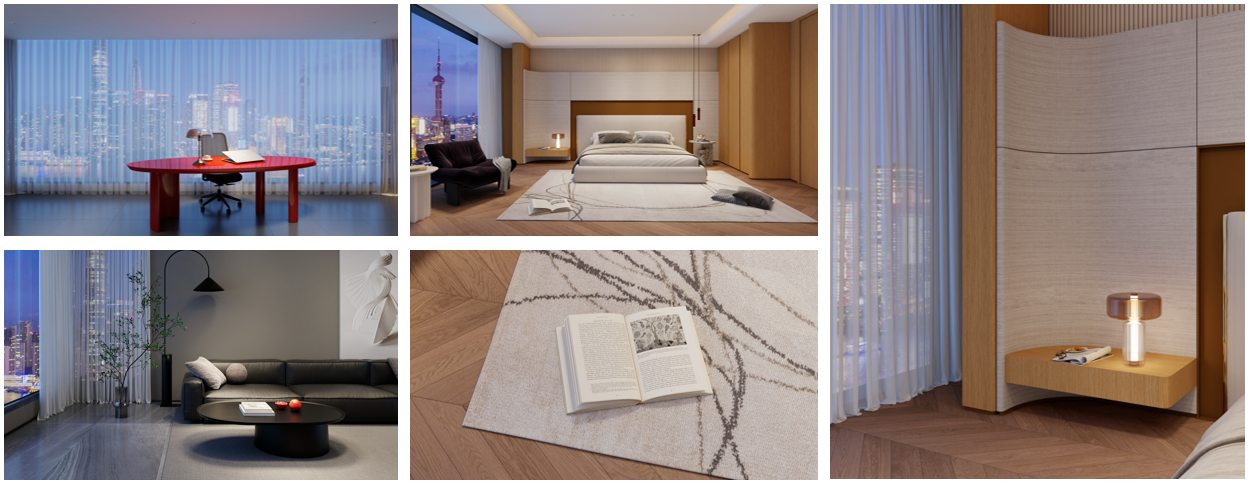
2. New Daytime and Night Lighting Templates
Highlights:
- New AI lighting templates add intelligent fill-lighting for both daytime and night scenes, with options for light and dark material spaces.
- The system can automatically arrange the environment, sunlight, ambient light, and fill lights to reduce manual adjustment.
- Generate more natural lighting with one click and near-instant feedback.
How to Use:
- Open the rendering page and choose the lighting template feature.
- Select a daytime or night template based on the scene.
- Choose a dark-material or light-material template based on the desired space effect.
- The system automatically sets the ambient light, sunlight, exterior brightness, and fill lights.
- You can continue to fine-tune the result before exporting the rendering.
3. New Show/Hide Controls on the Rendering Page
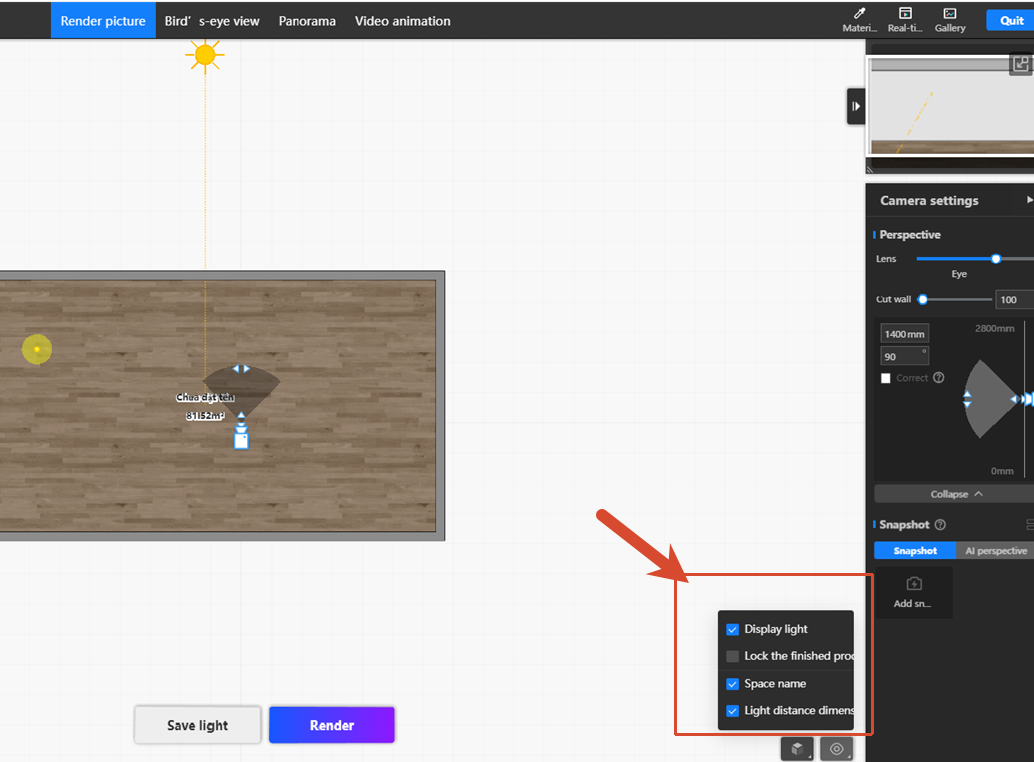
Highlights:
- A unified "Display" menu has been added to the rendering page, letting you show or hide lights, furniture items, space names, and light distance dimensions for a cleaner workspace.
- A new "Lock Furniture" option also improves box selection and multi-selection while editing lights.
How to Use:
- Click "Display" on the rendering page to open the display settings menu.
- Turn options such as "Show Lights", "Show Furniture", "Lock Furniture", "Space Names", and "Light Distance Dimensions" on or off as needed.
- When "Lock Furniture" is enabled, only virtual lights can be selected, which helps avoid accidental selection of furniture models.
- When "Show Lights" is enabled, all light information in the current scene becomes visible.
- In light editing scenarios, you can box-select multiple virtual lights for batch operations.
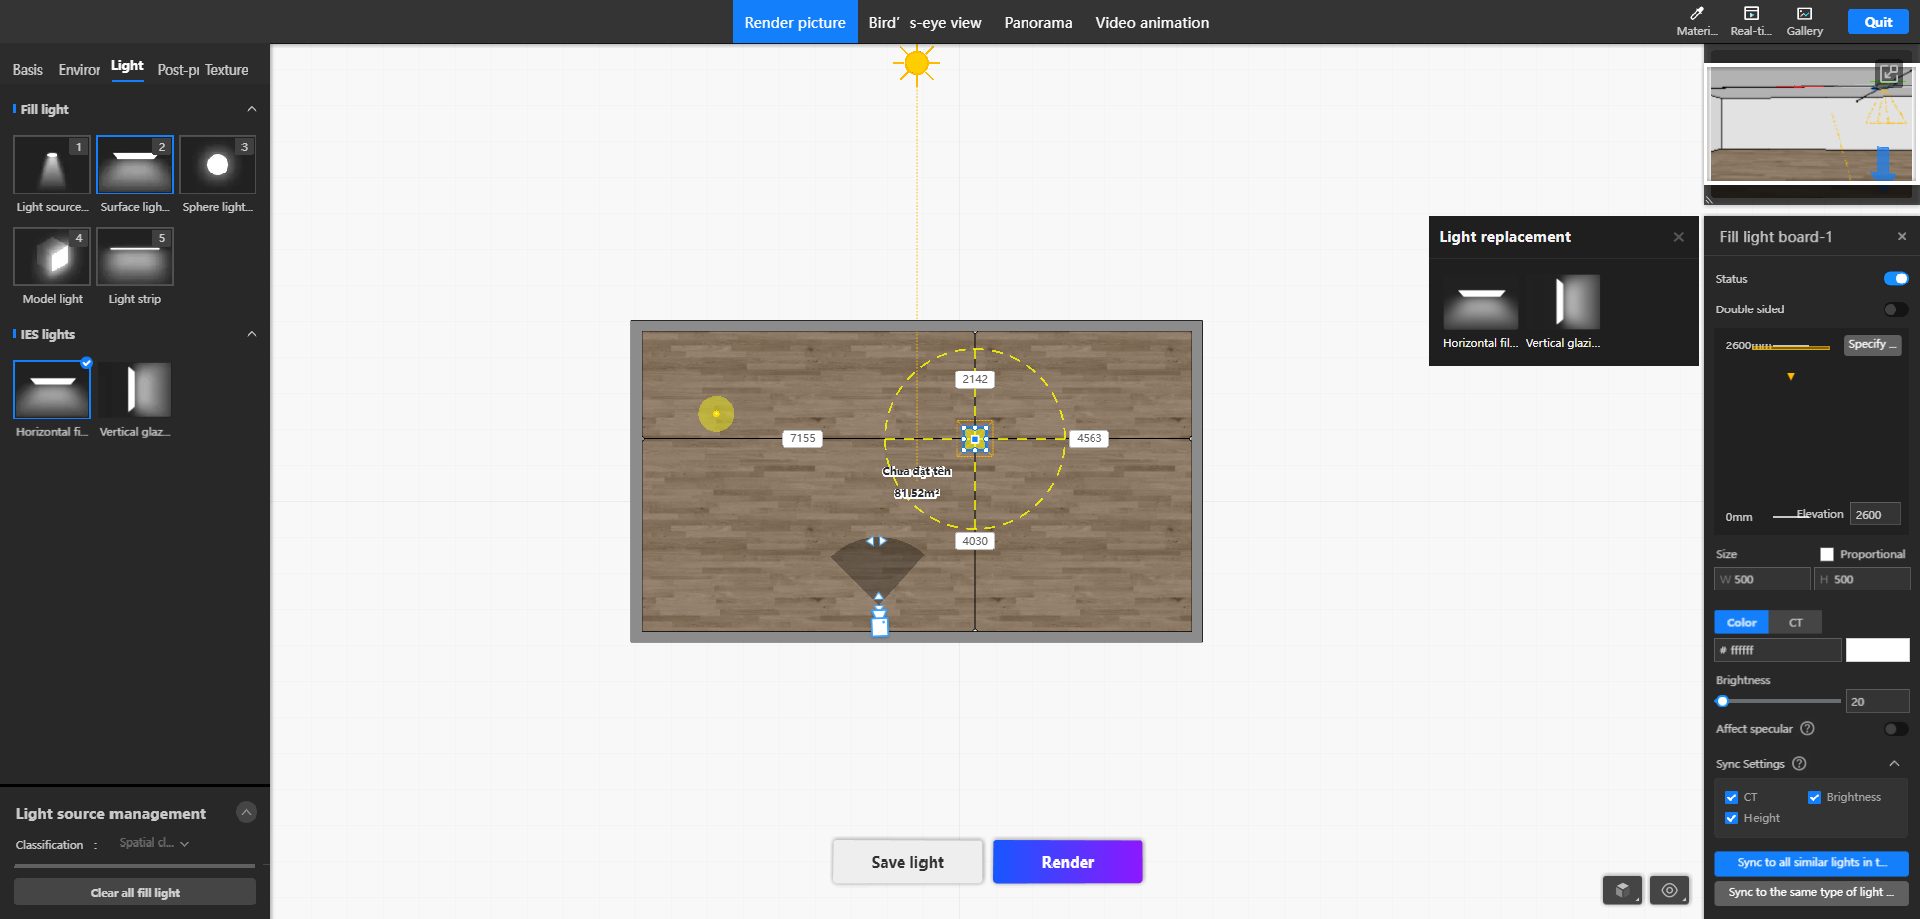
4. Improved Light Source Scaling
Highlights:
- Scaling is enabled by default, so no shortcut key is needed before you resize a light source.
- The scaling behavior is now aligned with standard model scaling, reducing the learning curve.
How to Use:
- Open the rendering page.
- Drag a light into the rendering canvas.
- Resize it by dragging the corner handles of the light bounding box.
5. 2D Floating Toolbar Improvements
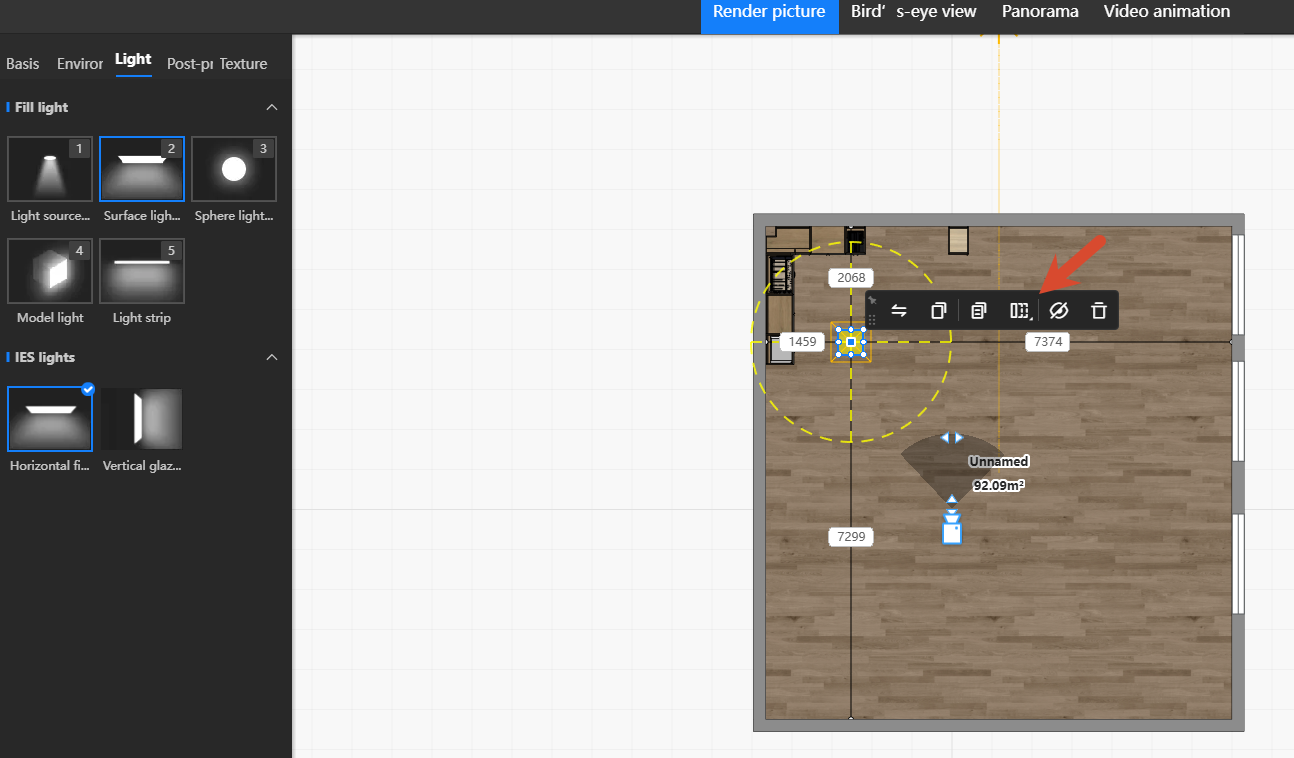
Highlights:
- The 2D view now supports floating-toolbar shortcuts for replace, set target, copy, copy attributes, array, delete, and hide.
- The floating toolbar now works across 2D, 3D, and walkthrough views, making lighting edits more consistent.
How to Use:
- Select a light in the 2D, 3D, or walkthrough rendering view to open the floating toolbar.
- Use the floating toolbar to replace, set targets, copy, copy attributes, create arrays, delete, or hide the light.
- For example, after clicking "Replace", you can choose a new IES profile or target light type.
- The floating toolbar can be pinned open or collapsed for continuous editing.
6. Ultra HD Upscaling in Album
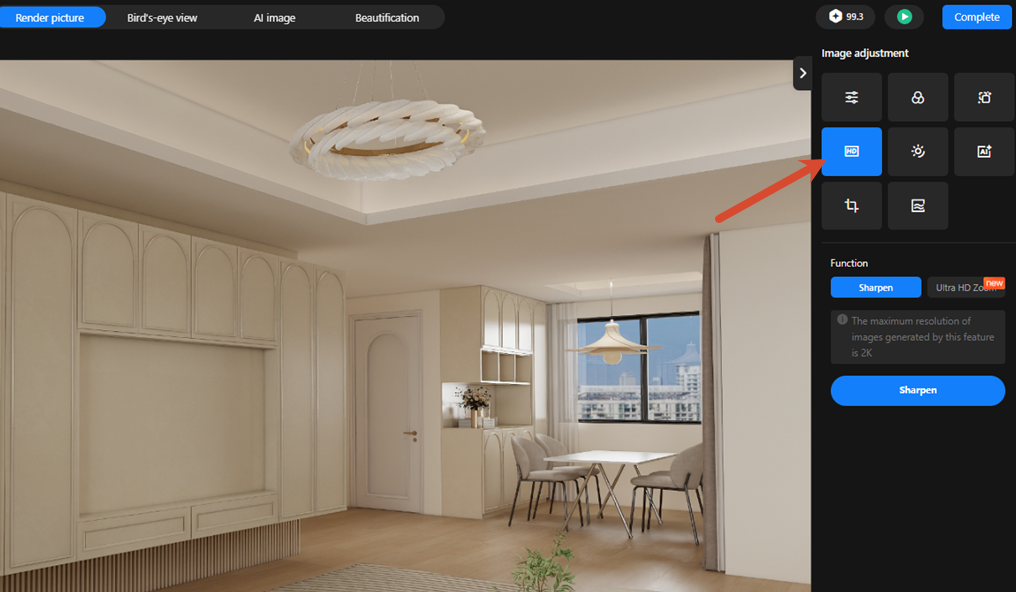
Highlights:
- Album now includes Ultra HD Upscaling to improve the resolution of existing images with AI.
- Standard-resolution images, low-quality images, rough draft renders, and AI-generated 2K images can all be enhanced for better clarity and detail.
How to Use:
- Go to Album > Image Enhancement > Enhance Clarity > Ultra HD Upscaling.
- Choose the upscale factor and click Generate.
7. AI Relighting Supports 4K Output
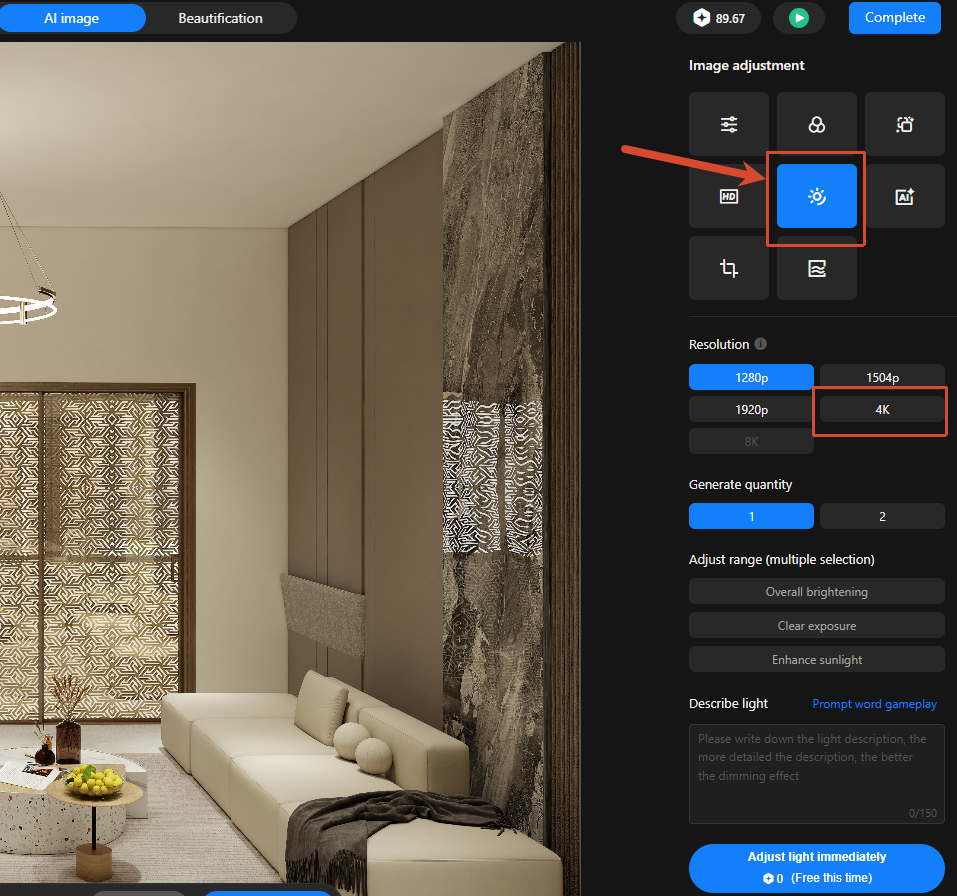
Highlights:
- Album now includes AI Relighting to improve both lighting atmosphere and image quality for renderings.
- It enhances depth, brightness, and overall polish while keeping materials, spatial structure, and design details as close to the original as possible.
How to Use:
- Open Album and select the rendering you want to enhance.
- Click "AI Relighting".
- Choose the target resolution.
- Optionally set the adjustment scope, such as overall brightening, exposure reduction, or stronger sunlight.
- Add your relighting request in the description field.
- Click "Generate Now".
- After generation, review the relit image in Album.
8. Enlarged Views, Section Views, and Color Drawings
Highlights:
- Enlarged views make small details easier to read, section views make internal structures easier to understand, and color drawings make material effects more intuitive.
- Design, review, production, and client communication can all align around the same drawing with less repeated explanation.
- The final drawing output looks more professional by combining construction information, detail confirmation, and proposal presentation in one package.
Design Efficiency
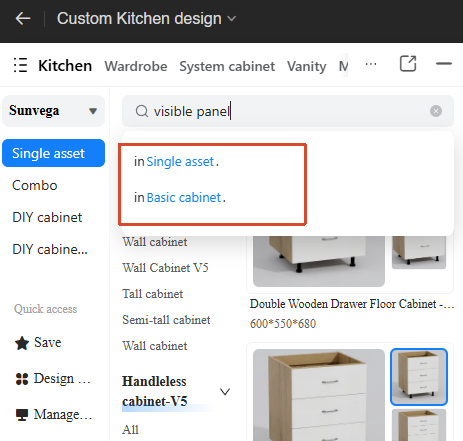
1. Search Within a Specific Folder in the Left Asset Panel
Highlights:
- The left asset panel now supports searching within a specified folder range.
- You can search across the full library or limit results to the current folder.
How to Use:
- Open an AiHouse proposal, enter the Cabinets & Wardrobes module, and click the search box in the left asset panel.
- Enter a keyword and choose the search range, such as "Search in Design Library" or "Search in Current Folder".
- Review the results, then drag in or use the target asset.
2. Multi-Select Door Panels and Drawer Fronts in Panel Editing Mode
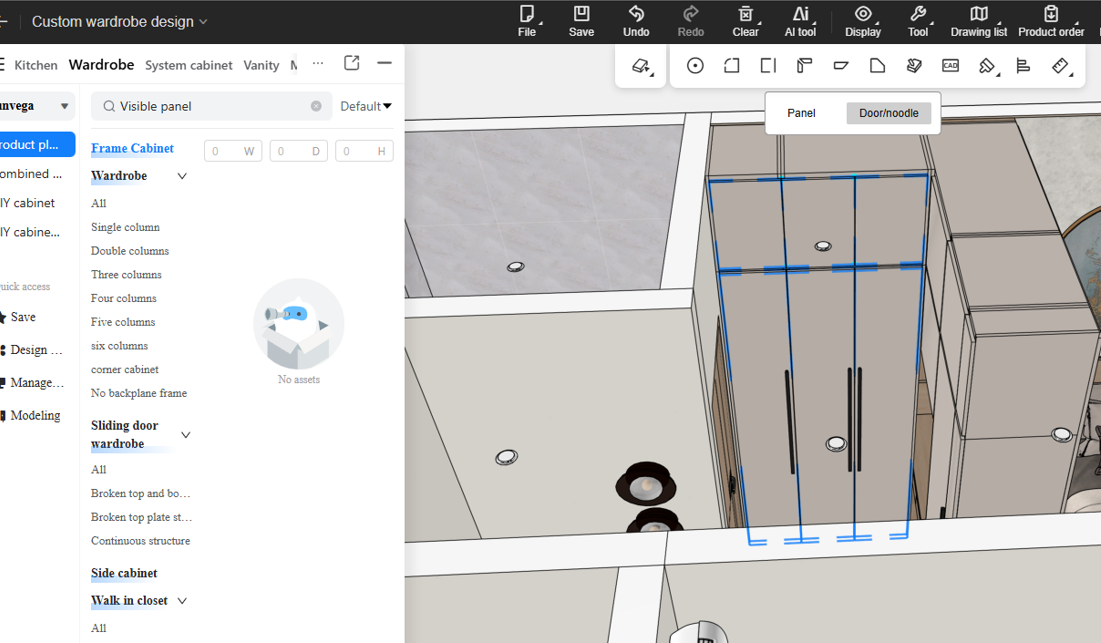
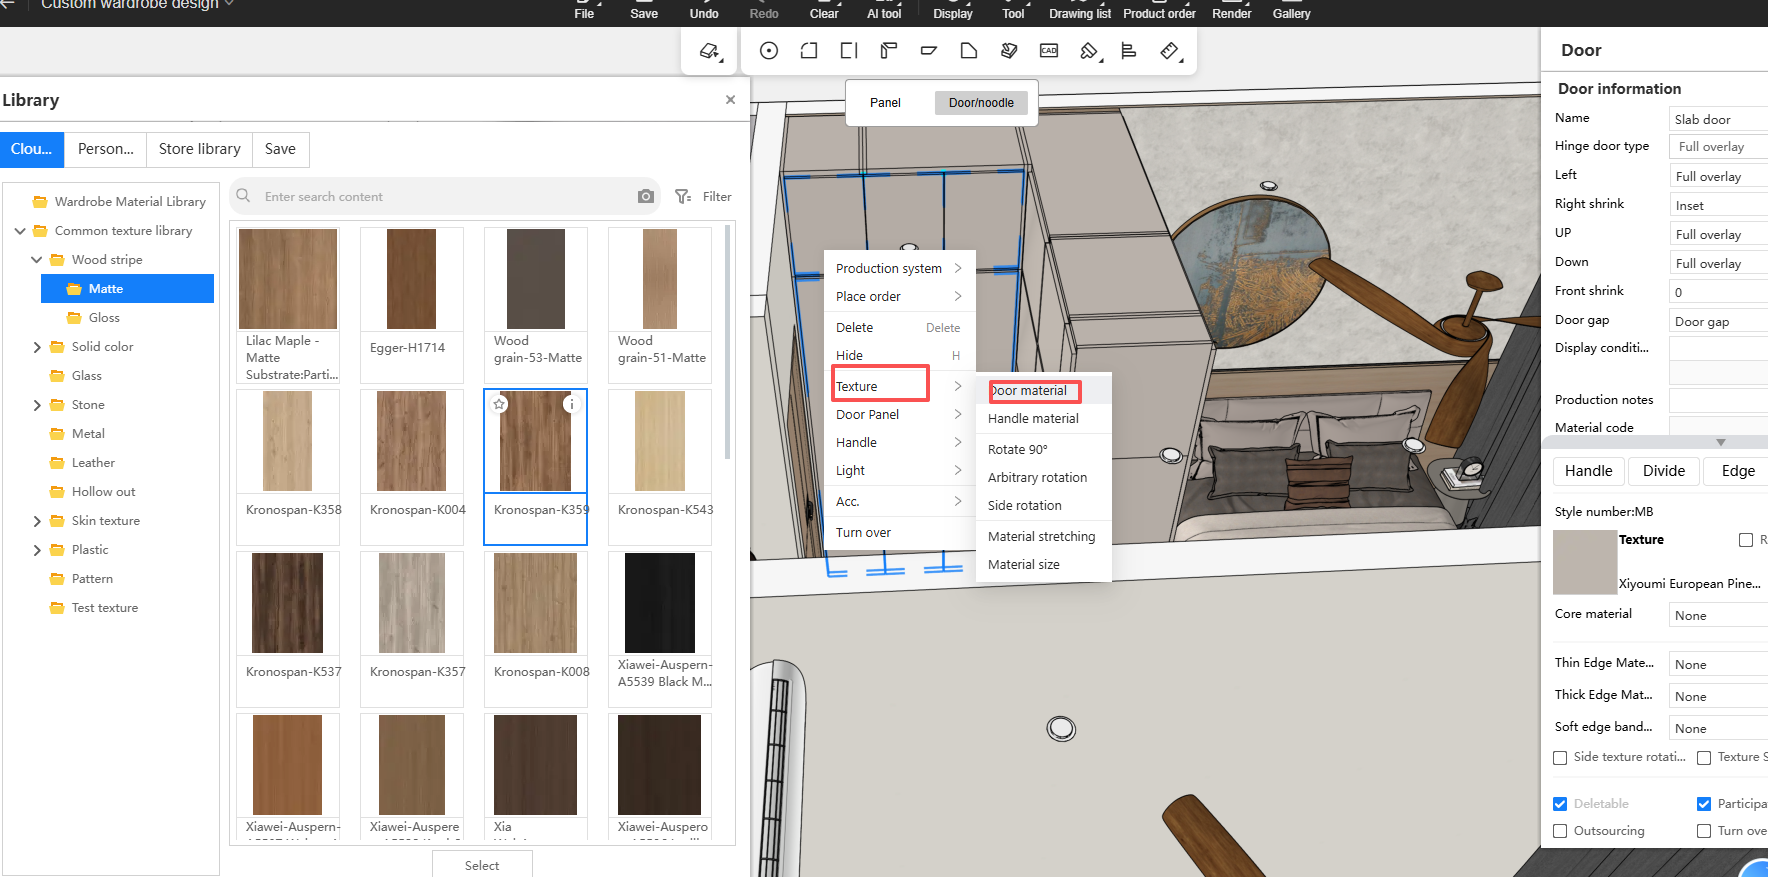
Highlights:
- Panel Editing mode now adds a "Selection Level" switch, allowing multi-selection of door panels, drawer fronts, and sliding door panels for batch material and size edits.
How to Use:
- Open an AiHouse proposal and enter the Cabinets & Wardrobes module.
- Switch to Panel Editing mode.
- Use the new "Panel Component / Door & Drawer Front" selection level switch.
- Stay at "Panel Component" to keep the original component-level selection logic.
- Switch to "Door & Drawer Front" when you need to batch-edit door panels, drawer fronts, or sliding door leaves.
- Left-click or Ctrl+Left-click to select the items you want to edit together.
- Open Material & Size and update material, size, UV Start, and Offset for all selected items at once.
3. Drawer Opening Animation Works Without a Drawer Front
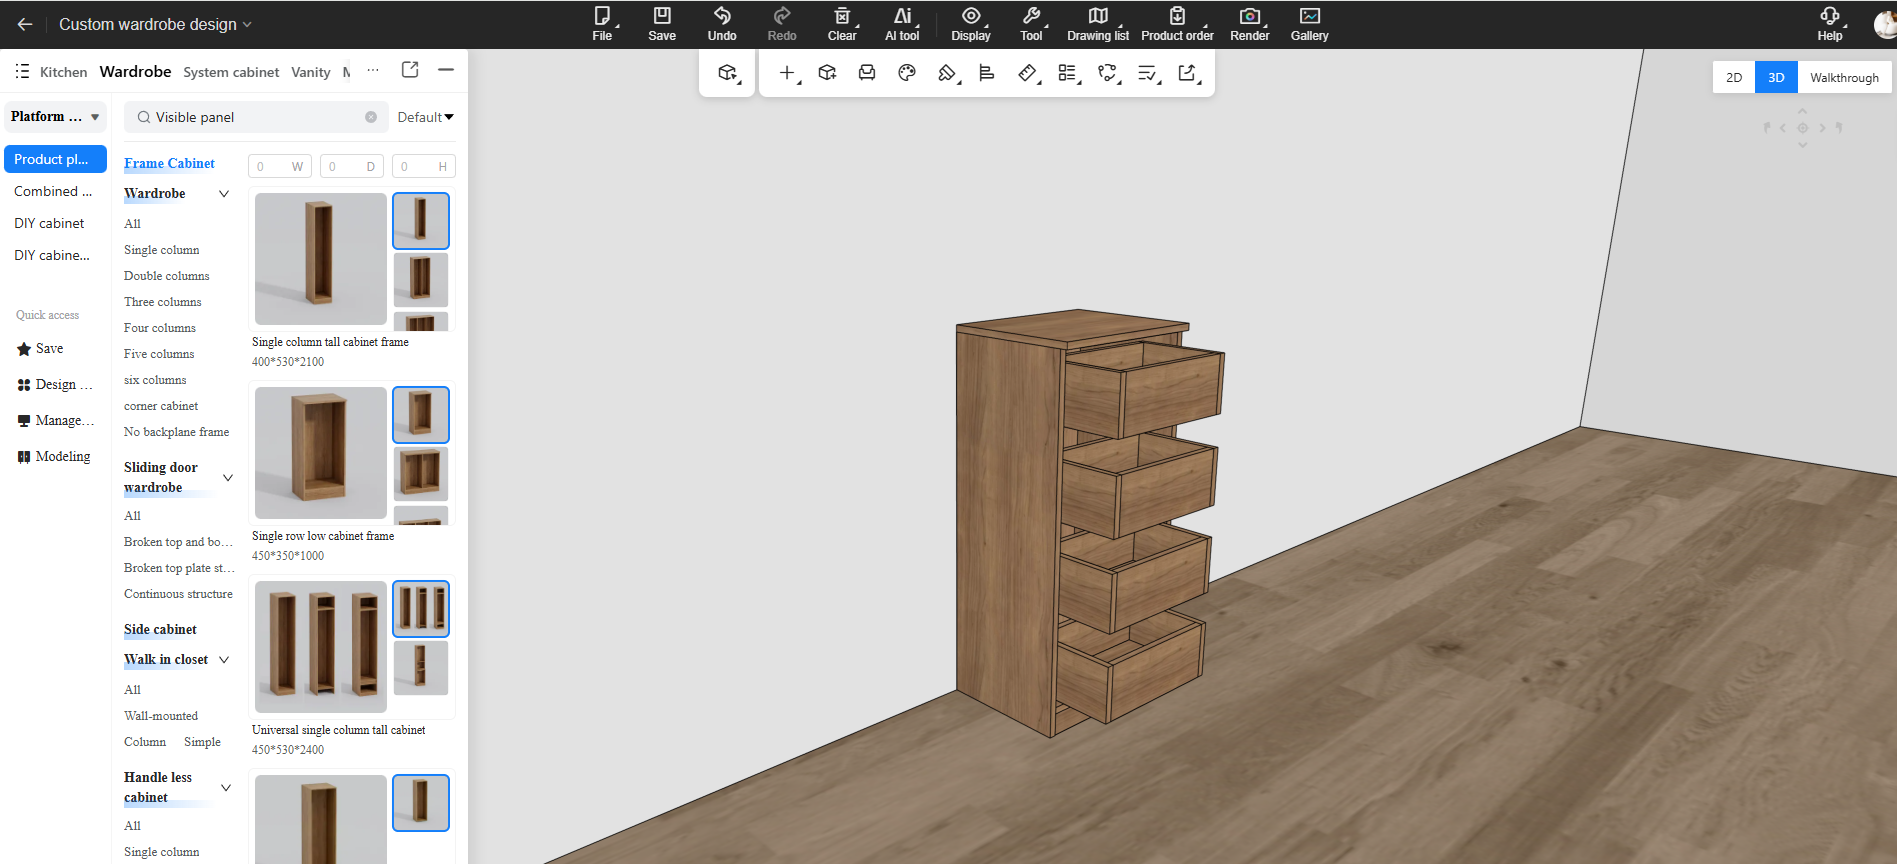
Highlights:
- Drawer-type functional components can now play opening and closing animations even without a physical drawer front.
- The animation no longer depends on the old drawer entity and still preserves drawer movement and hardware linkage in guide-rail scenarios.
How to Use:
- Open an AiHouse proposal and enter the Cabinets & Wardrobes module.
- Select the cabinet, drawer, or drawer-type functional component you want to verify.
- Run drawer opening or closing actions in standard cabinets, free cabinets, sliding-door cabinets, or combination mode.
- You can verify the result with right-click actions such as "Open Door Panel / Close Door Panel", step-by-step opening, custom-angle opening, or shortcut key O.
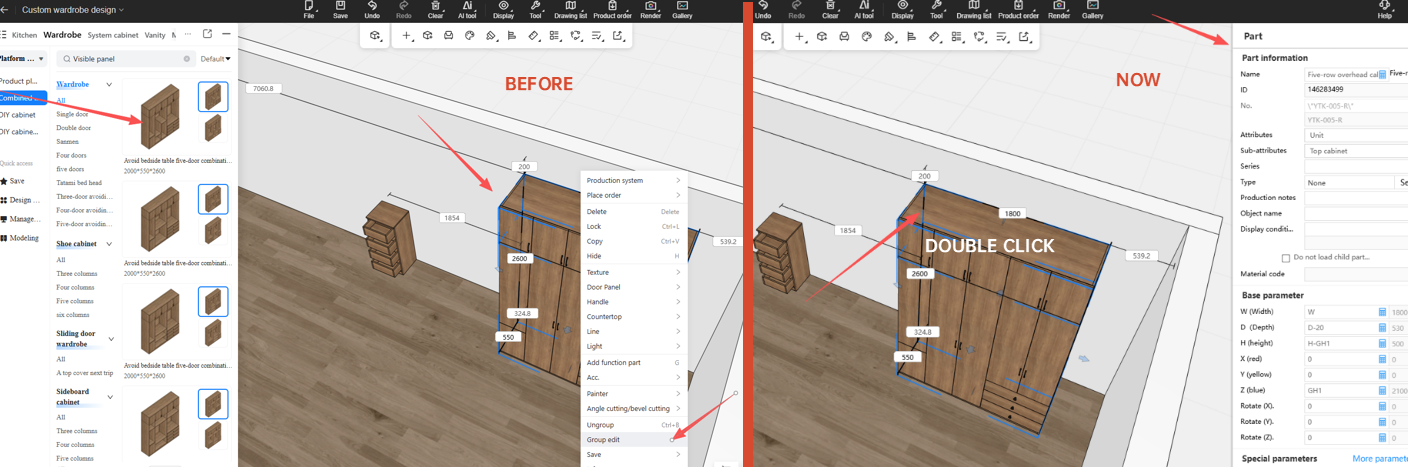
4. Double-Click Cells to Open the Part Editing Panel in Parametric Library Entry - Combo Edit Mode
Highlights:
- In Combo Edit mode, you can now double-click a cell to open the part editing panel directly for faster editing.
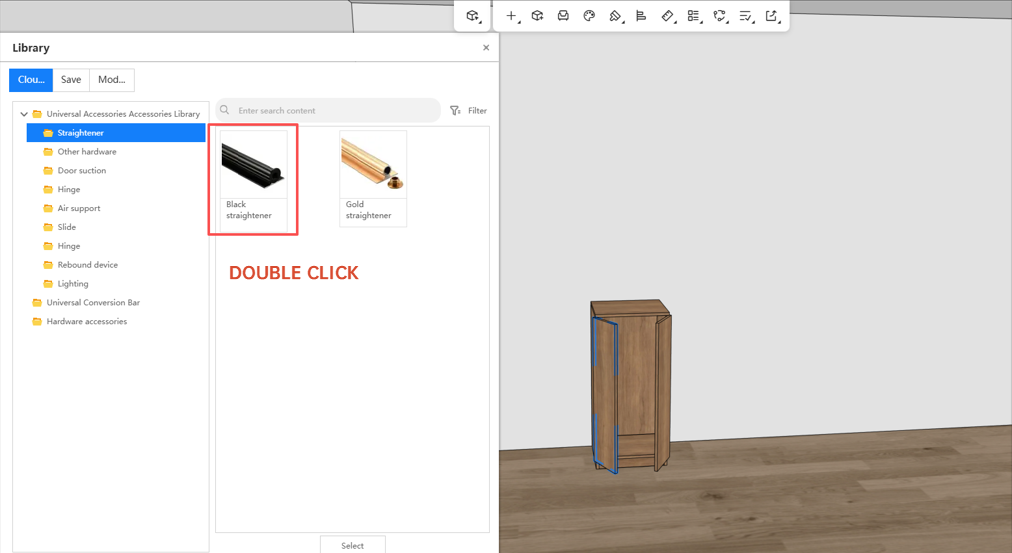
5. Double-Click Support for Adding Accessories and Batch Conversion
Highlights:
- Accessories can now be added by double-clicking.
- The double-click experience is now consistent across accessory adding and batch conversion.
How to Use:
- Open an AiHouse proposal, enter the Cabinets & Wardrobes module, and open the accessory entry for the cabinet or target object.
- Find the accessory you want and double-click it to add it to the current cabinet or configuration object.
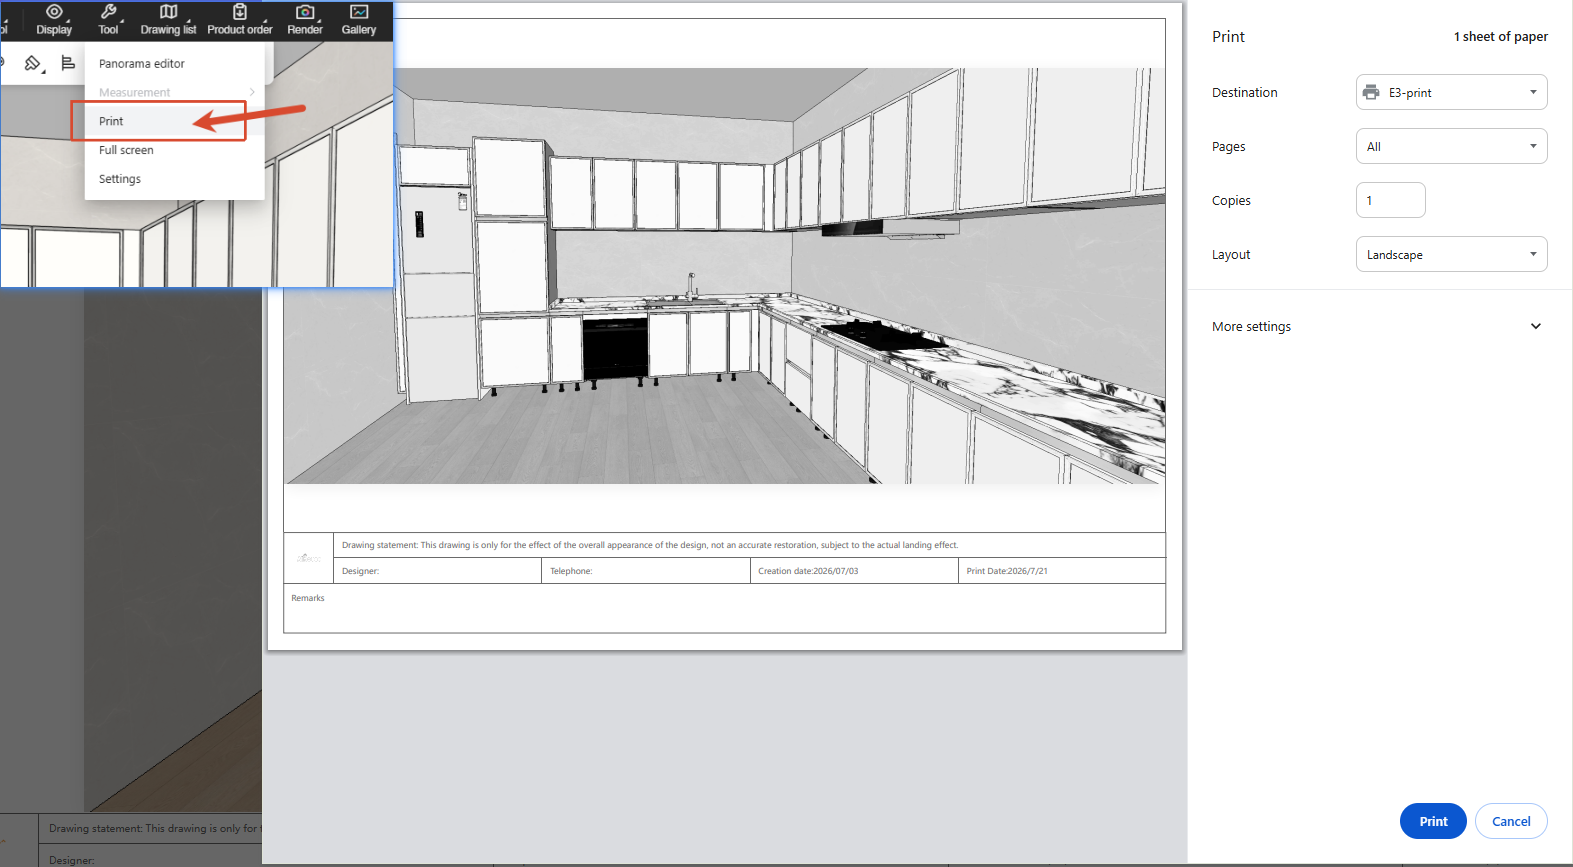
6. Quick Print from the Design Page
Highlights:
- A new quick-print shortcut lets you jump into printing directly from the design page, reducing repeated page switching and improving printing efficiency.
How to Use:
- Click "Print" in the top toolbar of the design page to enter printing directly.
- Choose the printer settings in the pop-up print window.
- Select the printer and confirm to finish printing.
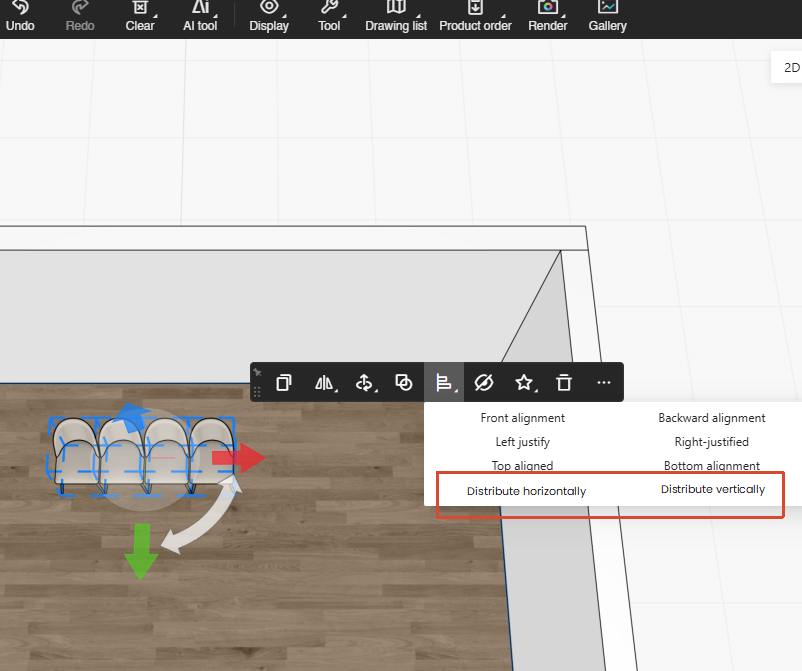
7. Horizontal and Vertical Distribution for Furniture Items
Highlights:
- New horizontal and vertical distribute commands let you space multiple models evenly with one click.
- When three or more models are selected, spacing can be equalized automatically instead of adjusting each model by hand.
How to Use:
- Select three or more models on the canvas.
- Open the alignment tools from the quick toolbar.
- Choose Horizontal Distribution or Vertical Distribution.
- The system automatically adjusts positions to keep equal spacing between the selected models.
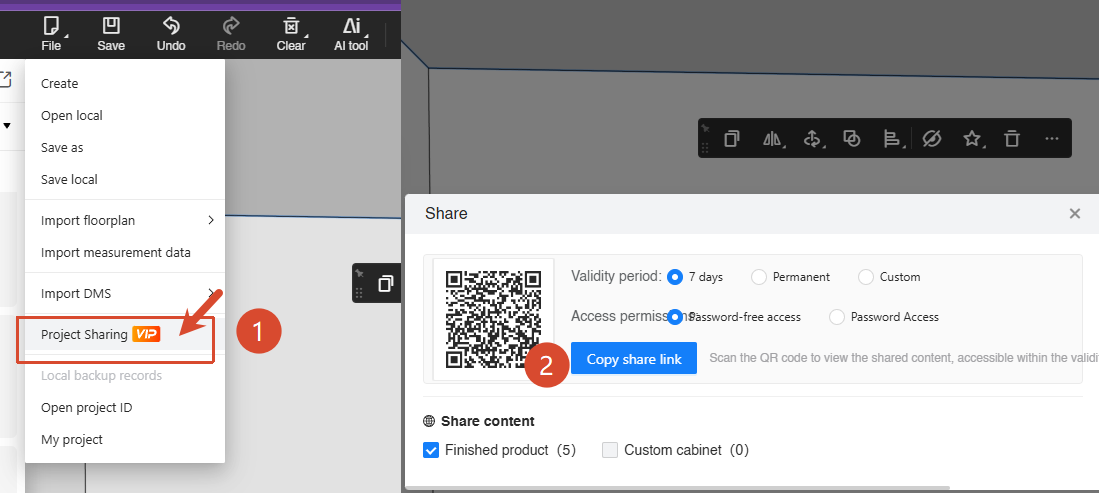
8. Project Sharing
Highlights:
- Share proposals quickly with either a QR code or a link.
- You can set an expiration date and password for safer access.
- Choose what to share, such as furniture items or custom cabinets.
- Viewers can browse the AiHouse proposal online with bird's-eye view, walkthrough, reset view, camera settings, and more.
- Product information such as model names and dimensions is also visible, making the proposal easier for clients to understand.
- Support for single-space and all-space switching helps viewers focus on the most important area.
- Display modes such as material, wireframe, material + wireframe, and transparent wireframe help clarify structure and details.
- Model show/hide and transparency controls make it easier to explain cabinet, soft furnishing, and interior finish details.
How to Use:
- Open your design project.
- Click the top menu.
- Go to File > Project Sharing.
- Choose what content to share in the dialog.
- Set the link expiration date and access password if needed.
- Copy the sharing link or let the client scan the QR code.
- After opening the link, the client can browse the AiHouse proposal and product information online.
Workbench Management
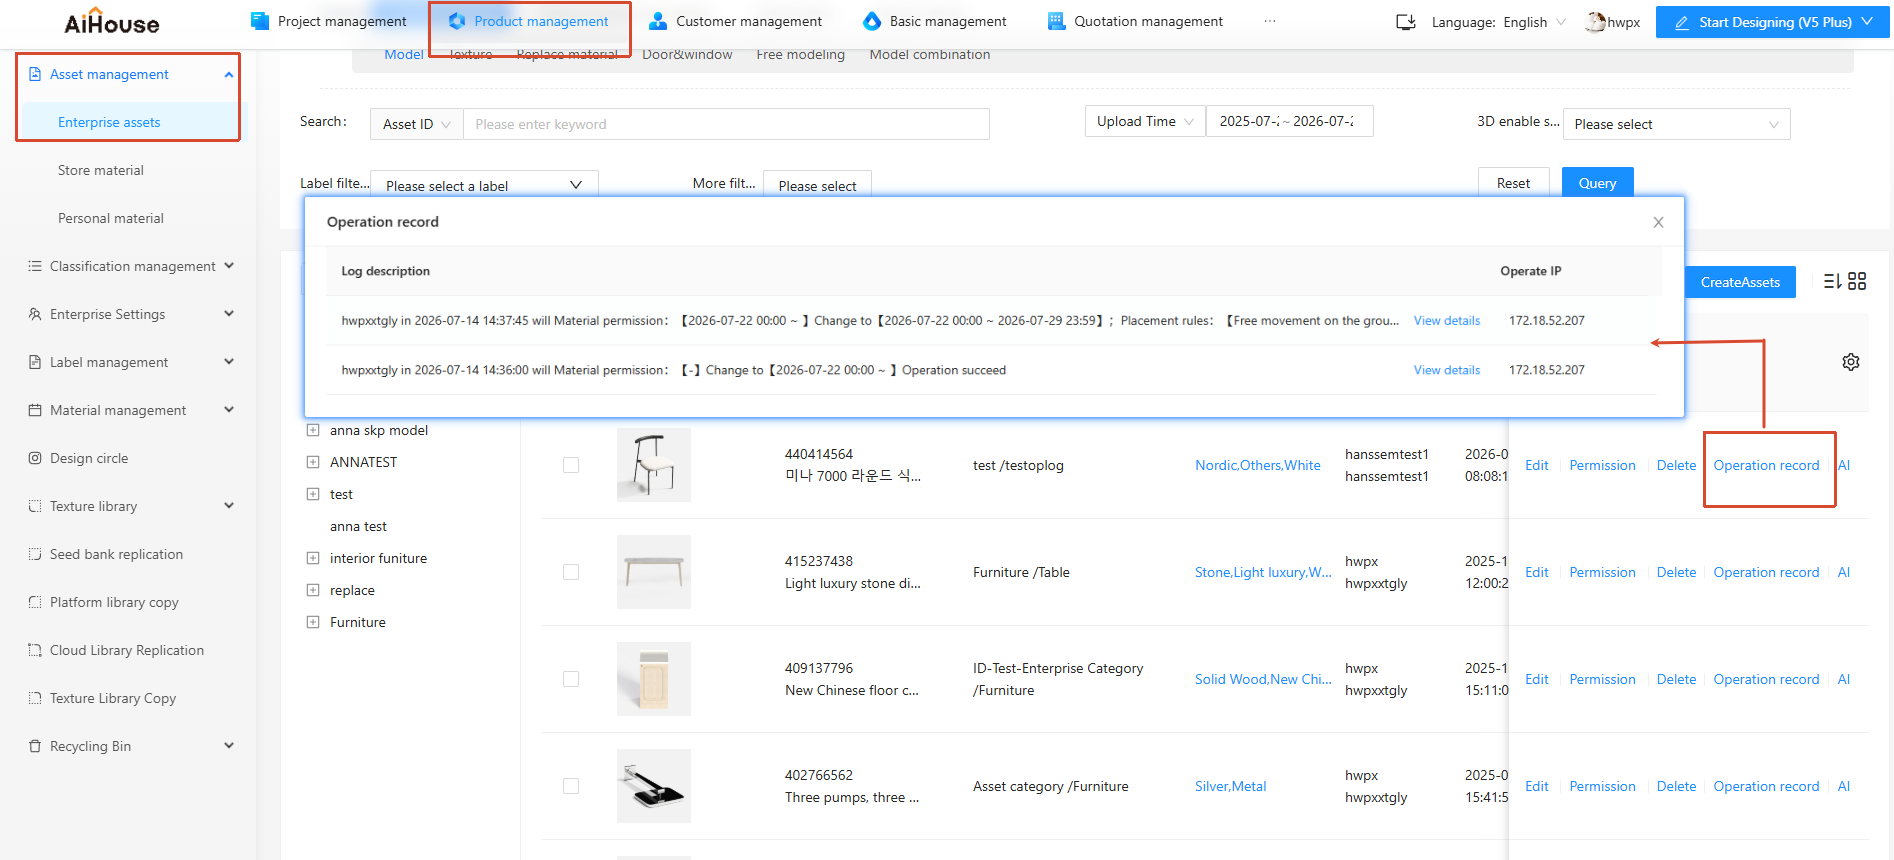
1. Operation Logs for Assets (Enterprise, Store, and Personal)
Highlights:
- All additions and later changes to assets are recorded automatically for full traceability.
- The operator, operation time, and action details are logged clearly for easier responsibility tracking.
- When asset issues appear, logs help trace the source of the problem much faster.
How to Use:
- Go to Workbench > Enterprise Assets > Models, then click "Operation Logs".
2. Operation Logs for Material Management > Base Material Library
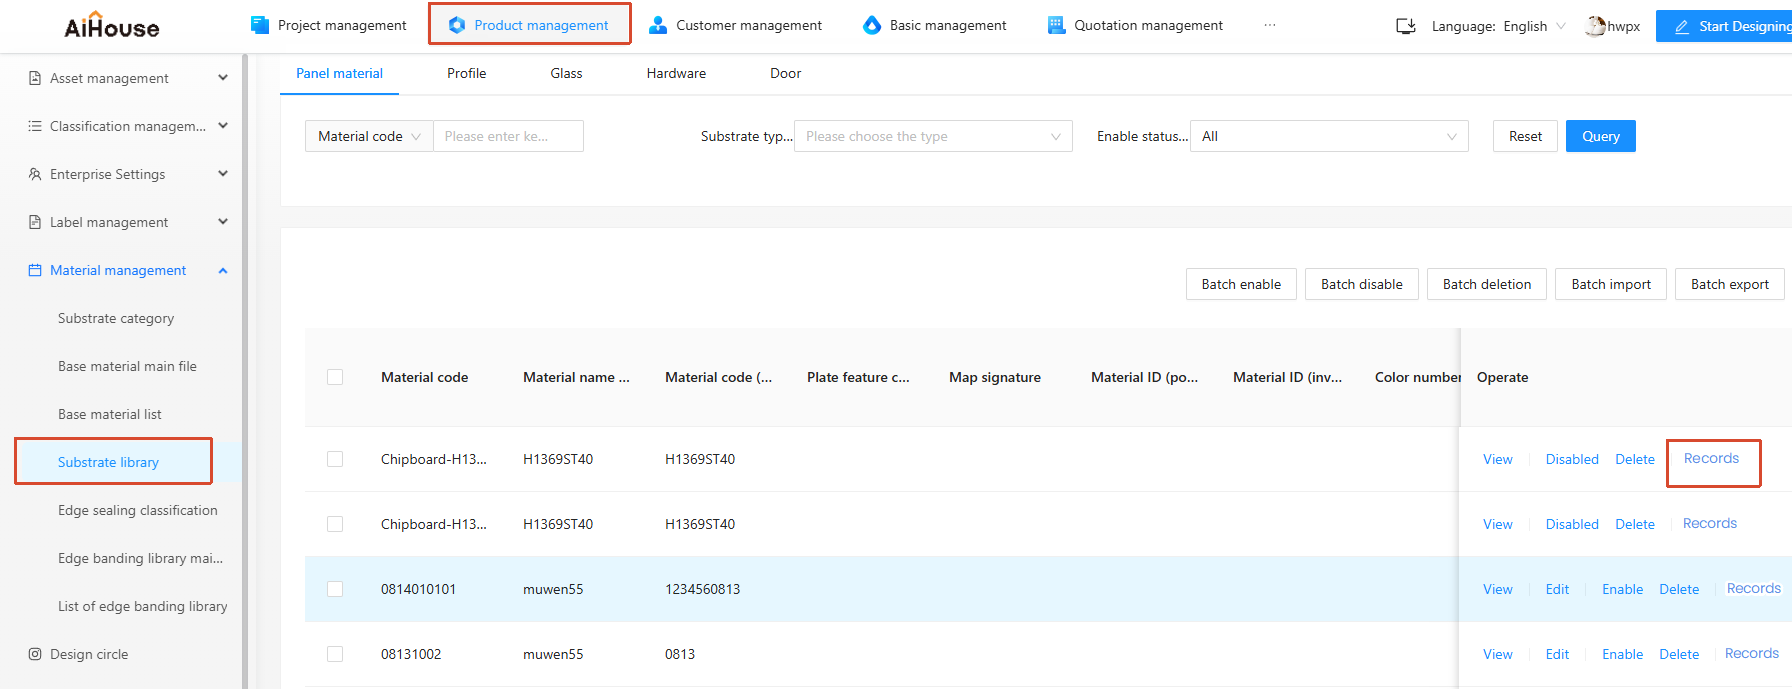
Highlights:
- All add, edit, delete, enable, and disable actions in the Base Material Library are now recorded.
- The operator, operation time, and action details are logged clearly for easier responsibility tracking.
- If base material data problems occur, the logs help trace the source of changes quickly.
How to Use:
- Go to Workspace > Material Management > Base Material Library, then click "Records".
Aluminum Doors & Windows
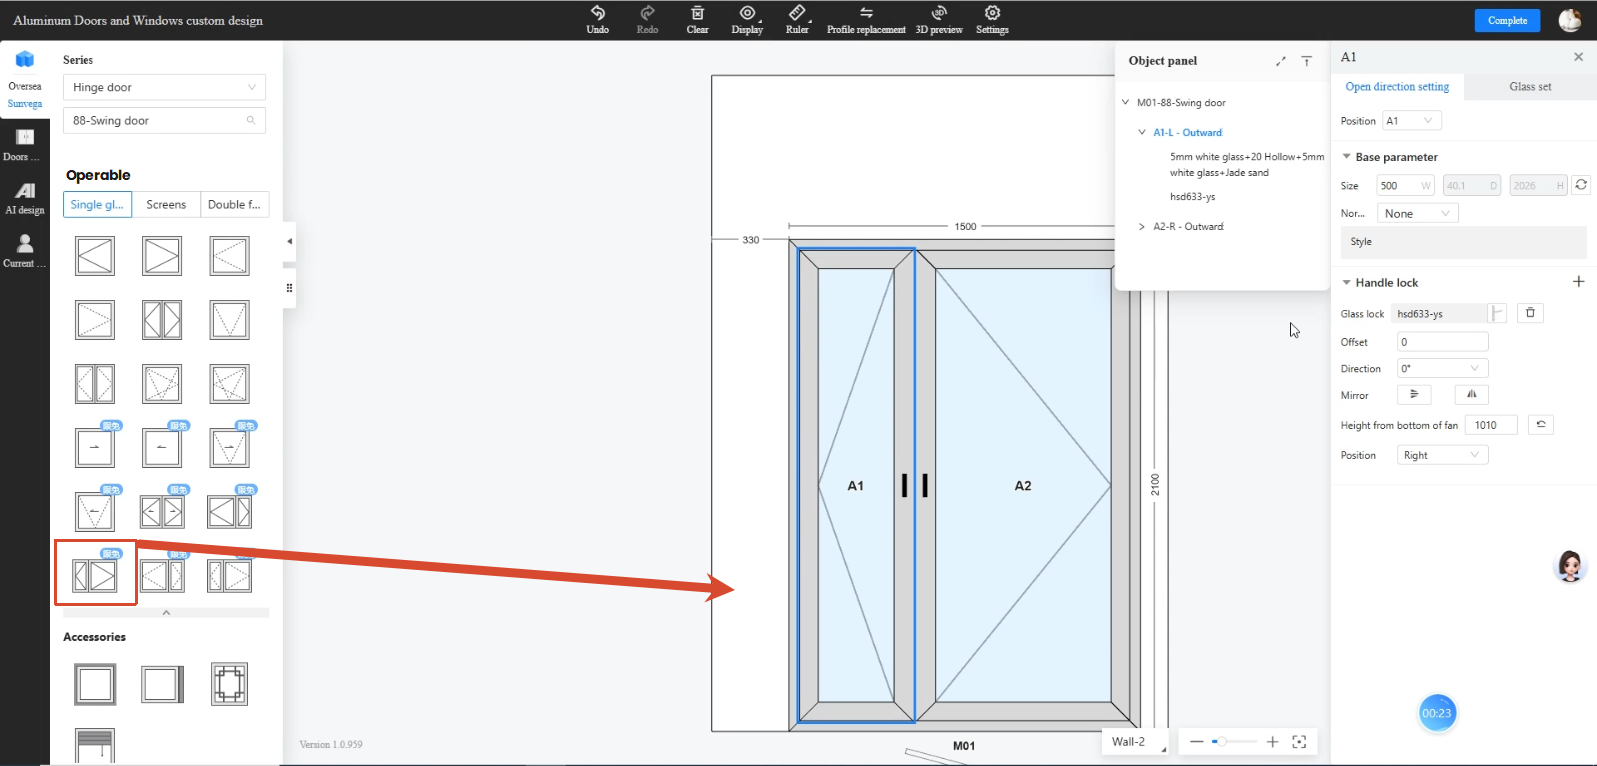
1. New Double-Leaf Sash Opening Style with Config-Based Generation
Highlights:
- Adds a new double-leaf sash opening style with both proportional generation and manual width setting.
- Supports combined glass-sash and screen-sash scenarios, with linked width adjustment on the opposite sash.
How to Use:
- Choose the target style under "Operable > Unequal pair".
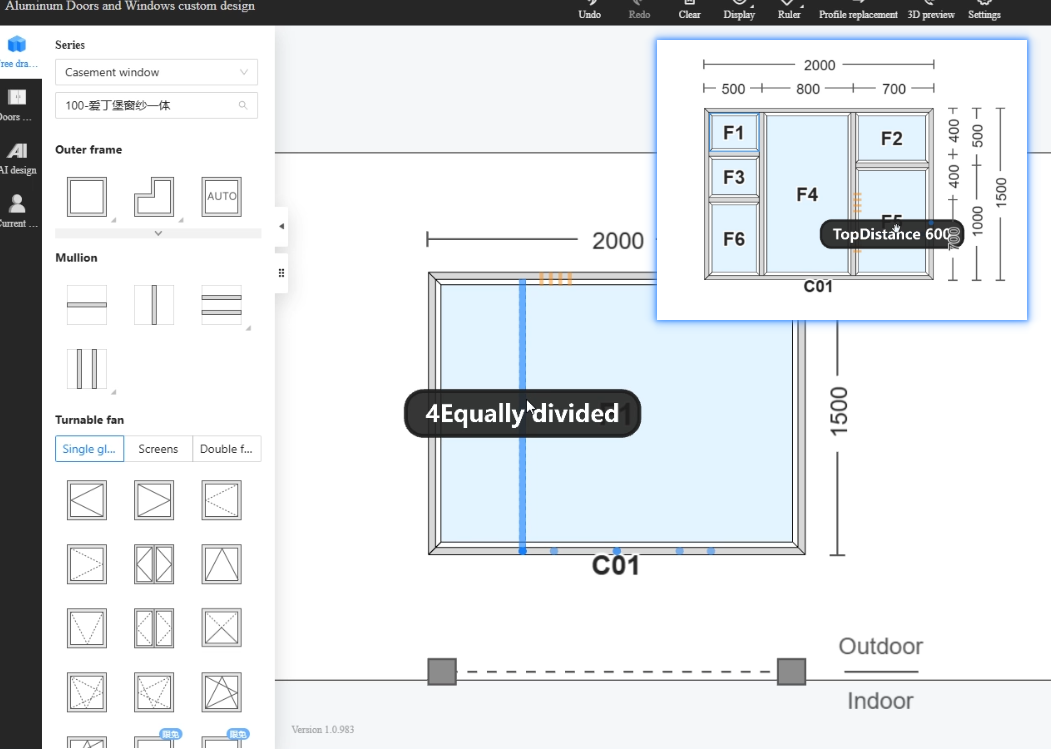
2. Placement Hints for Mullions Now Also Appear Near Standard Split Values
Highlights:
- When placing a mullion, equal-division points and standard edge-offset points are shown together, with colors and labels to distinguish them.
- Display density adapts to the size of the area, with different guidance rules for large, medium, and small regions.
- Clear feedback appears during hover, snapping, and placement, with guide lines and labels updating together.
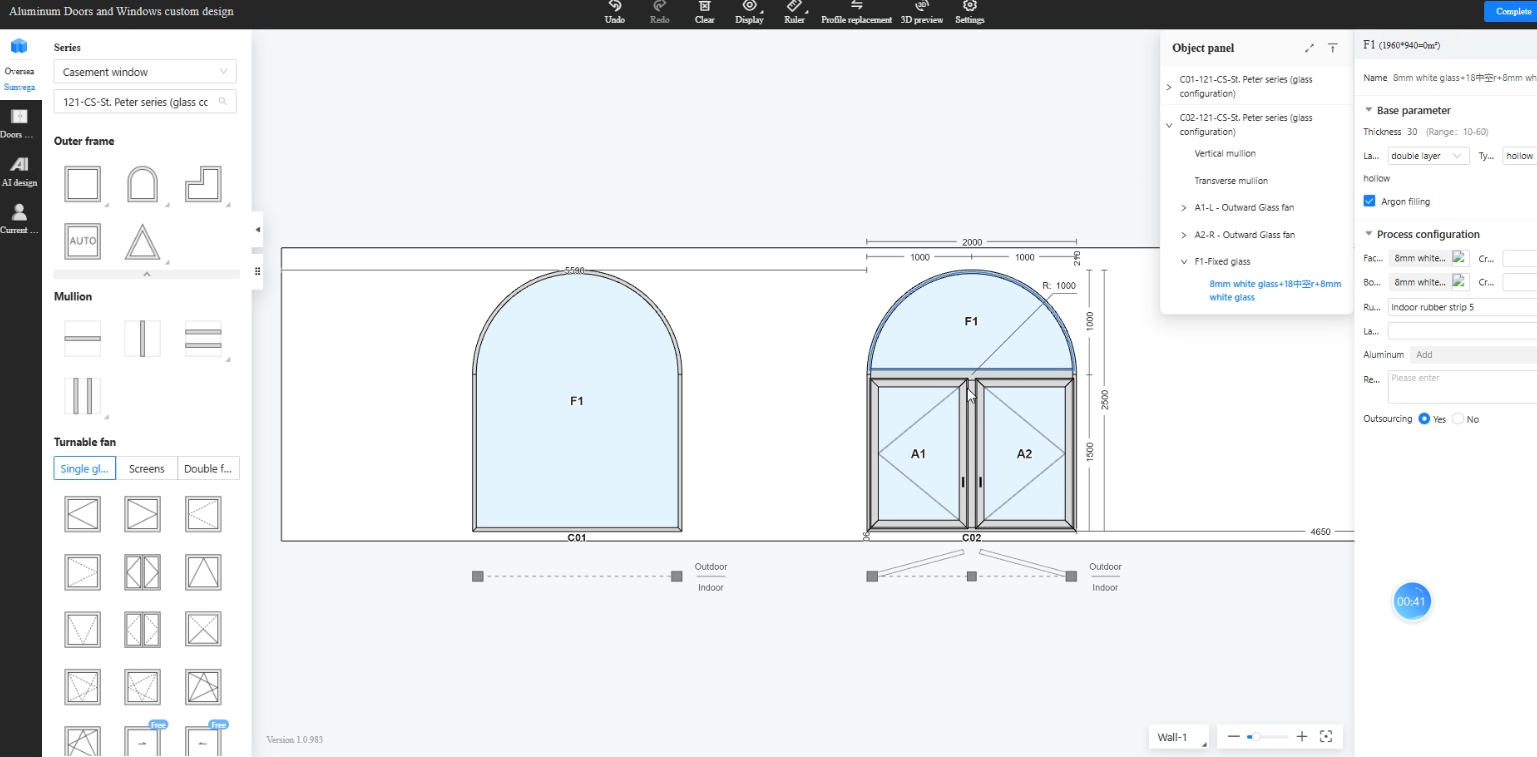
3. Arc Frame Templates Ready to Use, with New Sloped Frame Templates
Highlights:
- Arc-top, semicircular, and sloped frame templates can now be dragged directly into the design workspace.
- Supporting logic such as rulers, driver formulas, and irregular-area resizing has also been added for irregular frames.
- Irregular frames now support mullion splitting, equal division, and drag-based adjustment, expanding design flexibility.
- New sloped frame templates cover more real project scenarios.
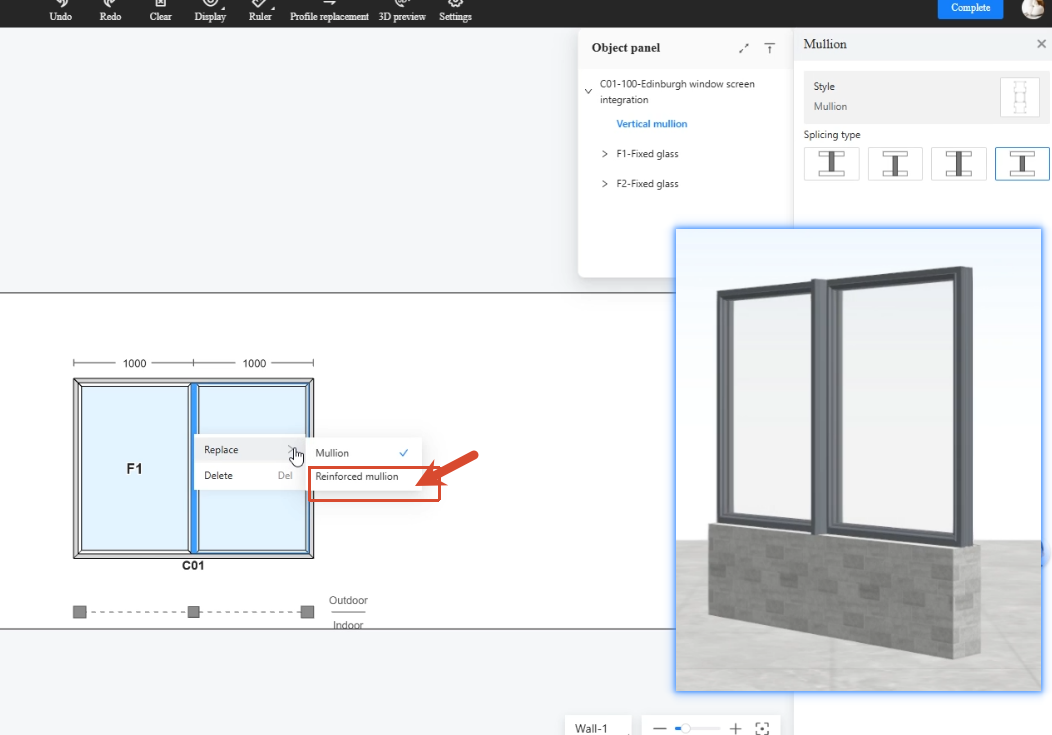
4. Universal Reinforcement Profiles (Mullions and Sliding Sash Frames)
Highlights:
- Universal reinforcement profiles now support both mullions and sliding sash frames for wider coverage.
- Installation can be turned on or off manually.
- Installation position, length rules, and 2D canvas representation are now more standardized.
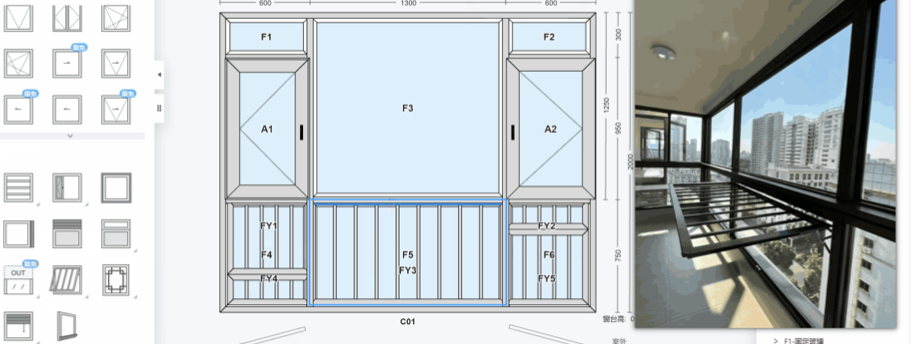
5. Drying Rack Feature
Highlights:
- Supports drying rack placement, editing, deletion, and linked control from the object panel for a complete workflow.
- Supports multiple styles such as flip-up and mixed fixed/movable versions, with configurable grille count, gap value, height, and more.
- Also supports 3D presentation and opening animations for more complete proposal demos.
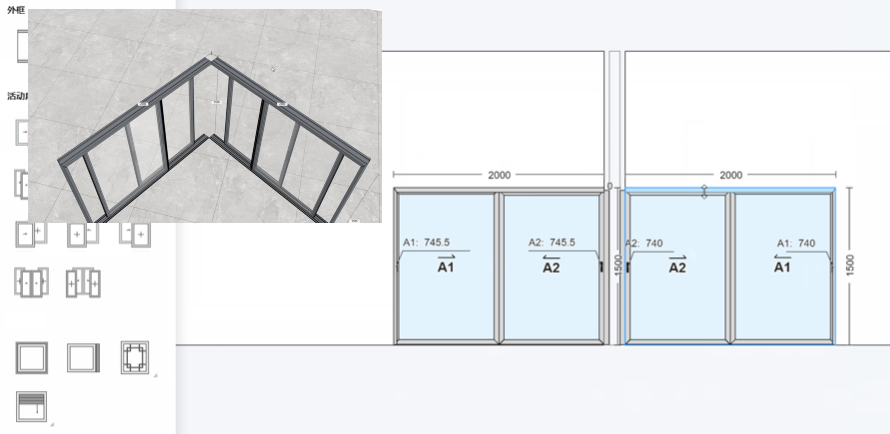
6. Post-Free Corner Drawing
Highlights:
- Supports post-free corner drawing for 90-degree sliding corner scenarios, expanding advanced corner design coverage.
- Automatically generates the correct corner and closing materials based on whether the sash is fixed or operable.
- Also adds support for outer frames without edge trim plus manual installation logic, making corner-generation rules more complete.
Millwork Customization
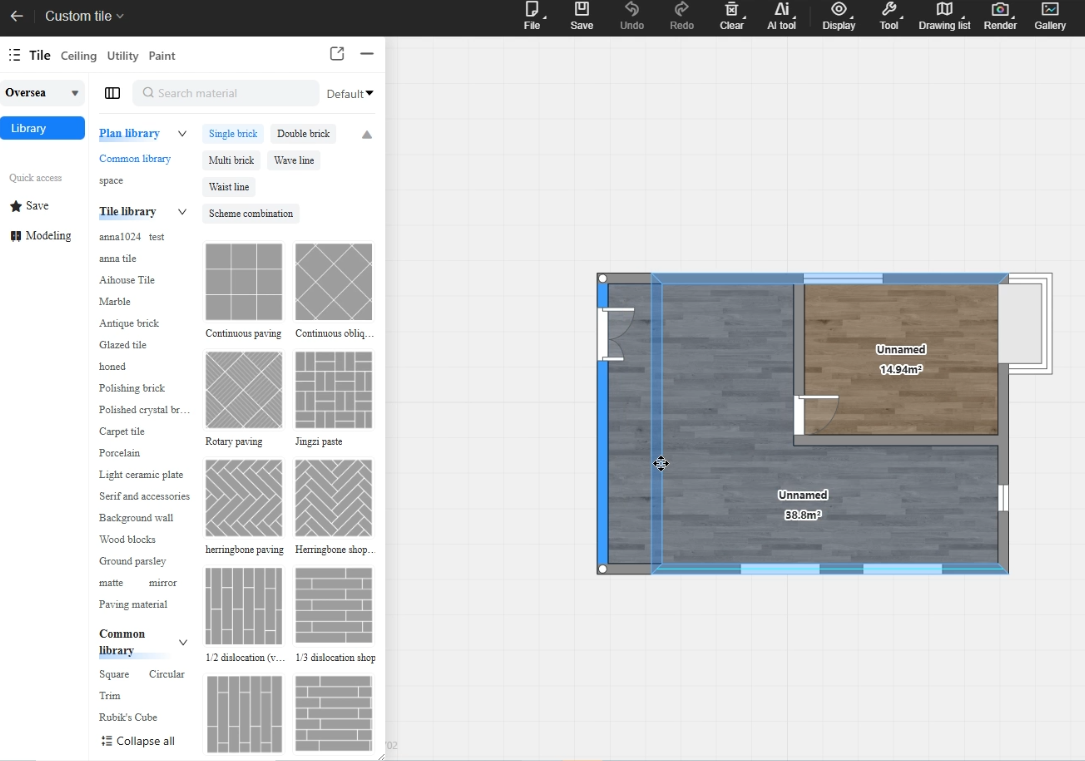
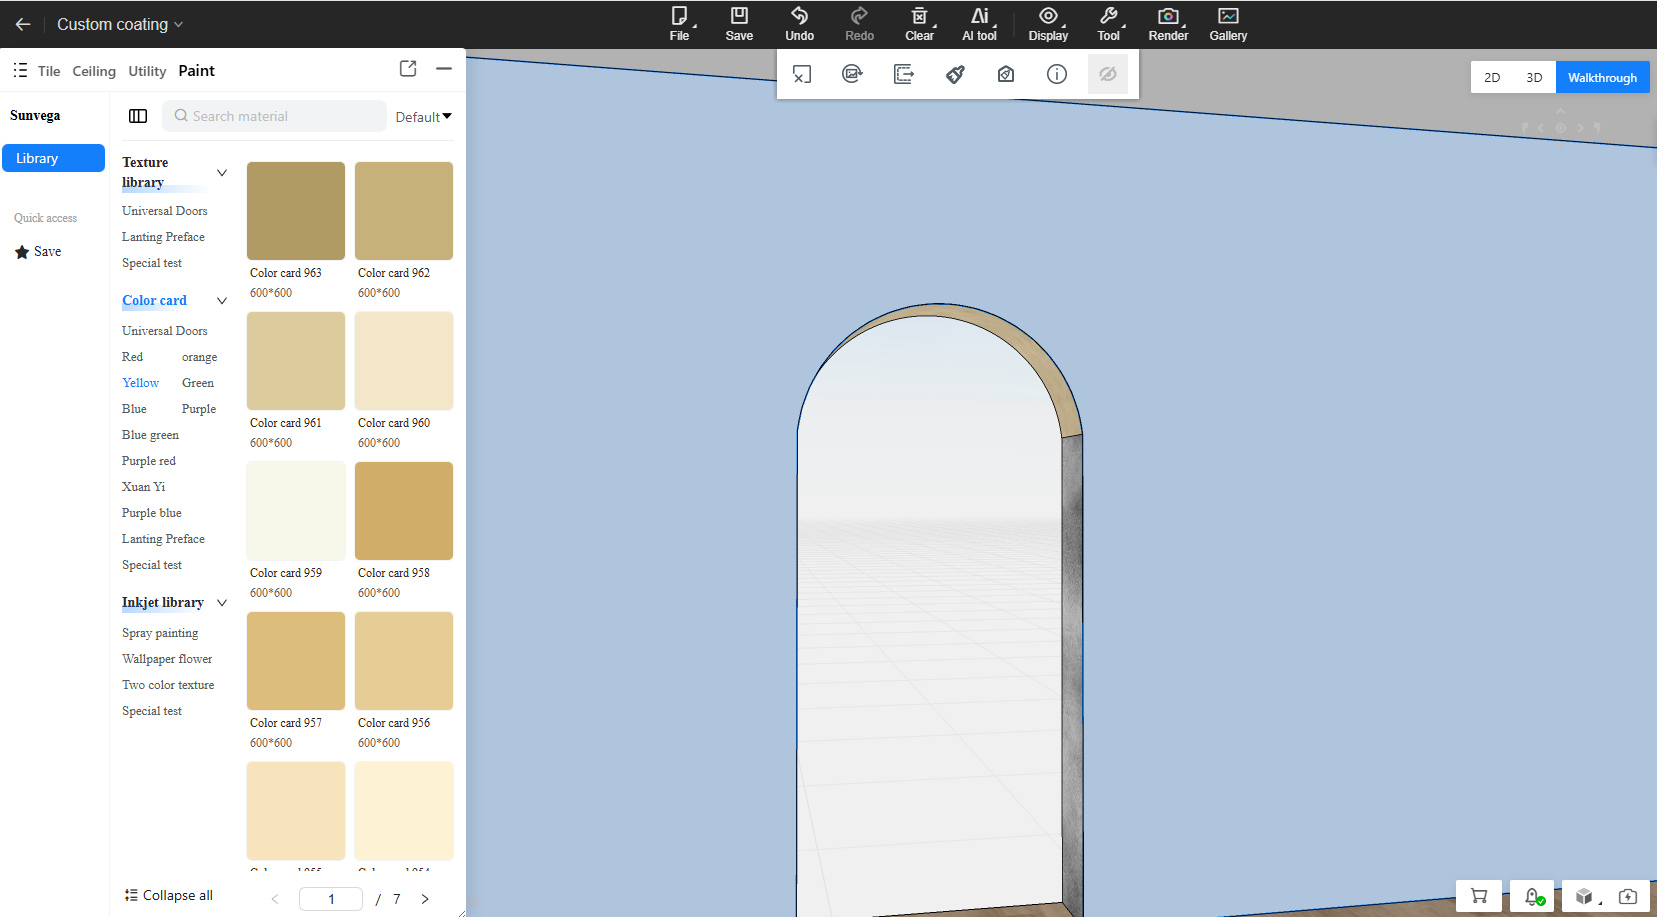
1. Custom Paint Supports Curved Wall Detection
Highlights:
- Custom paint can now detect curved wall positions correctly and apply finishes to arc-shaped wall surfaces.
- The curved-wall paint workflow has been rebuilt to improve mesh generation and UV handling on arc surfaces.
- This closes the material-replacement gap for irregular walls and improves texture fitting in curved-wall scenarios.
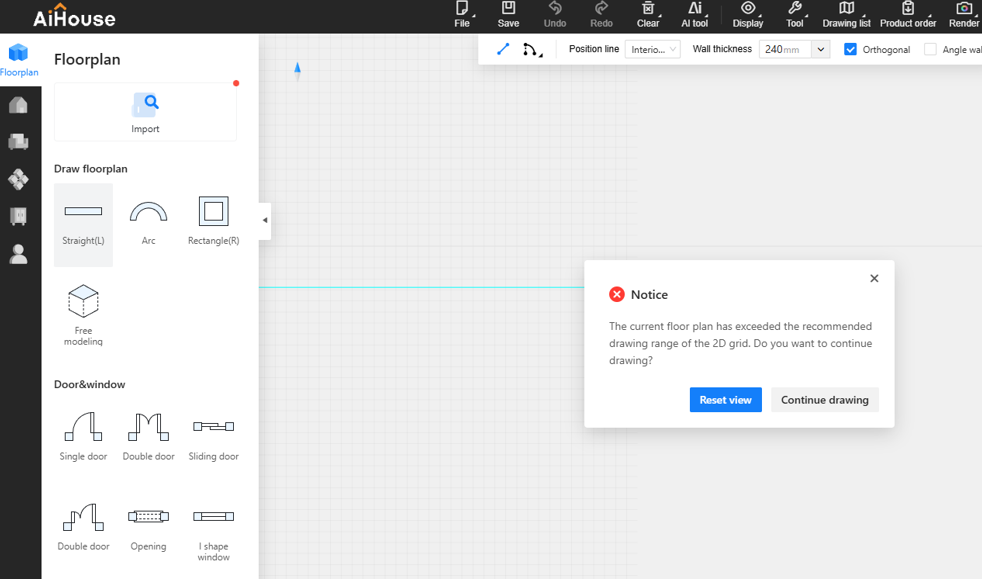
2. Prompt When Drawing Goes Beyond the Valid Area
Highlights:
- If the first wall point is placed outside the canvas range, a clear prompt now appears with options to continue drawing or reset the view.
- You can return to the canvas origin and restore the view to 100% to get back to a valid drawing area quickly.
- Out-of-range areas are visually de-emphasized, and the room list can quickly focus on the current room position.
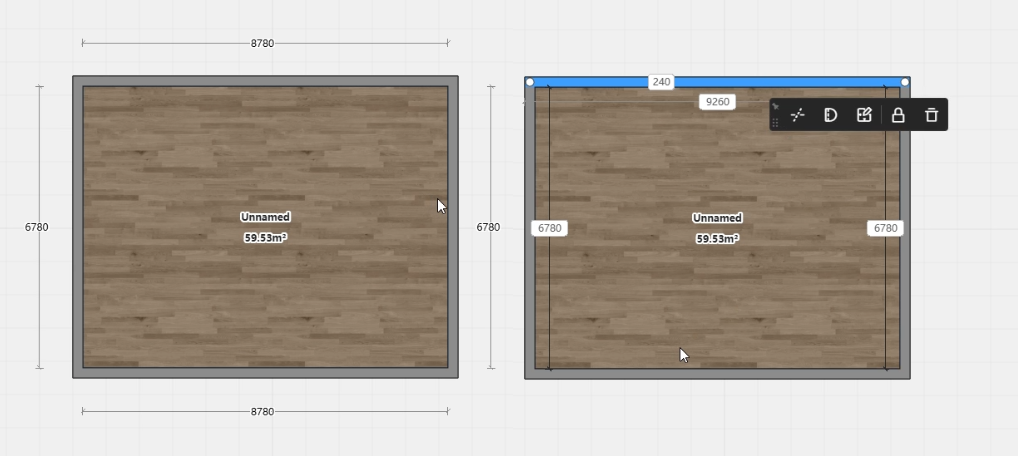
3. Wall Dimension Labels Always Drive the Inner-Wall Size
Highlights:
- Wall drawing now always shows inner-wall dimensions so the measurement standard stays consistent.
- When you type a dimension value, it always changes the inner-wall size and is no longer affected by alignment-line switching.
- Switching alignment modes with the spacebar only changes the outer-wall contour range, without changing dimension semantics or label position unexpectedly.
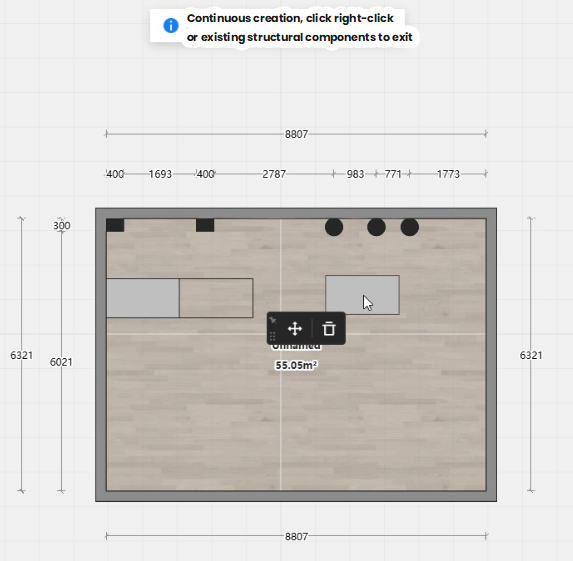
4. Exit Continuous Placement by Clicking Any Component
Highlights:
- While Continuous Placement is active, clicking any component now exits the mode automatically and selects that component.
- A clear top notification now confirms when "Continuous Placement has been exited".
- A global "Continuous Drawing" switch has also been added to Settings so users can control this behavior as needed.
5. Wall Dragging Now Supported in Aluminum Door/Window and Interior Finish Modules
Highlights:
- Wall editing is now available directly inside the Aluminum Doors & Windows and Interior Finish Customization modules.
- In 2D, wall dimensions and wall thickness can be shown and edited together with the right-side properties panel.
- The floating-toolbar interaction that hurt editing flow has been removed while keeping the essential wall-editing and floor-property loop intact.